Let’s look more detail into different types of migration techniques. A short introduction was given in my previous article. HCX can be used for agent based migration using Sentinel Agent via OS Assisted Migration ( OSA ), this article will focus only on agent-less migration methods.
Following chart will show a quick view of different agent-less migration types, its requirement in one page.
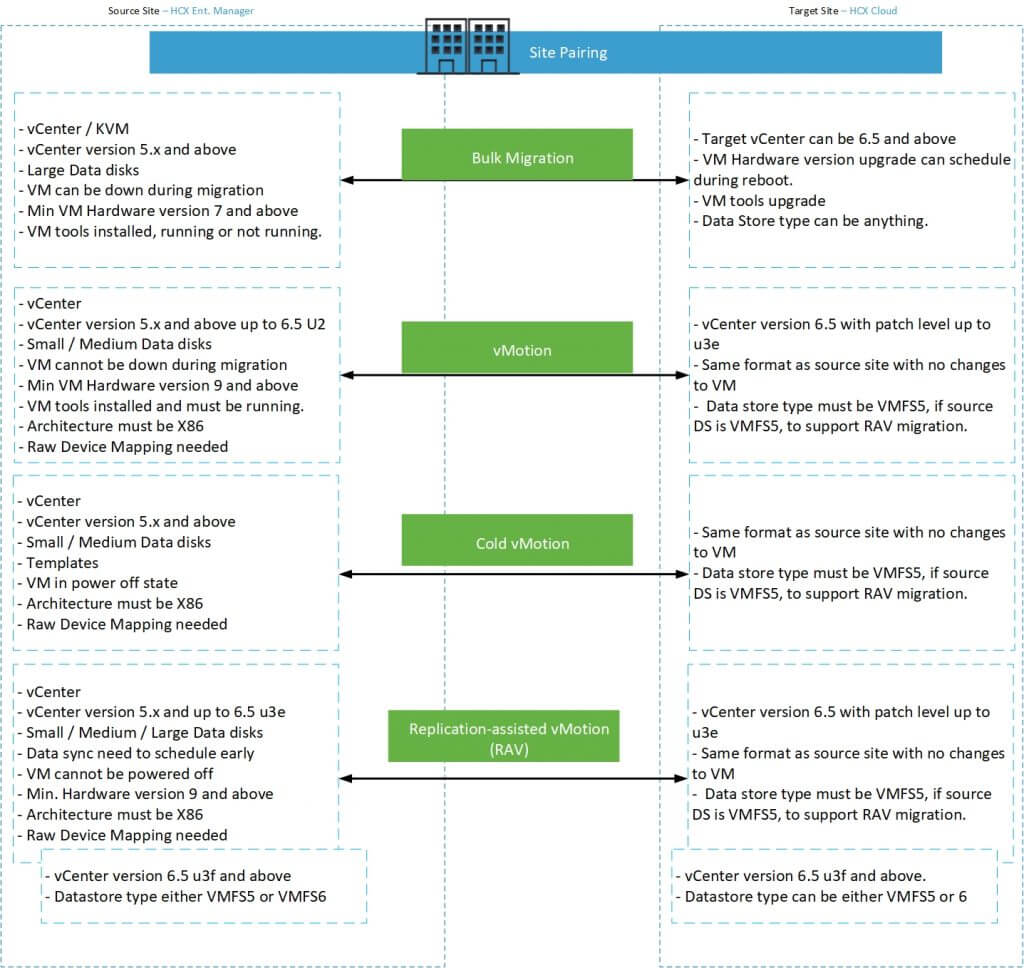
I will run through all agent-less method here and will explain in detail about the RAV.
vMotion
This is an uninterrupted migration method. System will be always on and accessible to end user during and after migration. This method is zero to low downtime technique. MAC address can be retained ( which is default option ) and CPU types won’t change even if you migrate from a source where the ESXi uses lower version of CPU type and target uses higher version of CPU type.
If you enable WAN Optimization tool and keep the bandwidth speed as 10Gbps ( or not enabling WO ), a VM with 45GB data disk with 2GB data inside will take approximate 7 min to vMotion. This is subject to your VM memory and the overall bandwidth available for your uplink connection between HCX appliances as well as other environmental configuration. In my test cases, I have stretched VLAN for all network and a dedicated uplink network with 6GBps speed.
When a vMotion triggers, HCX will first create a shadow copy of the VM to its interconnect appliance ( IX ) which also holds a temporary virtual data store. This IX appliance act as an ESXi host. VM to be moved will be transported to this IX appliance. IX appliance will then vmotion the VM from source IX to target IX using uplink and vmotion network. Once the VM moved to target IX it will then vMotion to target ESXi host or cluster and the selected data store. Once the VM moved, it will delete the shadow VM, update any tags and mark the job as completed.
It’s a good option if you have small / medium critical VM which cannot be down during the migration. vMotion job work sequentially. This means, if you trigger 10 vMotion job in a batch, even though actual data sync starts together, actual VM movement / vMotion for each VM will be done one by one only.
Cold vMotion
Like the name says, cold vMotion is another type of vMotion where any powered off systems and templates can migrate from source to target. Even if you choose other migration type, during the validation phase, if the tool finds the VM as powered off state, it will automatically change migration type to cold. Rest of the processes are same as described above.
Bulk Migration
This is a low down-time method of migration type. As the name mentions, we can trigger a maximum of 100 bulk migration job at a time and can switchover these. In bulk migration, you can trigger the data sync as early as possible and can schedule a switchover window at any time future. Your data will start to sync to the target site. Once the initial data sync ( base sync ) completed, it will continue to sync delta until the its switchover schedule window has come.
In normal scenario, at the time of switchover window it will initiate the VM power off at source, perform offline sync, create the VM at target, perform any additional task such as VM hardware version upgrade and then power on the VM. If you requested VM tool version upgrade it will update after the VM at target powered on. Once the VM at target in stable state, it will disconnect the network card for the source VM, rename the VM by appending time stamp and update it to the folder called “VM migrated to cloud”.
Advantage of bulk migration is that, it will retain a copy of VM at source, matches the VM with ESXi hosts latest capabilities, update VM tools without any additional reboot and can use latest type of data store that’s available. Overall duration for a standard size of VM takes hardly 15 min. However if a file server or larger server with 15TB – 18TB of data, the offline sync can take longer and the overall schedule can be longer. Bulk migration can trigger maximum of 100VM switchover at same time, not sequential like vMotion.
Replication-assisted vMotion (RAV)
This is another type of vMotion where we can schedule data sync in advance like Bulk Migration method. Like vMotion, RAV also do not keep any copy of the source VM and uses sequential movement of each VM. I will be explaining in detail about this migration here.
With the latest release ( at the time of writing this document, release version is R132a ), we can stack multiple jobs into one batch and can schedule the switchover of these at one shot rather than selecting each VM and doing separately.
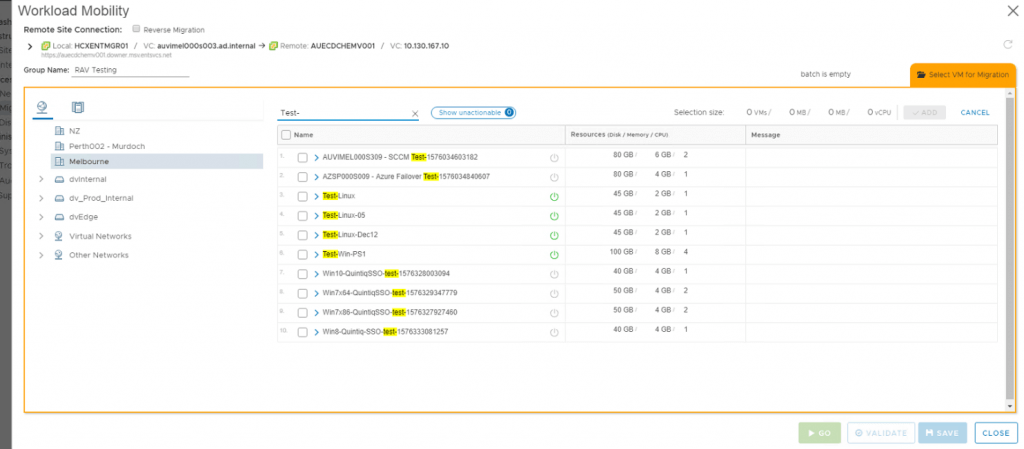
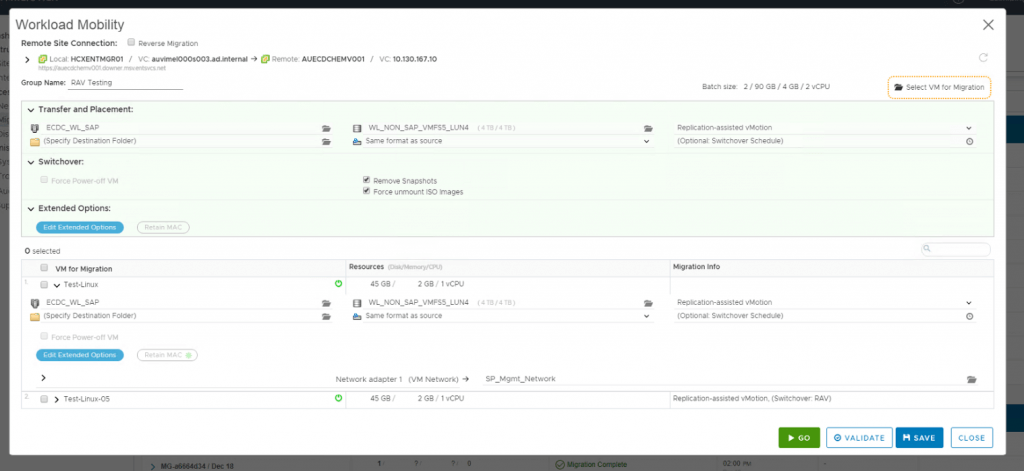
To initiate RAV job, select the target vCenter ( a.k.a remote vCenter ) from HCX Migration window first. Then search for the VM as shown in the picture below:
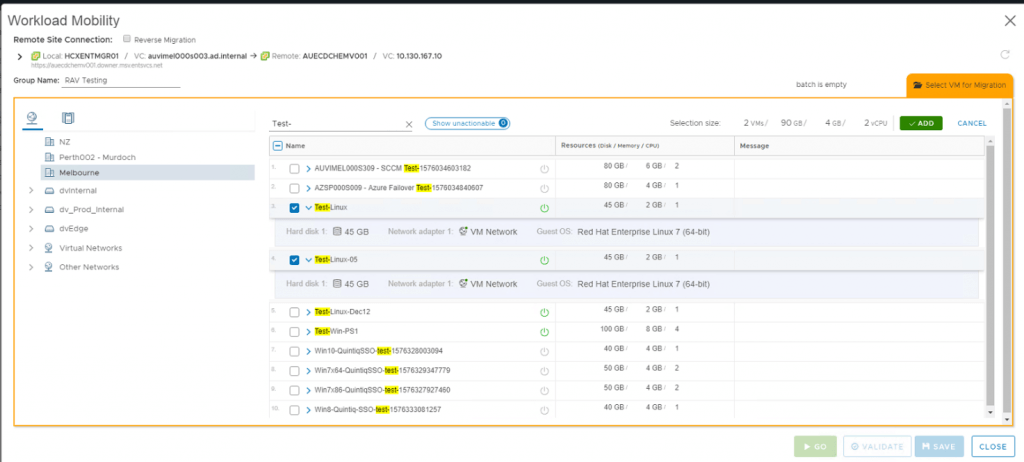
Select the VM to be migrated. You can select all at once or select one, click add and come back to the same selection window by clicking “Select VM for Migration” tab.
Name the batch job, select target cluster name, datastore and migration profile as Replication-assisted vMotion. Remember to select “Remove Snapshots” and “Force unmount ISO images”.
Once you mapped the NIC for each VM with correct NIC at target, click validate button. You can either save this job as draft, come back and do later or validate and save it or else click Go, it will validate and initiate the job.
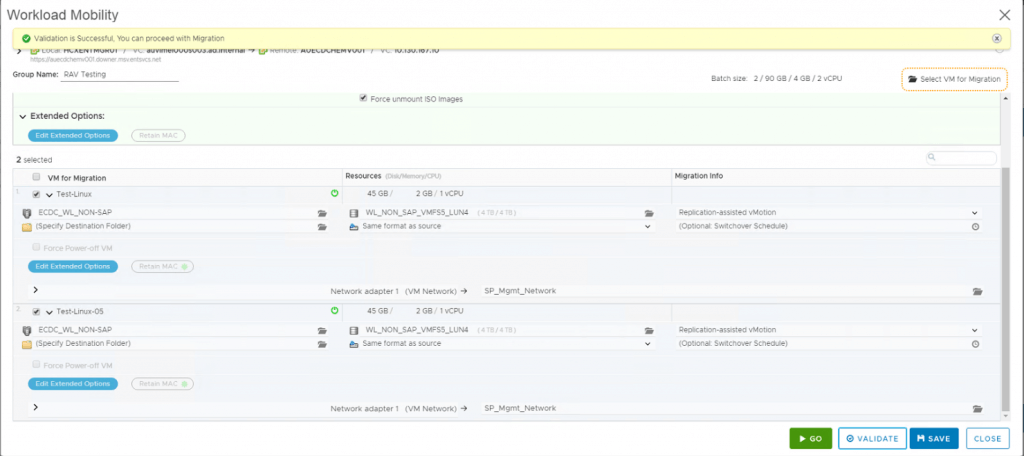
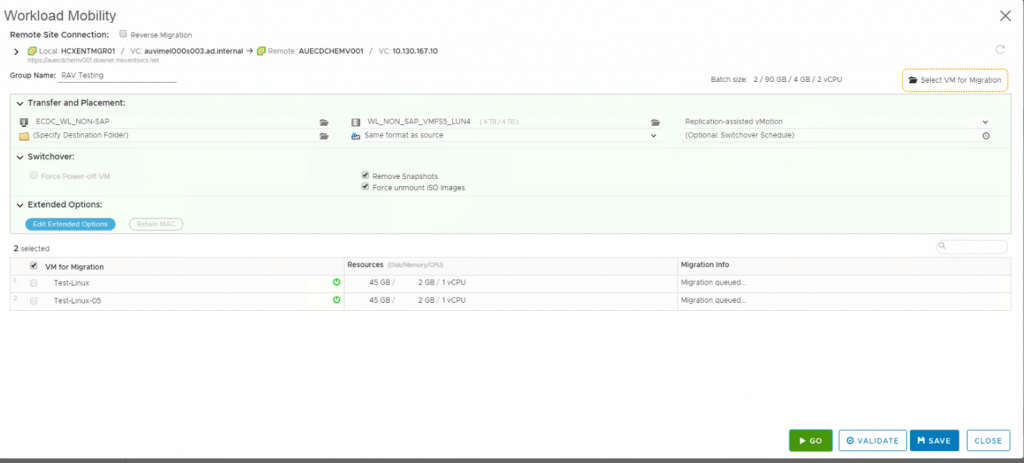
If you clicked validate, then you can see the message as shown above. If any errors or warnings, it will display on the top and detailed info will be displayed against each VM. Click Go button to trigger the job. You can see that jobs are queued and the window will remain as it is ( shown below ). Click to close it.
Detailed job information can be visible once job is started.
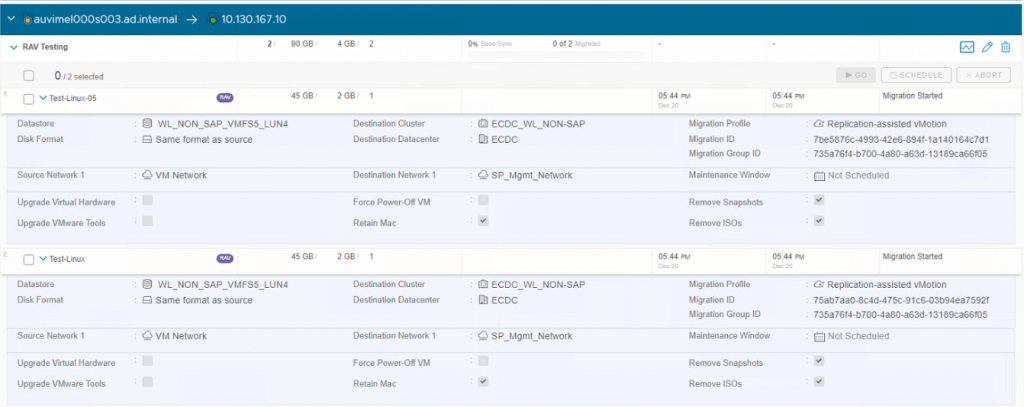
Click graph icon next to the pencil button, you can see more detailed info such as base sync, switchover, total and if any errors or paused it will also show there.
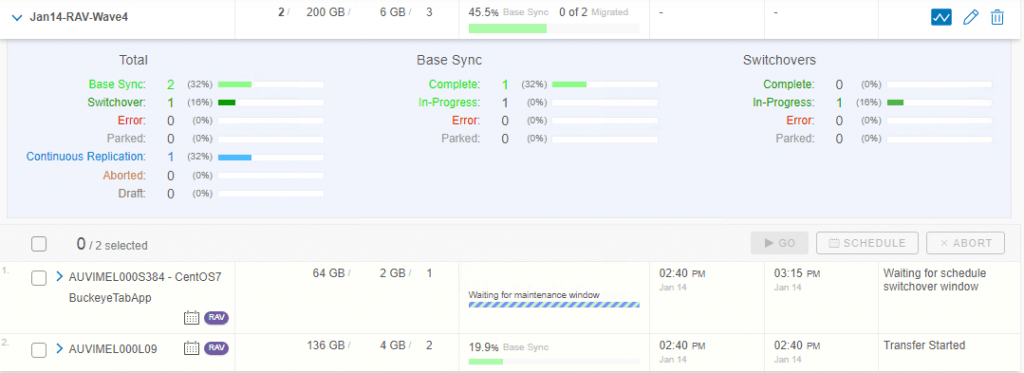
Once initial sync ( base sync ) completed, switchover will be triggered if it is not scheduled. If it is scheduled, then will wait for the switchover window ( as seen in above screen ).
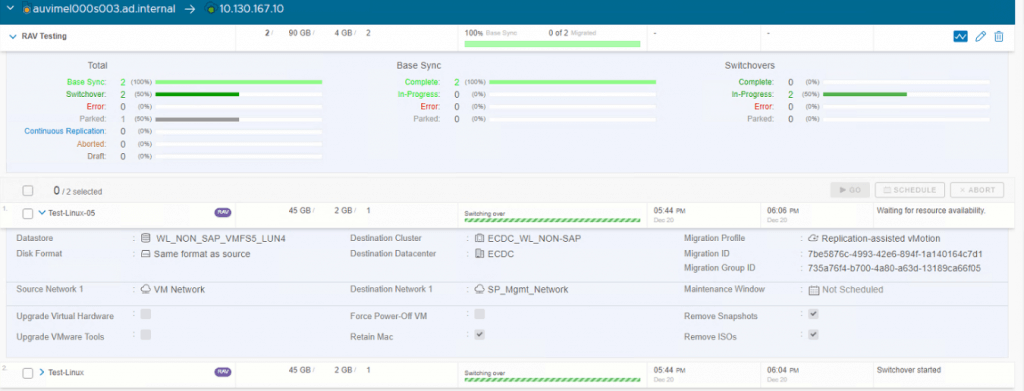
It will also show the start time of actual job, when the switchover started ( only visible during the switchover window – refer to above 2 screenshots to know the difference ) and actual end time for each VM in the batch.
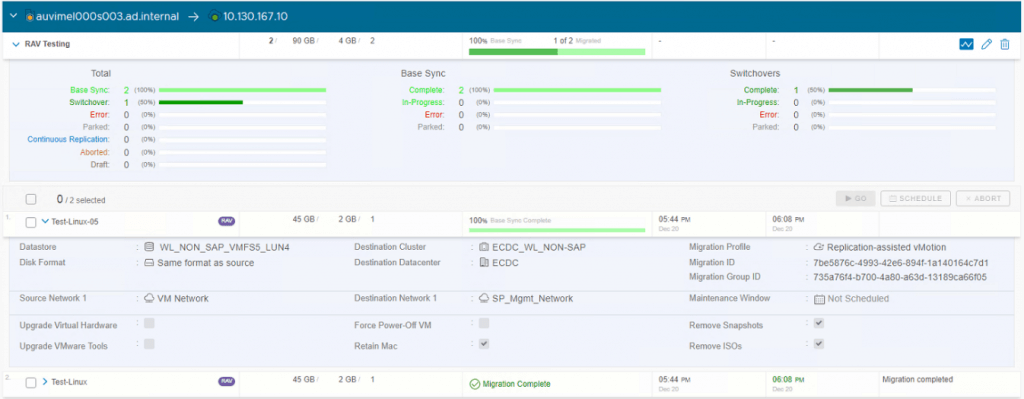
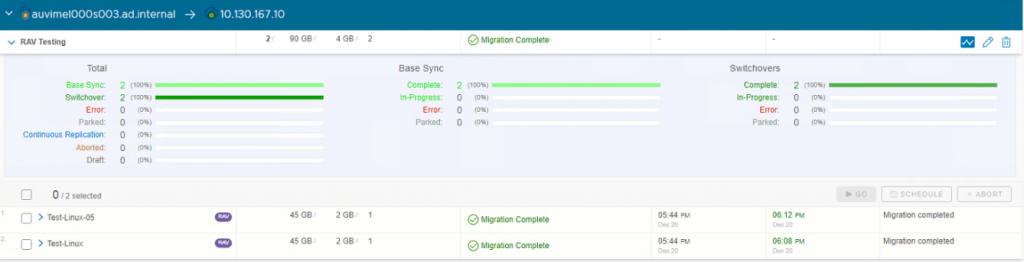
Once all VM’s in the batch successfully migrated, overall batch job will show as “Migration Complete”.
Speed of each job will be depends on size of the VM including the memory and actual data in the disk for each VM.
In case the job has any issues and need to roll back, there are no issues with running VM. As mentioned, it is vMotion job and transparent to end users and the application that runs. Hence zero to no disruption during the migration.
Summary
VMware HCX tool is maturing in its each sprint release. I have seen several improvements in the past. However there are some area it still lacks.
If you try to use PowerCLI to automate, you won’t get all these options as the PowerCLI module VMware released is not supported with latest version of HCX. Likewise, API modules are also not up to date with the release. Though documentations are available, still lacking timely update of these items.
Other undocumented issue is that, if your vCenter or ESXi uses 6.5U3e or lesser at source and target and your source has VMFS5 data store where VM currently uses, you must make sure all vMotion jobs including RAV must select target data store as VMFS5. This is because, temporary holding space (datastore use and visible by IX ) for these vMotion job can change its type to VMFS6 if you ever initiate a vMotion job to VMFS6 target data store. Once the data store type changed, it cannot be revert back unless you destroy the IX and recreate it. Once the data store type changed to VMFS6, if you initiate a RAV job from VMFS5 to VMFS5, it will fail with an error says “unable to relocate .vmdk”.
This issue has been fixed in ESXi versio 6.7 U3f and back ported to ESXi version 6.5 version u3f. You can either upgrade / update these patches to perform 2 different type of VMFS migration.
Also note that, if you did a vMotion migration and ever rebooted the VM at target, you will not be able to perform a reverse migration to source using vMotion. This is because, when you reboot the VM it re-applies the target ESXi host characteristics such as CPU type and supported info. If the source using lower version, you cannot roll back using vMotion method. Hence, if the VM rebooted which migrated using vMotion, roll back method for reverse migration is Bulk Migration.
Overall, different methods of HCX migration is faster than any other rivals. Since it is agent-less method is more perfect one for all conditions it shines as hassle free tool.
Disclaimer:
The views expressed and the content shared in all published articles on this website are solely those of the respective authors, and they do not necessarily reflect the views of the author’s employer or the techbeatly platform. We strive to ensure the accuracy and validity of the content published on our website. However, we cannot guarantee the absolute correctness or completeness of the information provided. It is the responsibility of the readers and users of this website to verify the accuracy and appropriateness of any information or opinions expressed within the articles. If you come across any content that you believe to be incorrect or invalid, please contact us immediately so that we can address the issue promptly.
Tags:
Latest posts


Comments
Leave a Reply