

Introduction
Integrating the Ansible Automation Platform with CyberArk allows you to retrieve credentials securely and automatically from CyberArk’s Password Vault Web Access (PVWA) and use them in Ansible playbooks. Here are the steps to integrate the Ansible Automation Platform with CyberArk.
Disclaimer: This article is a work in progress and may contain incomplete or inaccurate information. The code provided has been tested in a limited environment and may require additional configuration for your specific setup. Use the code at your own risk.
You can implement this integration using the CyberArk AIM Central Credential Provider Lookup or cyberark.pas the collection inside the playbook.
Also read: Ansible vs. Red Hat Ansible Automation Platform
The CyberArk terms you should know

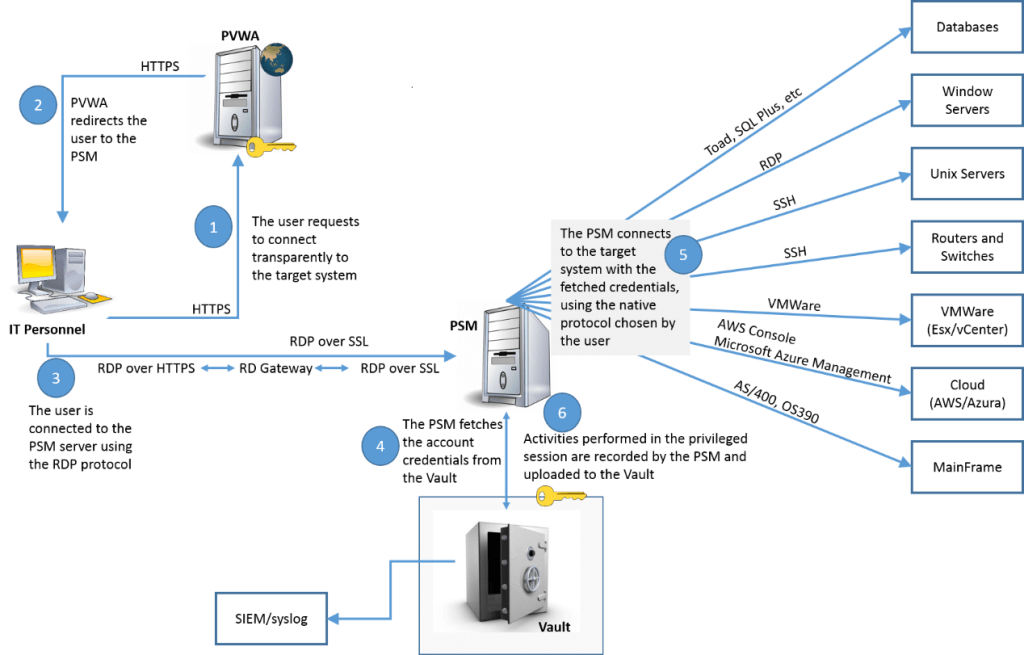
Password Vault Web Access (PVWA)
The Password Vault Web Access (PVWA) is a CyberArk component that enables you to access and configure the Privileged Access Security (PAM) solution over the Web.
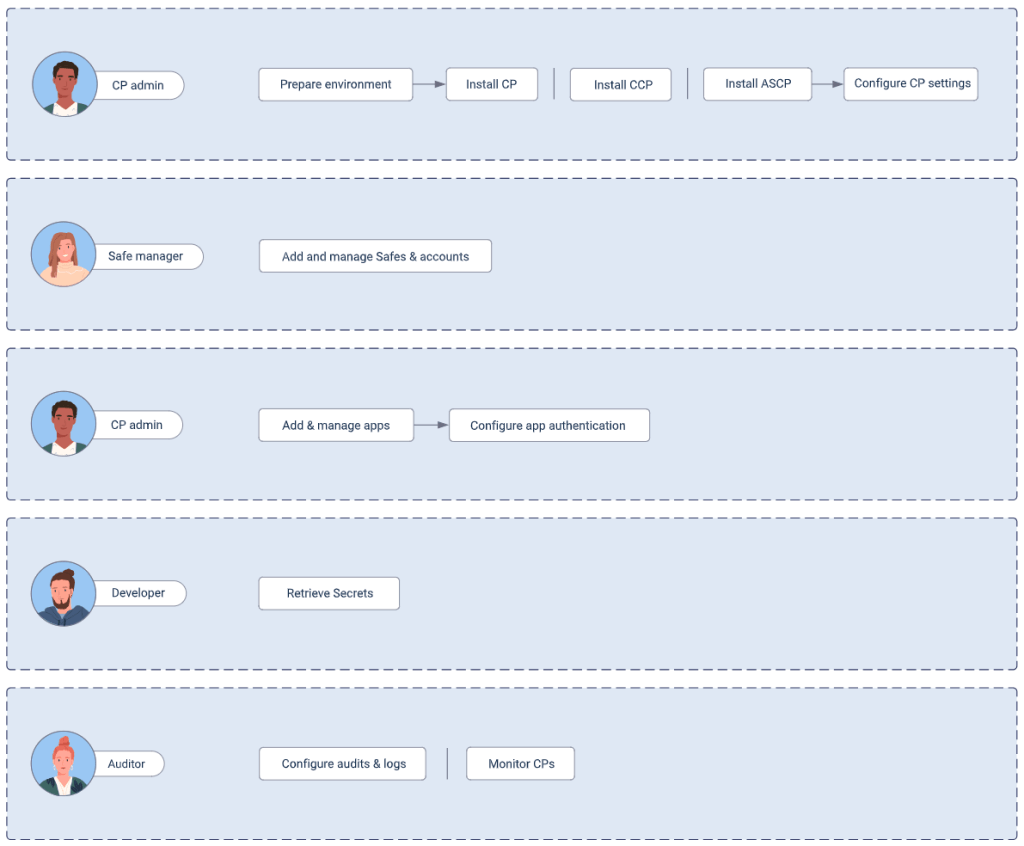
Credential Provider (CP)
CP stands for Credential Provider in CyberArk, a tool that can securely retrieve passwords and applications’ secrets from a Vault. It can be installed on servers running applications, or on the developer machine. The Credential Provider offers a variety of features, including:
Central Credential Provider (CCP)
CyberArk’s Central Credential Provider (CCP) is a credential vault that can be used by enterprises. It’s an agentless AAM method that allows applications to securely retrieve credentials from a vault during runtime without installing it on each end-user machine. CCP is installed on a separate Windows server.
Application Server Credential Provider (ASCP)
The Application Server Credential Provider (ASCP) eliminates hard-coded credentials embedded in data sources of application servers, such as IBM WebSphere, Oracle Weblogic, JBoss, and Apache Tomcat.
Privileged Session Manager
CyberArk’s Privileged Session Manager (PSM) enhances security for organizations by managing, monitoring, and safeguarding privileged access to sensitive systems without exposing actual credentials to users. Acting as a gateway, PSM secures high-risk environments by storing and rotating credentials in a secure vault, enforcing access control, and enabling detailed session monitoring. With support for RDP, SSH, and web protocols, PSM provides compatibility across different systems, centralizing privileged access and logging user actions for compliance and auditing, making it a robust solution for organizations aiming to protect against potential security breaches associated with privileged access.
Central Policy Manager
CyberArk’s Central Policy Manager (CPM) automates and enforces credential management policies for privileged accounts, ensuring consistent security and compliance across an organization. By regularly changing, verifying, and rotating passwords without disrupting workflows, CPM minimizes the risks associated with static credentials. It integrates with various target systems, supporting different platforms and protocols, and is configured to securely store and update passwords within the CyberArk Vault. CPM enables organizations to centralize and streamline credential management, reinforcing security policies across IT environments.
How Credential Providers Work
The Central Credential Provider uses advanced means to authenticate applications requesting credentials based on varying operating system and application characteristics. The Central Credential Provider runs as a web service that is used by applications residing on remote machines.

Disclaimer: CyberArk credentials can be retrieved via a REST API call using the Get Password Value method, which allows users to obtain the password or SSH key of an existing account identified by its Account ID. Users may also specify a reason and ticket ID if required. This capability is intended for human use only and is not recommended for applications or automated processes. For application-based authentication in automated processes, please refer to the Secrets Manager Credential Providers documentation.
Prerequisites
The following configurations at the CyberArk side have to be configured before proceeding with Ansible configurations.
Create a CyberArk Application Identity:
You need to create a CyberArk Application Identity to enable the Ansible Automation Platform to retrieve credentials from CyberArk PVWA. You can create an Application Identity by following these steps:
- Log in to the CyberArk PVWA web portal.
- Navigate to the Applications tab and click on the Add Application button.
- Enter the application name, description, and IP address or hostname of the Ansible Automation Platform server.
- Set the authentication method to “Password” and set the password complexity.
- Save the application.
Create a CyberArk Safe:
You need to create a CyberArk Safe to store the credentials that you want to use in your Ansible playbooks. You can create a Safe by following these steps:
- Log in to the CyberArk PVWA web portal.
- Navigate to the Safes tab and click on the Add Safe button.
- Enter the Safe name and description.
- Set the owners and the approvers for the Safe.
- Save the Safe.
Create a CyberArk Object:
You need to create a CyberArk Object to store the credentials for the target system that you want to manage using the Ansible Automation Platform. You can create a CyberArk Object by following these steps:
- Log in to the CyberArk PVWA web portal.
- Navigate to the Safe that you created in step 4.
- Click on the Add Object button.
- Enter the Object name, description, and the target system details.
- Enter the credentials for the target system and set the authentication method to “Password”.
- Save the Object.
Method 1. Using CyberArk AIM Central Credential Provider Lookup
Setting up a machine credential with CyberArk vault lookup is pretty straightforward in the Ansible Automation Platform.
Create CyberArk AIM Central Credential Provider Lookup credential
From the utomation controller WEBUI, Credential –> Create new credential as follows.


Give the exact URL without any API or Web Service ID; e.g.: https://cyberarkdemo.example.com
I will ignore the certificate portions to make this guide simple.
Create a machine credential
Create a new credential as follows: do not put any password in the Password field.
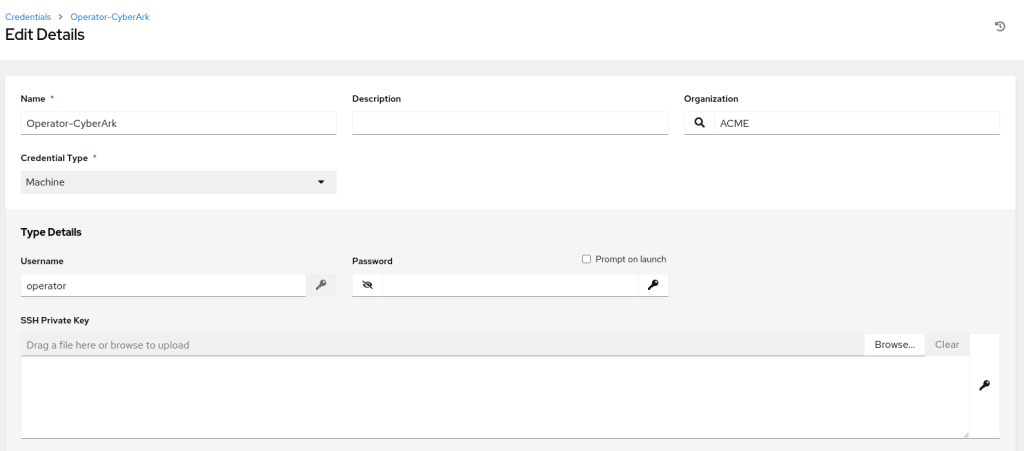
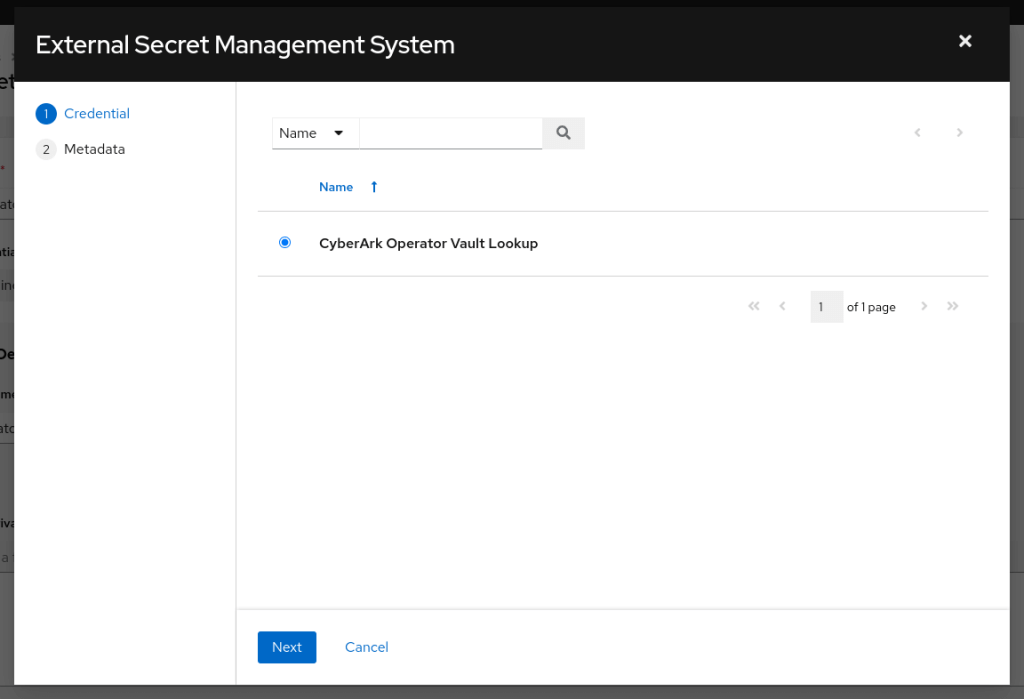
Now, click on the Key icon near the Password field and select the previously created CyberArk AIM Central Credential Provider Lookup credential as follows.

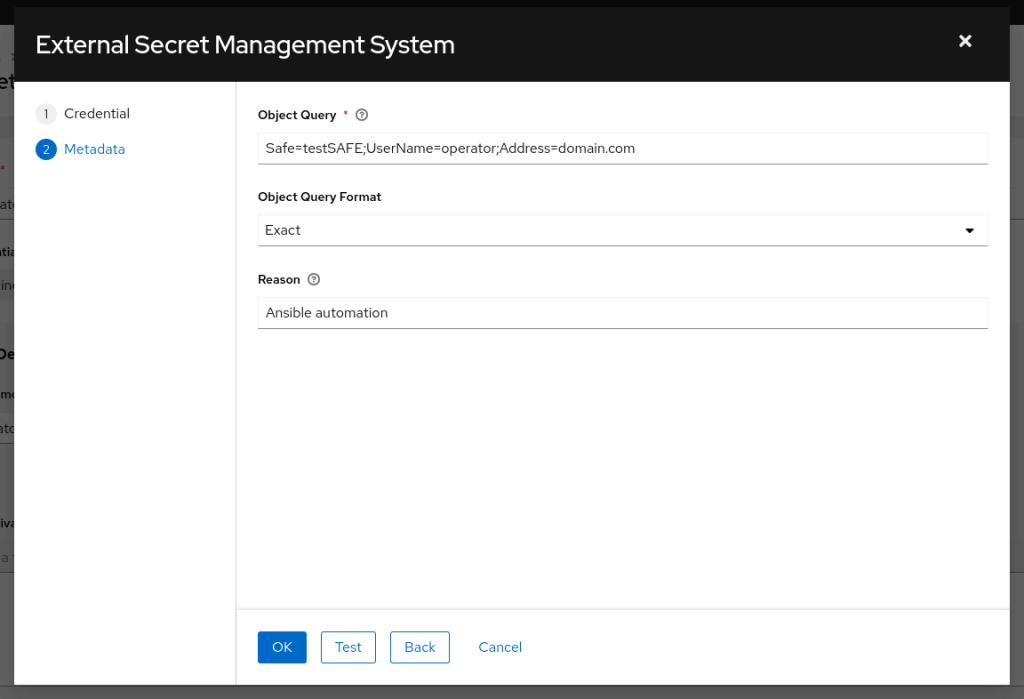
Click next and input the object query, format and reason fields as follows.
Now you can use this machine credential in job templates to retrieve and use credentials dynamically.
Method 2. Using cyberark.pas collection
If you are using the Ansible CLI (without Ansible Automation Platform or Ansible AWX, then you need to install and utilise the cyberark.pas collection as follows.
$ ansible-galaxy collection install cyberark.pasUse the CyberArk Provider in Ansible Playbooks:
You can use the credentials in your Ansible playbooks by calling the cyberark.pas.cyberark_credential module. Here’s an example playbook that uses the CyberArk Provider:
---
- name: Example playbook using CyberArk PAS
  hosts: "{{ remote_nodes }}"
  gather_facts: false

  collections:
    - cyberark.pas

  tasks:
    - name: Retrieve credentials using Central Credential Provider
      cyberark.pas.cyberark_credential:
        api_base_url: "https://cyberark.example.com"
        app_id: "ansible"
        validate_certs: false
        reason: "requesting credential for Ansible deployment"
        connection_timeout: 60
        query: "Safe=test;UserName=admin"
        query_format: "Exact"
        fail_request_on_password_change: True
      register: ca_cred
      delegate_to: localhost
      no_log: true

    - name: Set ansible_password to remote node
      ansible.builtin.set_fact:
        ansible_user: "{{ ca_cred.result.UserName }}"
        ansible_password: "{{ ca_cred.result.Content }}"
      no_log: true

    - name: Execute some command
      ansible.builtin.shell: "hostname"
      register: shell_output
In the above snippet,
api_base_url: the base URL of the server hosting the Central Credential Provider.app_id: Should be encrypted or coming from a custom credential type.query: "Safe=test;UserName=admin": The UserName can be dynamically passed to the playbook to retrieve password objects and usernames.
In this example, the cyberark_credential task retrieves the credentials for the target system from the CyberArk Object and saves them in the ca_cred variable. The Execute some command task uses the retrieved credentials to execute the specified command on the target system.
Also, notice the no_log: true lines to mask the sensitive data in the logs.
Note: Remember to use the cyberark.pas.cyberark_authentication for the appropriate authentication.
Conclusion
Integrating the Ansible Automation Platform with CyberArk provides a powerful solution to automate credential management and improve security in your organization. By using CyberArk to securely store and manage privileged credentials, and Ansible to automate the retrieval of those credentials, you can ensure that only authorized users and processes have access to sensitive information. This integration allows you to streamline your IT operations, reduce manual errors, and increase overall efficiency. With the continuous evolution of security threats, it’s crucial to implement tools that can help you stay ahead of the game. By combining CyberArk and Ansible, you can achieve a more secure and efficient IT environment, ultimately improving your organization’s overall security posture.