

What is Terraform
Terraform is an open-source software tool to manage end to end lifecycle of your IT infrastructure. Terraform provides a consistent CLI workflow to manage hundreds of cloud services.
Latest Terraform Articles
- Book Review: Terraform Cookbook, Second Edition
- The Architect’s Arsenal: Terraform vs. Pulumi in Cloud Combat!
- 10 Free Courses to Learn Terraform
- Terraform Cheat Sheet
- Creating the Elastic Stack on AWS using Terraform
- Using Ansible with Terraform – Ansible Real Life Series
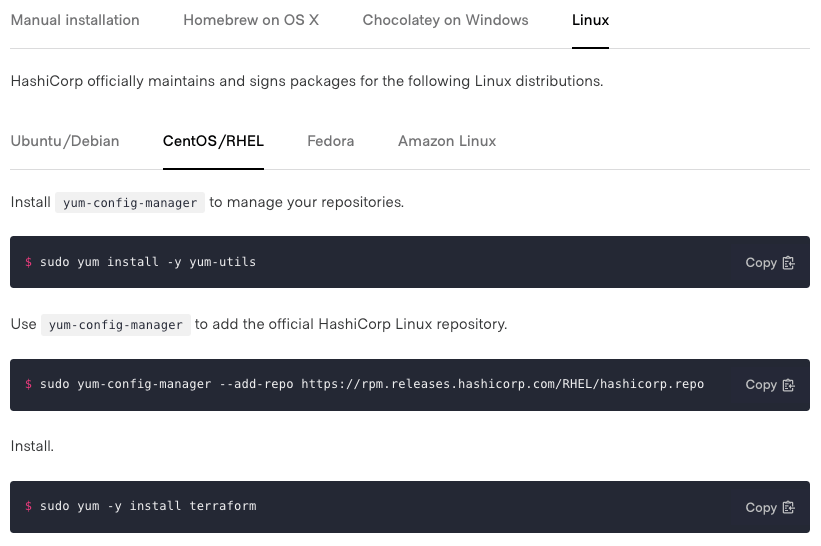
Installing Terraform
You can download the Terraform software from HashiCorp’s download page and use native installation methods for your operating system. Also you can install Terraform using the package managers like yum, apt, homebrew, Chocolatey (choco) etc. Refer install Terraform page for the appropriate method for your operating system.

Terraform CLI Cheat Sheet
Please note, this cheat sheet is a living document and I will make changes whenever there is an update or changes in the Terraform CLI options or versions. This cheat sheet does not written in an alphabetical order or based on workflow.
Planning HashiCorp Certified Terraform Associate Certification ? Watch the video for details.

terraform version
$ terraform version
Terraform v1.0.1
on darwin_amd64
terraform init
$ terraform initAsk for input if necessary. If false, will error if input was required.
$ terraform init -input=falseYou can also change the backend details using -backend-config option. -reconfigure will reconfigure the backend, ignoring any saved configuration.
$ terraform init -backend-config=PATH/TO/CONFIGURATION_FILE -reconfigureterraform plan
The plan will check the configuration files (basically all the *.tf files in the directory) and will show you the items or changes going to made on target infrastructure or resources. Please note, this command will not actually perform the planned actions.
$ terraform planYou can optionally save the plan to a file, which you can then pass to the apply command to perform exactly the actions described in the plan.
$ terraform plan -out plan.outterraform get
Downloads and installs modules needed for the configuration given by PATH. get recursively downloads all modules needed, such as modules imported by modules imported by the root and so on. Module installation also happens automatically by default as part of
the “terraform init” command, so you should rarely need to run this command separately.
$ terraform getYou can update the already downloaded modules using -update=true option.
$ terraform get -update=trueterraform apply
apply will do the actual operation on the infrastructure resources. apply will show the plan and actions in detail.
$ terraform applyapply will ask for your confirmation to proceed with changes. You can use -auto-approve for auto-confirmation.
$ terraform apply -auto-approveYou can pass different variables or variable files.
$ terraform plan -var="instancetype=t2.small"
$ terraform plan -var-file="custom.tfvars
You can use -target option to target specific resources, modules, or collections of resources.
$ terraform apply -target="aws_s3_bucket_object.objects"terraform destroy
Warning: destroy will delete all resource but with confirmation.
$ terraform destroyYou can create a deletion plan as below.
$ terraform plan –destroyUse the -target to destroy a specific resource.
$ terraform destroy -target="aws_s3_bucket_object.objects"Also note, you can comment out the resource, then terraform will detect it as not part of config and will remove when you do plan or apply.
terraform refresh
You can update the terraform state file with metadata that matches the physical resources they are tracking.
$ terraform refreshterraform show
Show the terraform state information in a human readable format. You can also use it for displaying information from plan file.
$ terraform showterraform validate
You can check the syntax and validate the configuration using validate subcommand.
$ terraform validate
Success! The configuration is valid.
terraform providers
You can see the providers in use by the modules and configurations in your Terraform files.
$ terraform providers

Providers required by configuration:
.
└── provider[registry.terraform.io/hashicorp/aws]
terraform state
terraform state has multiple subcommands to manage the terraform state. You can move, rm (delete), list or show the resource state.
Subcommands:
    list                List resources in the state
    mv                  Move an item in the state
    pull                Pull current state and output to stdout
    push                Update remote state from a local state file
    replace-provider    Replace provider in the state
    rm                  Remove instances from the state
    show                Show a resource in the state
Example usages
# List state
$ terraform state list
aws_iam_user.lb
aws_instance.myec2

# Show resource
$ terraform state show aws_instance.myec2

# Push terraform state to remote backend
$ tarraform state push

# Pull the remote terraform state to a local copy
$ terraform state pull > terraform.tfstate

# Update and tell terraform that packet_device.worker has been renamed to packet_device.helper
$ terraform state mv packet_device.worker packet_device.helper

# Move the resource block into the child module configuration
$ terraform state mv packet_device.worker module.worker.packet_device.worker

# Remove the resource from state but it will not remove the resource from cloud/provider.
$ terraform state rm aws_instance.myec2
Remove the resource from state but it will not remove the resource from cloud/provider. But next time when you run terraform plan or apply, Terraform will recreate the instance as again as the resource definition is still there.
$ terraform state rm aws_instance.myec2
Removed aws_instance.myec2
Successfully removed 1 resource instance(s).
terraform graph
graph will generate the visual graph of your infrastructure based on Terraform configuration files.
Outputs the visual execution graph of Terraform resources according to
either the current configuration or an execution plan.
$ terraform graphThe output of terraform graph will be in DOT format and you can use tools like dot to generate image files from dot files.
sudo apt-get install graphviz
# or
sudo yum install graphviz

$ terraform graph | dot –Tpng > graph.png
terraform fmt
Rewrites all Terraform configuration files to a canonical format with appropriate indentation and styling. (JSON files (.tf.json or .tfvars.json) are not modified.)
$ terraform fmtterraform taint
You can manually mark a terraform managed resource as tainted and forcing it to be destroyed and recreated on the next apply. terraform taint command will make modification in the tfstate file and recreate action will happen in next apply. Please note, terraform taint command will not modify the .tf file or the infrastructure.
$ terraform taint aws_instance.myec2terraform import
You can import your existing infrastructure into Terraform and manage using Terraform.
# Importing VMWare VM to terraform
$ terraform import vsphere_virtual_machine.vm /DC1/vm/DEV/DEV2
Read our detailed guide: How to Import Existing VMWare VM’s into Terraform
terraform workspaces
Terraform Workspaces will help to manage same terraform configurations for different environments (eg: dev, staging, production) in the same project directory.
# Check the workspace
$ terraform workspace show
default

# Create new workspace
$ terraform workspace new dev
Created and switched to workspace "dev"!

# List all workspaces
$ terraform workspace list
  default
* dev

# Switch to a specific workspace
$ terraform workspace select dev
Switched to workspace "dev".
Terraform will create separate terraform.tfstate files in terraform.tfstate.d/WORKSPACE_NAME/ directories in the project directory.
$ tree terraform.tfstate.d/
terraform.tfstate.d/
├── dev
│   └── terraform.tfstate
├── prod
└── stage
    └── terraform.tfstate

3 directories, 2 files
You can use ${terraform.workspace} interpolation to dynamically use the workspace name inside your terraform configuration (*.tf). Eg: you can use it for selecting instance type from an array based on workspace.
resource "aws_instance" "myec2" {
  ami           = "ami-0cd31be676780afa7"
  instance_type = lookup(var.instance_type,terraform.workspace)

}
variable "instance_type" {
 type = map

 default = {
   default = "t2.nano"
   stage = "t2.nano"
   dev = "t2.micro"
   prod = "t2.large"
 }
}
Or you can use this ${terraform.workspace} for tagging the instance.
resource "aws_instance" "example" {
  # ... other arguments
  tags = {
    Name = "web-${terraform.workspace}"
  }
}
Refer Terraform Workspaces documentation for more details.
Terraform Default Plugin Directories
- Windows: %APPDATA%\terraform.d\plugins
- All other systems: ~/.terraform.d/plugins
Terraform Variable Assignment
You can pass variables to Terraform in different methods.
1. Environment variables – with a prefix TF_VAR_
$ export TF_VAR_instance_type=t2.micro2. Command Line Flags
$ terraform plan -var="instancetype=t2.small"3. From a variable file – use terraform.tfvars – terraform will load all variables from this file. If different var files to be used then,
$ terraform plan -var-file="custom.tfvars4. Variable Defaults – can keep variable default in another .tf file.
$ cat variables.tf
variable "my_ip" {
default = "10.1.10.10/32"
}- if no value mentioned, then
defaultvalue will be used. - if
defaultvalue not defined, then terraform will ask for variable when you doapplyorplanoperation.