Build your own Multi-node Kubernetes Cluster with Ubuntu(20) on VirtualBox
-
 Sethumadhavan Kishore
- Cloud, Infrastructre & hardware, Kubernetes
- July 5, 2021
Typically Minikube is a utility that most developers use when they are learning Kubernetese. Though it’s a great tool, Minikube runs a single-node Kubernetes cluster inside a VM. Ideally, Minikube is not suited when you want to learn and execute multi-cluster Use Case scenarios. This motivated me to build and configure a multi-cluster Kubernetes cluster in my local VM using a Virtual box with which I have full control.
Although you can find many tools, websites, and practice LABS where you can learn about Kubernetes, having your own cluster make it so easy and convenient compared to cloud-based tools.
In this tutorial, I will help you install 2 nodes Kubernetes cluster on your own computer so you don’t have to sign-up for AWS or Azure account, spin up computer servers and make it available when you need it.
Following instructions will work out of the box on the latest Mac OS X however similar steps may work on any computer with virtualization software installed.
So let’s get started.
This Tutorial was originally published in [Medium blog](https://kishoreteach.medium.com/build-your-own-multi-node-kubernetes-cluster-with-ubuntu-20-on-virtualbox-3a93864445c2)
What you Need
- System/Computer( Windows/ Mac/Linux) with minimum 8 GB of RAM, I am using in Mac , but the step is more or less similar for Windows or Linux
- Processor with VT-x Support (Virtualization Technology)
- Internet connectivity
- VirtualBox and Ubuntu 20.04 Server Edition ISO image( Can be downloaded Free)
- SSH client
Architecture
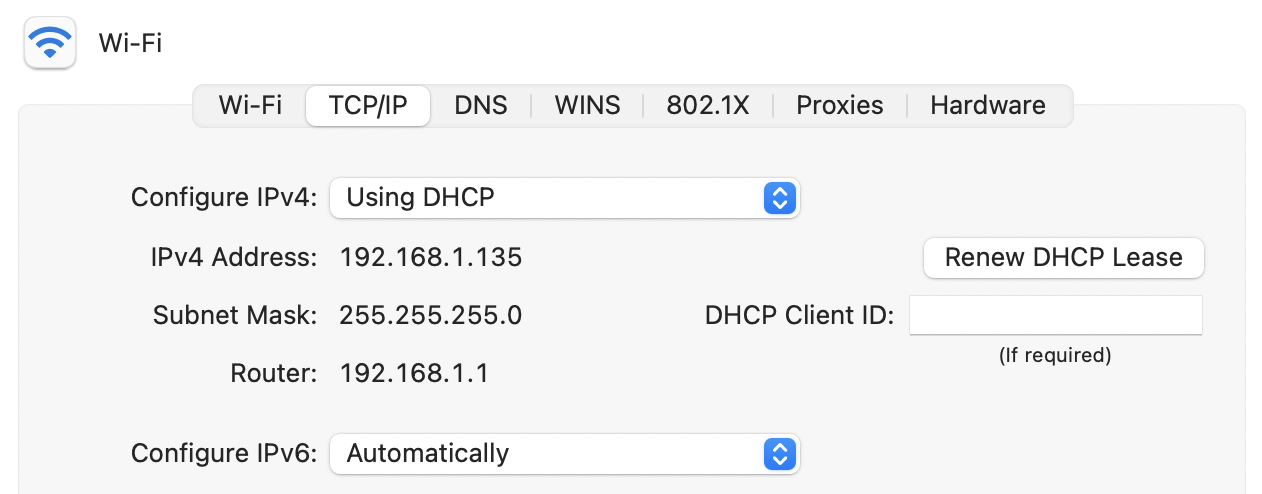
My router network is configured at 192.168.1.0/24
You can check your router detail, by checking the Network settings in your system. In Mac, its Network → Advance → TCP/IP Tab as shown below
So this is what we are going to do. We will be creating multi-cluster VM instances of one Master and worker node. These VM instances will have the OS of Ubuntu 20.4, and each of these VM instances will have two network interfaces, one Bridge adapter, and another NAT Adapter. With Bridge adapter, the VM will be in the same network as the router network, and it will enable me to ssh VM instance and no need to login to the console of these VM instances. The NAT adapter, which will be assigned in a separate subnet, is how the Master and Worker node will communicate. Also, with NAT adapter, VM instances will access the external network, but no direct access to VM is possible. The CIDR range provided to the NAT adapters ( 192.168.10.0/24) differs from the Home router Network ( 192.168.1.0/24), so there won’t be any conflict.

This architectural setup is what we are going to achieve by end of this article
Steps
- The first step is to download the latest Virtual box and Ubuntu Server ISO image ( I have downloaded ubuntu server 20.04). Note that we will be working with the server edition and not the desktop, as we will manage the server from the host machine via SSH, so we don’t need a GUI to log into the server.
- Need to set up the NAT adapter as discussed in the architecture section, navigate to Virtual box >Preferences> Network(tab)

Add on the CIDR range (192.168.10.0/24)as we discussed earlier

Let’s configure the VM, create a new Machine(VM instance). You can name the machine and mention the path for the folder on the host machine (Machine folder)

- For Master Kubernetes VM instance its recommended 2 GB instance

- Define the Hard Disk configuration, create a Virtual HDD>VDI


I have set the size as 20GB, but the default 10GB should also be fine.

Also set the CPU to 4 for master, again 2 should be fine if you are not intending for heavy workloads

Now is the time to configure Network, both Bridge and NAT adapter, so navigate to network tab set Adapter one as Bridge Network and adapter two as NAT Network( as configured earlier)


Navigate to storage and ensure that when the VM boots up, it loads the Ubuntu image which we downloaded earlier, so select the ISO image

Now you can start the virtual machine and can select the language of your choice. I am selecting English here

You will see the two network interfaces details which were specified earlier. The two IP addresses, one as part of the address pool of the Home router network(enp0s3) and another part of the NAT CIDR address pool we defined earlier (enp0s8)

Next , you can continue with default

Next section remove the option Set up this disk as LVM group

Next enter your username and password details which will be used to log into the system

Next , select install of OpenSSH server

No Need to select any feature as to keep the configuration minimal

Click on Done and the installation starts

The installation will take some time. Once the installation is done, try to SSH the system using the command (for Mac)
Note here 192.168.1.117 IP is the Ip from the pool of bridge network as configured earlier.
- This completes the Master node Basic set up, similarly create one more VM instance for Worker node, the only difference being you can set the RAM to 2 GB and CPU to 2, and follow the same steps as we configured Master Node.
- So once worker node is set up , you should have two instances up which is part of same cluster and running

Its a good practice to make the IP address of instances static so for that log into VM instance ( Via SSH) , navigate to /etc/network/interfaces, you can do sudo /etc/network/interfaces and add the following, do same for worker node, and please note the ip address, the gateway will be different in your case

Now you need to start configuring the Master and worker node. We will create a cluster with kubeadm . Some commands need to run on both Master and worker node, only Master Node and Only worker node. I will tag these commands accordingly( Master and Worker / Master Only / Worker Only)
Commands to be executed ( Master+Worker Node)
- Update the package repository
sudo apt-get update
- Install Docker
sudo apt-get install docker.io -y
- Get Curl
sudo apt-get install apt-transport-https curl -y
- Add Kubernetes repository for Ubuntu 20.04, Add K8S key and Repo
curl -s https://packages.cloud.google.com/apt-key.gpg | sudo apt-key add-cat << EOF | sudo tee /etc/apt/sources.list.d/kubernetes.list deb https://apt.kubernetes.io/ kubernetes-xenial main EOF
- Install the required packages
sudo apt-get update sudo apt-get install -y kubelet=1.20.1–00 sudo apt-get install -y kubeadm=1.20.1–00 sudo apt-get install -y kubectl=1.20.1–00 sudo apt-mark hold kubelet kubeadm kubectl
I have used Kubernetes version 1.20.1, you can use the appropriate version to update the package repository and Install K8S components
- Disable SWAP
sudo swapoff -a edit /etc/fstab to remove the swap entry
Commands to be executed ( Only Master Node)
- Intitate the cluster
sudo kubeadm init — control-plane-endpoint kube-master:6443 — pod-network-cidr 10.10.0.0/16
In this case, the POD CIDR is taken as 10.10.0.0/16, these IP address is completely internal to kubernetese so can assign any IP
- Set the kubectl context auth to connect to the cluster
mkdir -p $HOME/.kube sudo cp -i /etc/kubernetes/admin.conf $HOME/.kube/config sudo chown $(id -u):$(id -g) $HOME/.kube/config
- Install Calico networking add -on , You can read more about Calico , Download the Calico networking manifest
curl https://docs.projectcalico.org/manifests/calico.yaml -O
-
Uncomment the CALICO_IPV4POOL_CIDR variable in the manifest and set it to the same value as your chosen pod CIDR(10.10.0.0/16)
-
Apply Calico configuration
kubectl apply -f calico.yaml
- Wait for the PODS to be in running state and if you run command
kubectl get nodes
you will see only the Kube master in running state and status is ready
- Now you need to add the worker node to the cluster, so if you go back to the init set( step1), you should see kubeadm join command which can be used to join the worker node

Commands to be executed ( Only Worker Node)
- execute the kubeadm join command as shown in above screenshot
- Switch to Master node and run the following command
kubectl get nodes

run the following command
kubectl run nginx — image=nginx

Congratulations!!! you now have your own 2nodes Kubernetes cluster up and running. Let me know if what you think and if you have questions or comments.
Sethumadhavan Kishore
Technology consultant
Note
Disclaimer: The views expressed and the content shared in all published articles on this website are solely those of the respective authors, and they do not necessarily reflect the views of the author’s employer or the platform. We strive to ensure the accuracy and validity of the content published on our website. However, we cannot guarantee the absolute correctness or completeness of the information provided. It is the responsibility of the readers and users of this website to verify the accuracy and appropriateness of any information or opinions expressed within the articles. If you come across any content that you believe to be incorrect or invalid, please contact us immediately so that we can address the issue promptly.