Ceph Cluster Deployment on AWS: Mastering Distributed Storage
-
 Nikhil Kumar
- Aws, Infrastructre & hardware, Ceph
- July 20, 2023
In today’s data-driven world, scalable and reliable storage solutions have become paramount. This is where Ceph, an open-source software-defined storage system, comes into play. Ceph offers a flexible platform for efficiently managing vast amounts of data, meeting organizations’ storage demands. Combined with Amazon Web Services (AWS), Ceph on AWS provides unparalleled scalability, performance, and cost-effectiveness.
Ceph’s design incorporates scalability, enabling it to scale seamlessly from small deployments to massive petabyte-scale environments. Ceph’s distributed architecture distributes data across multiple storage nodes, allowing businesses to add more nodes as their data volume increases without experiencing disruption. Furthermore, this scalability not only ensures that organizations can effectively accommodate their growing storage needs but also enables them to maintain optimal performance at the same time.
One of the key advantages of Ceph is its high availability. By replicating data across multiple nodes, Ceph ensures that data remains accessible even during hardware failures or network outages. With built-in redundancy, Ceph eliminates single points of failure, providing continuous data availability and mitigating the risk of data loss.
Benefits of Ceph as a Distributed Storage System:
- Scalability: Ceph is designed to scale seamlessly from small deployments to massive petabyte-scale environments. Its distributed nature allows for the addition of storage nodes as the data volume increases, ensuring that businesses can accommodate their growing storage needs without disruption.
- High Availability: Ceph replicates data across multiple nodes, ensuring that data remains accessible even during hardware failures or network outages. With built-in redundancy, Ceph eliminates single points of failure and provides continuous data availability.
- Fault tolerance is another critical aspect of Ceph. It employs data redundancy and error correction mechanisms to protect against data loss. Ceph distributes data across nodes and utilizes techniques like replication or erasure coding to withstand component failures while preserving data integrity and reliability.
- Ceph’s flexibility is a significant advantage for organizations with diverse storage requirements. It supports multiple storage interfaces, including object, block, and file storage. This versatility allows businesses to choose the most suitable storage model for their specific needs. Whether it’s storing virtual machine images, hosting databases, or managing large-scale file repositories, Ceph can adapt to various use cases seamlessly.
Deploying Ceph on AWS amplifies its advantages by leveraging the capabilities of AWS infrastructure. AWS provides a highly scalable environment that seamlessly accommodates the growth of a Ceph cluster. By leveraging AWS services like Amazon EC2 and Amazon S3, businesses can easily add or remove storage nodes based on demand, allowing them to scale their Ceph cluster dynamically.
The geographic flexibility offered by AWS is another advantage. With a global network of data centres, organizations can deploy Ceph clusters in multiple regions, improving data locality and reducing latency. This enables businesses to meet their data storage and compliance requirements effectively, catering to users in different geographical locations. AWS offers managed services like Amazon EBS (Elastic Block Store) and Amazon S3, which integrate seamlessly with Ceph to enhance its capabilities. These managed services simplify the management and operation of the storage infrastructure, freeing up valuable resources and allowing businesses to focus on their core activities.
Cost optimization is an essential consideration for any storage solution. AWS offers various pricing models and tools to help businesses optimize their storage costs. Features like AWS Cost Explorer and different storage classes (e.g., Amazon S3 Standard, Glacier) enable organizations to align their storage expenses with their specific needs and usage patterns, ensuring cost-effectiveness.
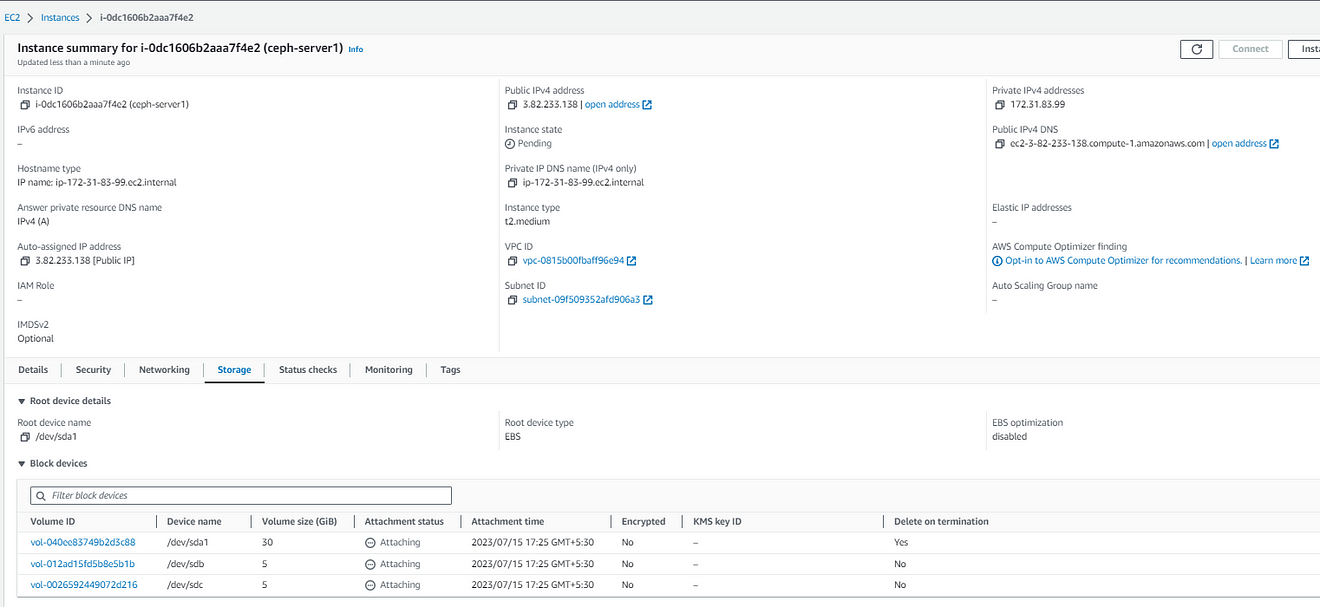
For deploying Ceph on AWS, you will need a minimum of two EC2 instances and two EBS volumes. To meet your performance requirements, we recommend using instances of suitable sizes, such as T2.medium, with Ceph. Ensure you select an RHEL-based AMI for compatibility with Ceph, and configure at least two EBS volumes with a minimum size of 5GB for data storage.
Firstly, we need to set up the environment to deploy Ceph on that. Here I have created two EC2 instances along with two EBS volumes & Here am going to deploy open source version of Ceph so we don’t require a Redhat subscription to install Ceph packages.
Once you create both instances, you need to perform the initial setup to prepare the instances for running the Ansible playbook and executing Ceph commands.
Login to server1 using ssh and run the below commands to set up the hostname, some configuration changes.
[[email protected] ~]$ sudo -i
[[email protected] ~]# hostnamectl set-hostname server1.example.com
[[email protected] ~]# hostname
server1.example.com
[[email protected] ~]# passwd root
Changing password for user root.
New password:
BAD PASSWORD: The password is shorter than 8 characters
Retype new password:
passwd: all authentication tokens updated successfully.
[[email protected] ~]# vi /etc/ssh/sshd_config
#uncomment below line
PasswordAuthentication yes
# then restart the sshd service so user can use password for login
[[email protected] ~]# systemctl restart sshd
[[email protected] ~]# vi /etc/hosts
[[email protected] ~]# cat /etc/hosts
127.0.0.1   localhost localhost.localdomain localhost4 localhost4.localdomain4
::1         localhost localhost.localdomain localhost6 localhost6.localdomain6
172.31.83.99 server1 server1.example.com
172.31.92.21 server2 server2.example.com
[[email protected] ~]#

#follows the same set of command on server2 as well but changes hostname to server2
Now, generate ssh keys so that both instances should have connectivity with each other.
[[email protected] ~]# ssh-copy-id server1
/bin/ssh-copy-id: INFO: Source of key(s) to be installed: "/root/.ssh/id_rsa.pub"
The authenticity of host 'server1 (172.31.83.99)' can't be established.
ECDSA key fingerprint is SHA256:qnJ3JRMwb/aUabmuBEvHtl9bdqaJPLT6yRLjb8IqOfM.
Are you sure you want to continue connecting (yes/no/[fingerprint])? yes
/bin/ssh-copy-id: INFO: attempting to log in with the new key(s), to filter out any that are already installed
/bin/ssh-copy-id: INFO: 1 key(s) remain to be installed -- if you are prompted now it is to install the new keys
root@server1's password:
Number of key(s) added: 1
Now try logging into the machine, with:   "ssh 'server1'"
and check to make sure that only the key(s) you wanted were added.
[[email protected] ~]# ssh-copy-id server2
/bin/ssh-copy-id: INFO: Source of key(s) to be installed: "/root/.ssh/id_rsa.pub"
/bin/ssh-copy-id: INFO: attempting to log in with the new key(s), to filter out any that are already installed
/bin/ssh-copy-id: INFO: 1 key(s) remain to be installed -- if you are prompted now it is to install the new keys
root@server2's password:
Number of key(s) added: 1
Now try logging into the machine, with:   "ssh 'server2'"
and check to make sure that only the key(s) you wanted were added.
[[email protected] ~]#
# to test the connection try to do ssh to server2
[[email protected] ~]# ssh server2
[root@server2 ~]# hostname
server2.example.com
[root@server2 ~]#
To deploy the open-source version of Ceph we need to configure the yum repository with Epel release packages. Use the below configuration to set up the yum repo in both nodes & Install Ansible if not already installed.
[[email protected] ~]# cat /etc/yum.repos.d/epel.repo
[epel]
name=Extra Packages for Enterprise Linux 8
baseurl=https://dl.fedoraproject.org/pub/epel/8/Everything/x86_64/
enabled=1
gpgcheck=1
gpgkey=https://dl.fedoraproject.org/pub/epel/RPM-GPG-KEY-EPEL-8
[[email protected] ~]# scp /etc/yum.repos.d/epel.repo server2:/etc/yum.repos.d/epel.repo
epel.repo                                                                                   100%  202   102.6KB/s   00:00
[[email protected] ~]#
Now we are ready to start with Ceph cluster deployment. Clone the git repository of cephadm-ansible using the below link.
[[email protected] ~]# git clone https://github.com/ceph/cephadm-ansible
Cloning into 'cephadm-ansible'...
remote: Enumerating objects: 1756, done.
remote: Counting objects: 100% (509/509), done.
remote: Compressing objects: 100% (164/164), done.
remote: Total 1756 (delta 387), reused 378 (delta 336), pack-reused 1247
Receiving objects: 100% (1756/1756), 360.85 KiB | 16.40 MiB/s, done.
Resolving deltas: 100% (1064/1064), done.
[[email protected] ~]# ls
cephadm-ansible
[[email protected] ~]#
Once the repo got cloned go inside the cephadm-ansible directory and create a hosts file with the below content
[[email protected] cephadm-ansible]# cat hosts
server1
server2
[[email protected] cephadm-ansible]#
Now, run the ansible playbook “cephadm-preflight.yml” to do the preflight check and installation of packages which is need to for the bootstrap of the Ceph cluster.
[[email protected] cephadm-ansible]# ansible-playbook -i hosts cephadm-preflight.yml
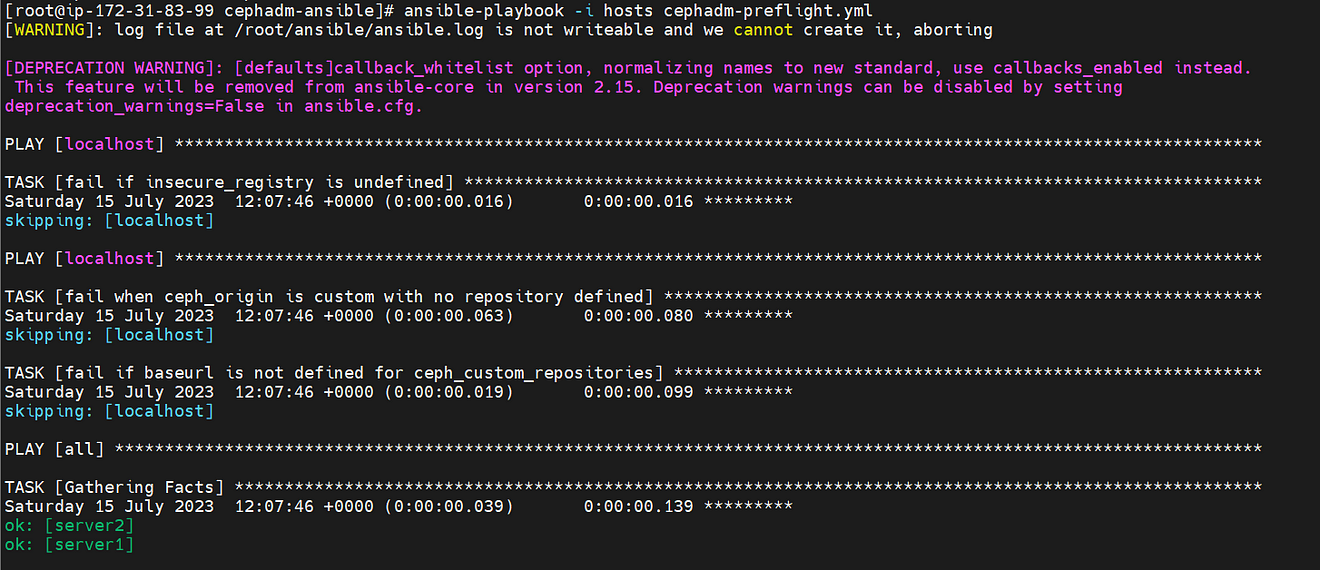
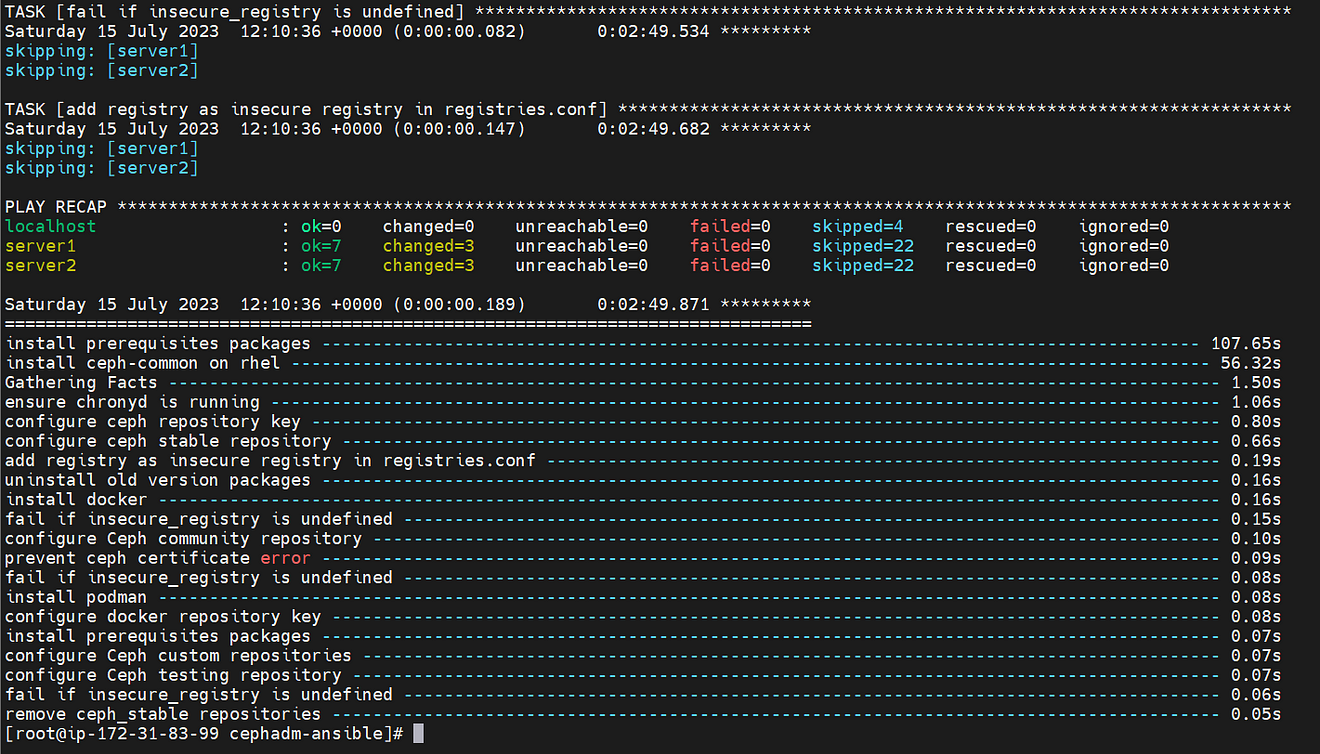
The preflight check playbook worked fine and completed the initial configuration on both instances.
Now, it’s time to initialise the bootstrap process of the ceph cluster by creating a configuration file for the cluster followed by the cephadm bootstrap command.
Create an initial Configuration file using the below content
[[email protected] ~]# cat initial_config.yaml
---
service_type: host
addr: 172.31.83.99 # update private ip of server1
hostname: server1.example.com
---
service_type: host
addr: 172.31.92.21 # update private ip of server2
hostname: server2.example.com
---
service_type: mon
placement:
  hosts:
    - server1.example.com
    - server2.example.com
---
service_type: mgr
placement:
  hosts:
    - server1.example.com
    - server2.example.com
---
service_type: osd
service_id: default_drive_group
placement:
  hosts:
    - server1.example.com
    - server2.example.com
data_devices:
  paths:
    - /dev/xvdb  #use lsblk -fp command to get the storage devices path
    - /dev/xvdc
[[email protected] ~]#
Now, run the cephadm utility to initialize the bootstrap process.
[[email protected] ~]# cephadm bootstrap --mon-ip=172.31.83.99 --apply-spec=initial_config.yaml --initial-dashboard-password=redhat --dashboard-password-noupdate --allow-fqdn-hostname

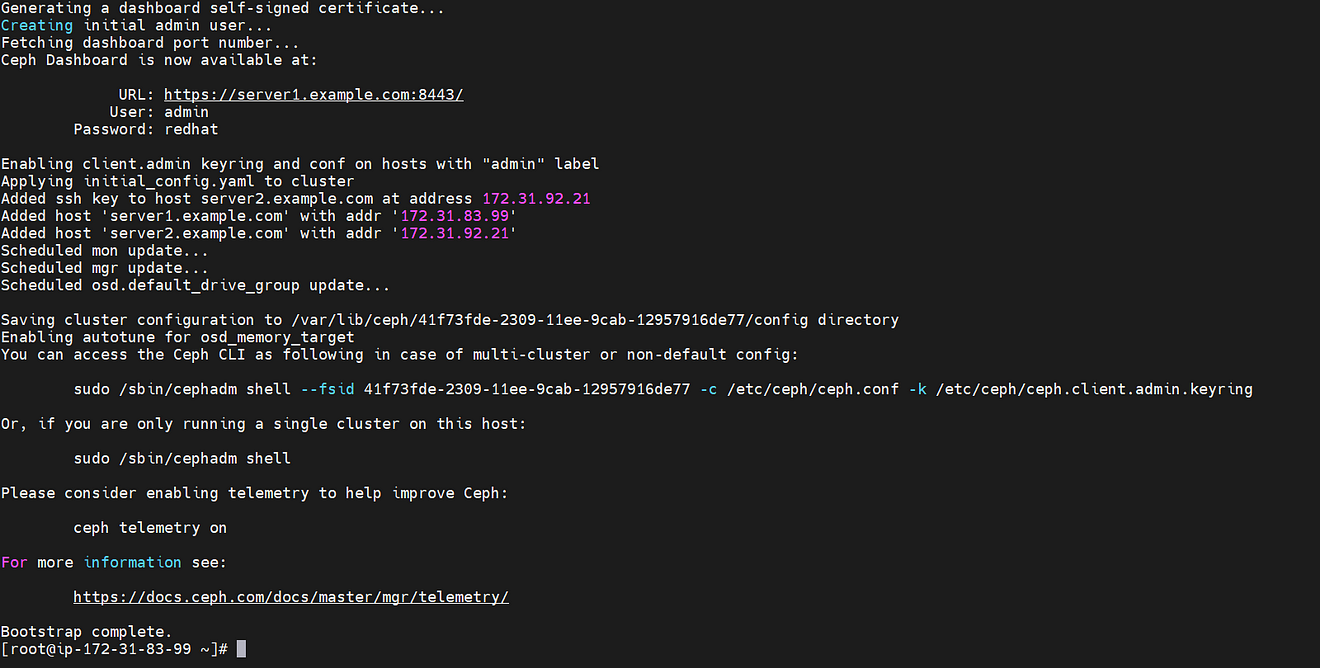
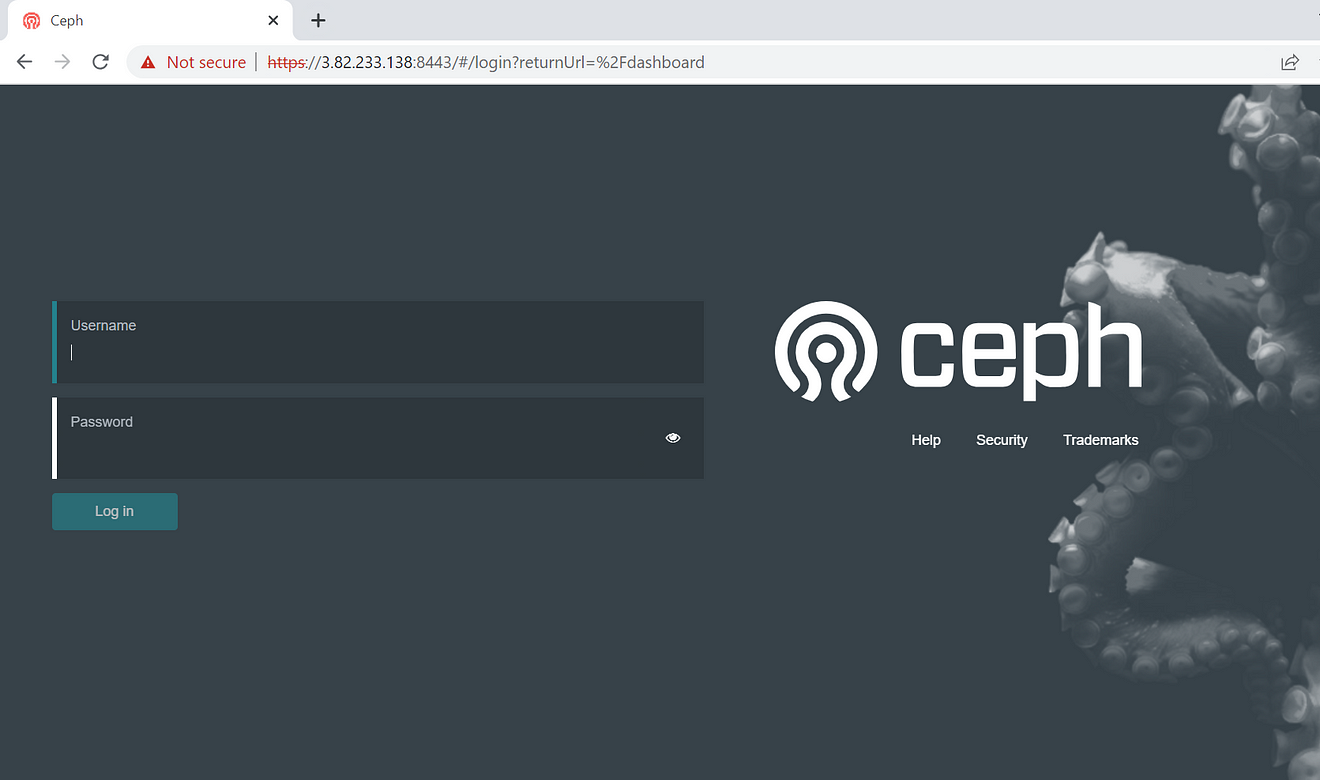
Now Cluster got deployed and we can access it using a web browser as well with the public IP of server1 instance with port 8443.
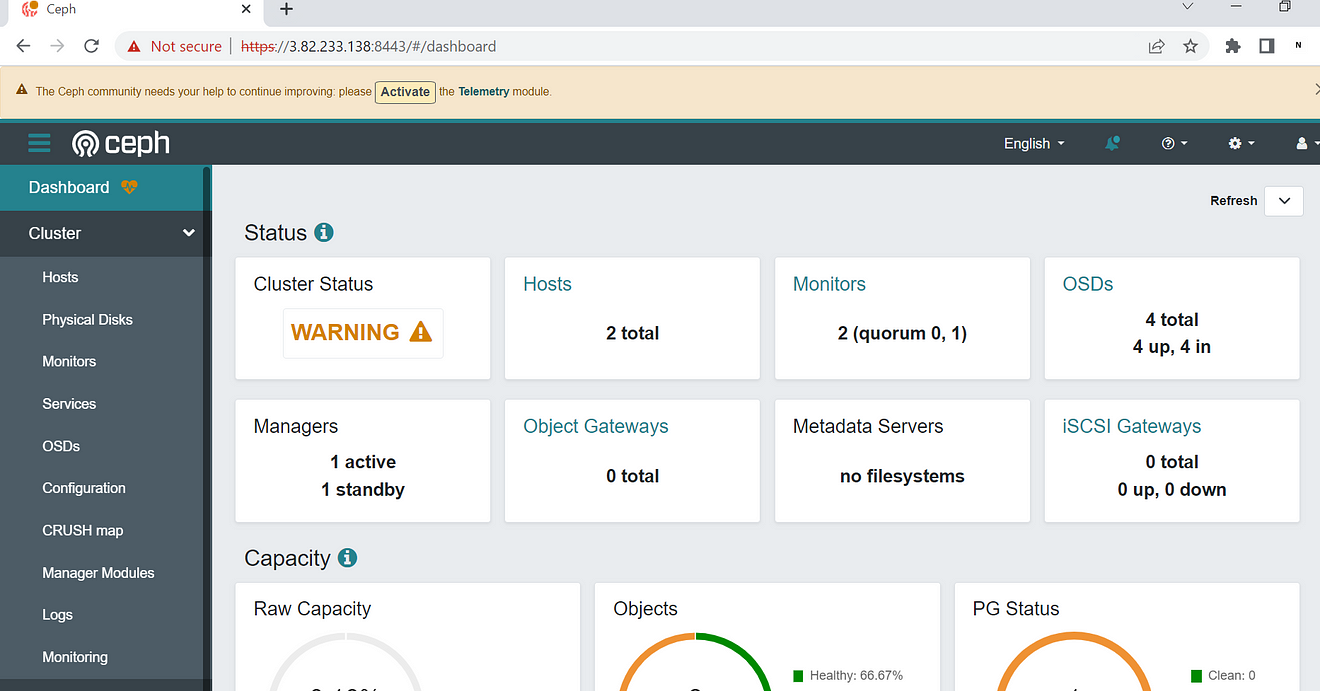
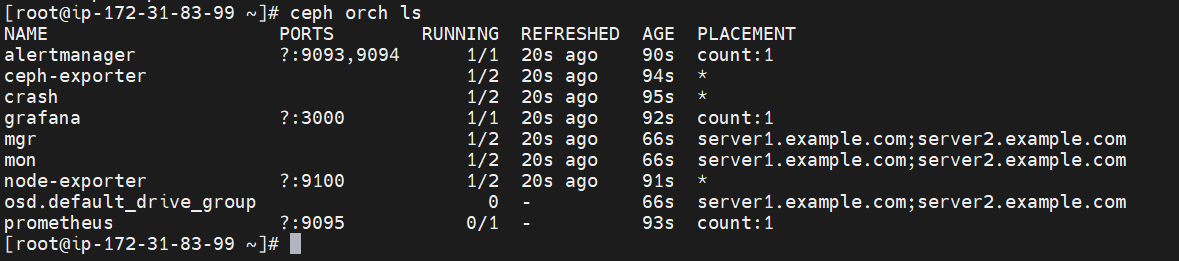
Ceph Cluster is up and we can see that we have 2 hosts available with 4 OSD (object storage devices)
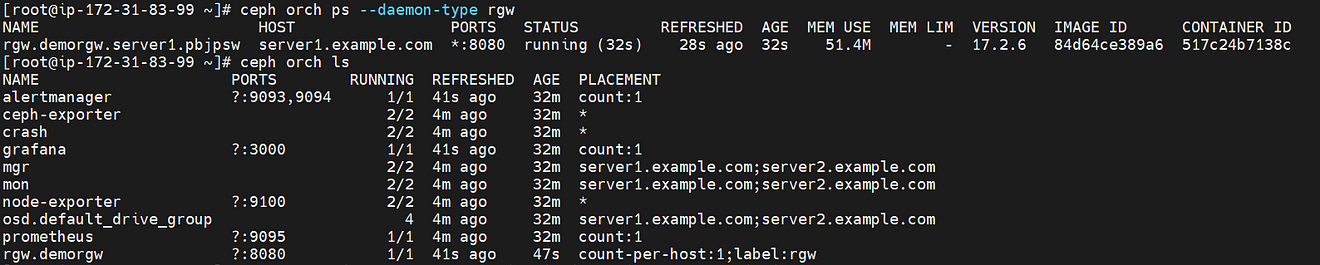
Now it’s time to create Rados Gateway which will be used to create an S3 bucket in AWS using Ceph.
To create Rados Gateway we need to create a configuration file to proceed further with the below content
[root@ip-172-31-83-99 ~]# ceph orch host lable add server1.example.com rgw
[root@ip-172-31-83-99 ~]# cat rados_gw.yml
---
service_type: rgw
service_id: demorgw
placement:
   count_per_host: 1
   label: rgw
spec:
   rgw_frontend_port: 8080
   rgw_realm: myrealm
   rgw_zone: default
[root@ip-172-31-83-99 ~]#
[root@ip-172-31-83-99 ~]# ceph orch ps --daemon-type rgw
NAME                        HOST                 PORTS   STATUS         REFRESHED  AGE  MEM USE  MEM LIM  VERSION  IMAGE ID      CONTAINER ID
rgw.demorgw.server1.pbjpsw  server1.example.com  *:8080  running (32s)    28s ago  32s    51.4M        -  17.2.6   84d64ce389a6  517c24b7138c
[root@ip-172-31-83-99 ~]# ceph orch ls
NAME                     PORTS        RUNNING  REFRESHED  AGE  PLACEMENT
alertmanager             ?:9093,9094      1/1  41s ago    32m  count:1
ceph-exporter                             2/2  4m ago     32m  *
crash                                     2/2  4m ago     32m  *
grafana                  ?:3000           1/1  41s ago    32m  count:1
mgr                                       2/2  4m ago     32m  server1.example.com;server2.example.com
mon                                       2/2  4m ago     32m  server1.example.com;server2.example.com
node-exporter            ?:9100           2/2  4m ago     32m  *
osd.default_drive_group                     4  4m ago     32m  server1.example.com;server2.example.com
prometheus               ?:9095           1/1  4m ago     32m  count:1
rgw.demorgw              ?:8080           1/1  41s ago    47s  count-per-host:1;label:rgw
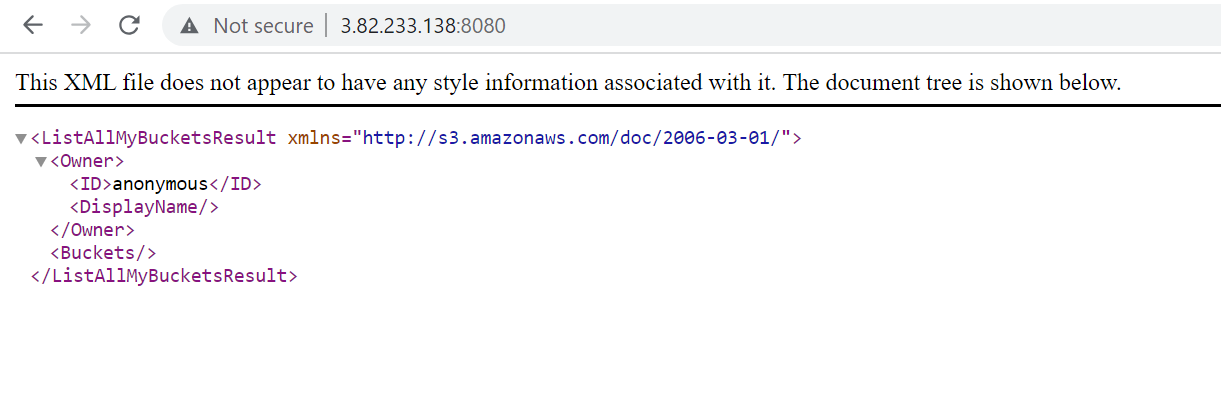
It’s also accessible using a web browser on port 8080 as we configured
Now, we need to create a rados gateway user which we will be used to access AWS to create an s3 bucket
[root@ip-172-31-83-99 ~]# radosgw-admin user create --uid nikhil --display-name "Nikhil Kumar" --access-key=XXXX --secret-key=XXXXXXXXXXXXX
{
    "user_id": "nikhil",
    "display_name": "Nikhil Kumar",
    "email": "",
    "suspended": 0,
    "max_buckets": 1000,
    "subusers": [],
    "keys": [
        {
            "user": "nikhil",
            "access_key": "XXXX",
            "secret_key": "XXXXXX"
        }
    ],
    "swift_keys": [],
    "caps": [],
    "op_mask": "read, write, delete",
    "default_placement": "",
    "default_storage_class": "",
    "placement_tags": [],
    "bucket_quota": {
        "enabled": false,
        "check_on_raw": false,
        "max_size": -1,
        "max_size_kb": 0,
        "max_objects": -1
    },
    "user_quota": {
        "enabled": false,
        "check_on_raw": false,
        "max_size": -1,
        "max_size_kb": 0,
        "max_objects": -1
    },
    "temp_url_keys": [],
    "type": "rgw",
    "mfa_ids": []
}
Now we need to install the package “s3cmd” package to connect with aws s3 service and then run the “s3cmd — configure” command to set the access key and secret key.
[root@ip-172-31-83-99 ~]# yum install s3cmd -y
Updating Subscription Management repositories.
Unable to read consumer identity
This system is not registered with an entitlement server. You can use subscription-manager to register.
Last metadata expiration check: 0:40:13 ago on Sat 15 Jul 2023 12:10:37 PM UTC.
Dependencies resolved.
======================================================================================================================================================================
 Package                               Architecture                           Version                                      Repository                            Size
======================================================================================================================================================================
Installing:
 s3cmd                                 noarch                                 2.3.0-4.el8                                  epel                                 213 k
Transaction Summary
======================================================================================================================================================================
Install  1 Package
Total download size: 213 k
Installed size: 775 k
Downloading Packages:
s3cmd-2.3.0-4.el8.noarch.rpm                                                                                                          5.3 MB/s | 213 kB     00:00
----------------------------------------------------------------------------------------------------------------------------------------------------------------------
Total                                                                                                                                 5.0 MB/s | 213 kB     00:00
Running transaction check
Transaction check succeeded.
Running transaction test
Transaction test succeeded.
Running transaction
  Preparing        :                                                                                                                                              1/1
  Installing       : s3cmd-2.3.0-4.el8.noarch                                                                                                                     1/1
  Running scriptlet: s3cmd-2.3.0-4.el8.noarch                                                                                                                     1/1
  Verifying        : s3cmd-2.3.0-4.el8.noarch                                                                                                                     1/1
Installed products updated.
Installed:
  s3cmd-2.3.0-4.el8.noarch
Complete!
[root@ip-172-31-83-99 ~]# s3cmd --configure
Enter new values or accept defaults in brackets with Enter.
Refer to user manual for detailed description of all options.
Access key and Secret key are your identifiers for Amazon S3. Leave them empty for using the env variables.
Access Key: XXXX
Secret Key: XXXX
Default Region [US]:
Use "s3.amazonaws.com" for S3 Endpoint and not modify it to the target Amazon S3.
S3 Endpoint [s3.amazonaws.com]:
Use "%(bucket)s.s3.amazonaws.com" to the target Amazon S3. "%(bucket)s" and "%(location)s" vars can be used
if the target S3 system supports dns based buckets.
DNS-style bucket+hostname:port template for accessing a bucket [%(bucket)s.s3.amazonaws.com]:
Encryption password is used to protect your files from reading
by unauthorized persons while in transfer to S3
Encryption password: redhat
Path to GPG program [/bin/gpg]:
When using secure HTTPS protocol all communication with Amazon S3
servers is protected from 3rd party eavesdropping. This method is
slower than plain HTTP, and can only be proxied with Python 2.7 or newer
Use HTTPS protocol [Yes]: yes
On some networks all internet access must go through a HTTP proxy.
Try setting it here if you can't connect to S3 directly
HTTP Proxy server name:
New settings:
  Access Key: XXXX
  Secret Key: XXX
  Default Region: US
  S3 Endpoint: s3.amazonaws.com
  DNS-style bucket+hostname:port template for accessing a bucket: %(bucket)s.s3.amazonaws.com
  Encryption password: XXXX
  Path to GPG program: /bin/gpg
  Use HTTPS protocol: True
  HTTP Proxy server name:
  HTTP Proxy server port: 0
Test access with supplied credentials? [Y/n] y
Please wait, attempting to list all buckets...
Success. Your access key and secret key worked fine :-)
Now verifying that encryption works...
Success. Encryption and decryption worked fine :-)
Save settings? [y/N] y
Configuration saved to '/root/.s3cfg'
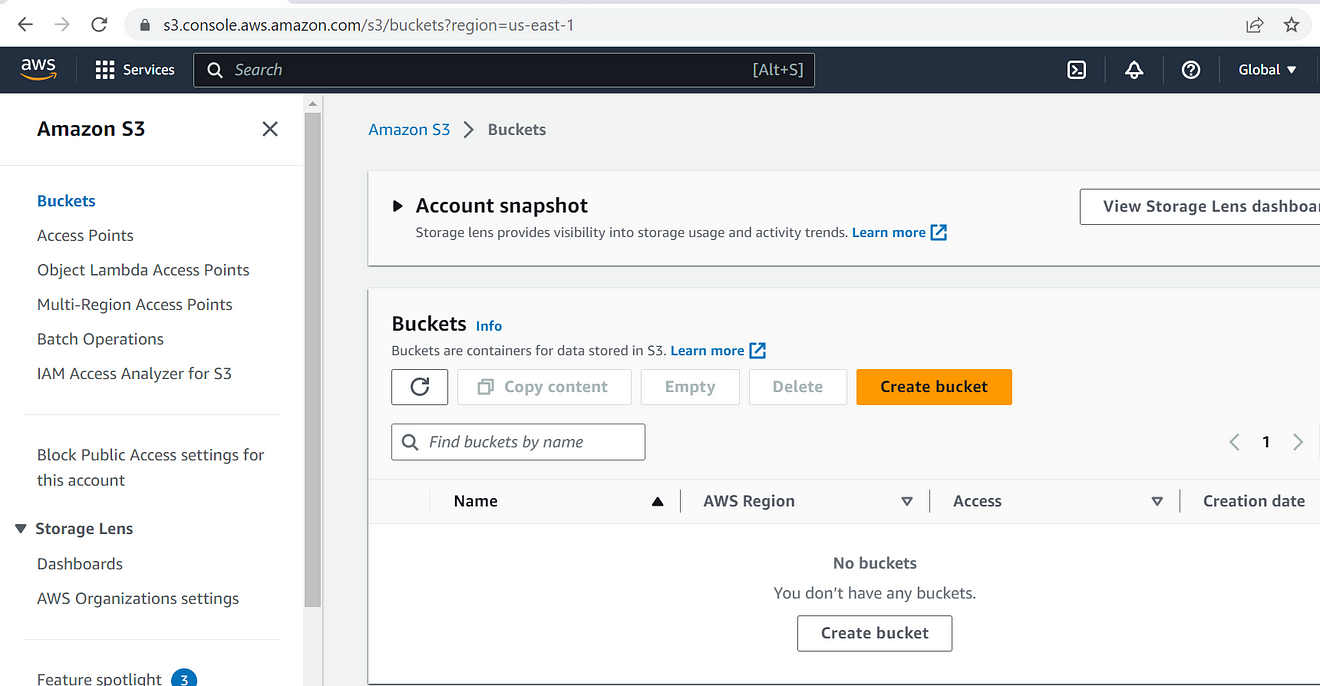
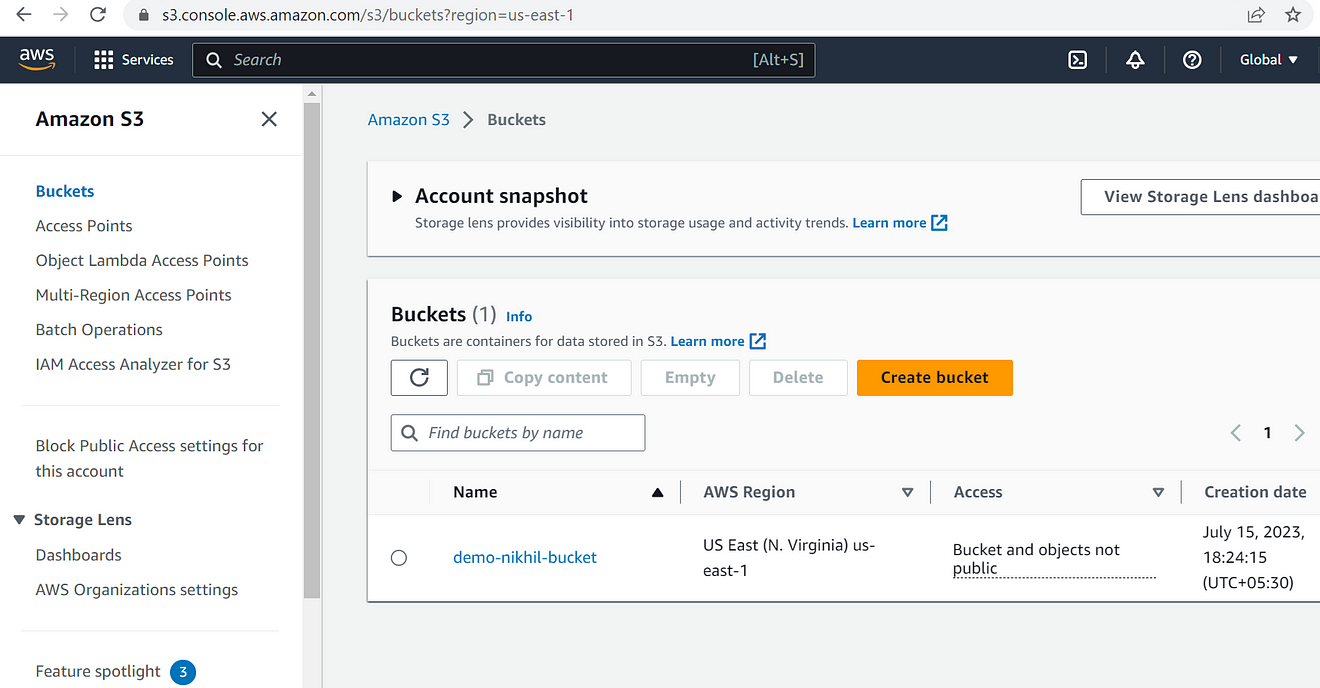
Right now if you see there is no s3 bucket created in AWS.
With the s3cmd mb command, we can create an s3 bucket
[root@ip-172-31-83-99 ~]# s3cmd mb s3://demo-nikhil-bucket
Bucket 's3://demo-nikhil-bucket/' created
[root@ip-172-31-83-99 ~]#
I will add one file on the s3 bucket using the s3cmd put command
[root@ip-172-31-83-99 ~]# touch demo.txt
[root@ip-172-31-83-99 ~]# s3cmd put demo.txt s3://demo-nikhil-bucket
upload: 'demo.txt' -> 's3://demo-nikhil-bucket/demo.txt'  [1 of 1]
 0 of 0     0% in    0s     0.00 B/s  done
[root@ip-172-31-83-99 ~]#
[root@ip-172-31-83-99 ~]# s3cmd ls s3://demo-nikhil-bucket
2023-07-15 12:55            0  s3://demo-nikhil-bucket/demo.txt
[root@ip-172-31-83-99 ~]#
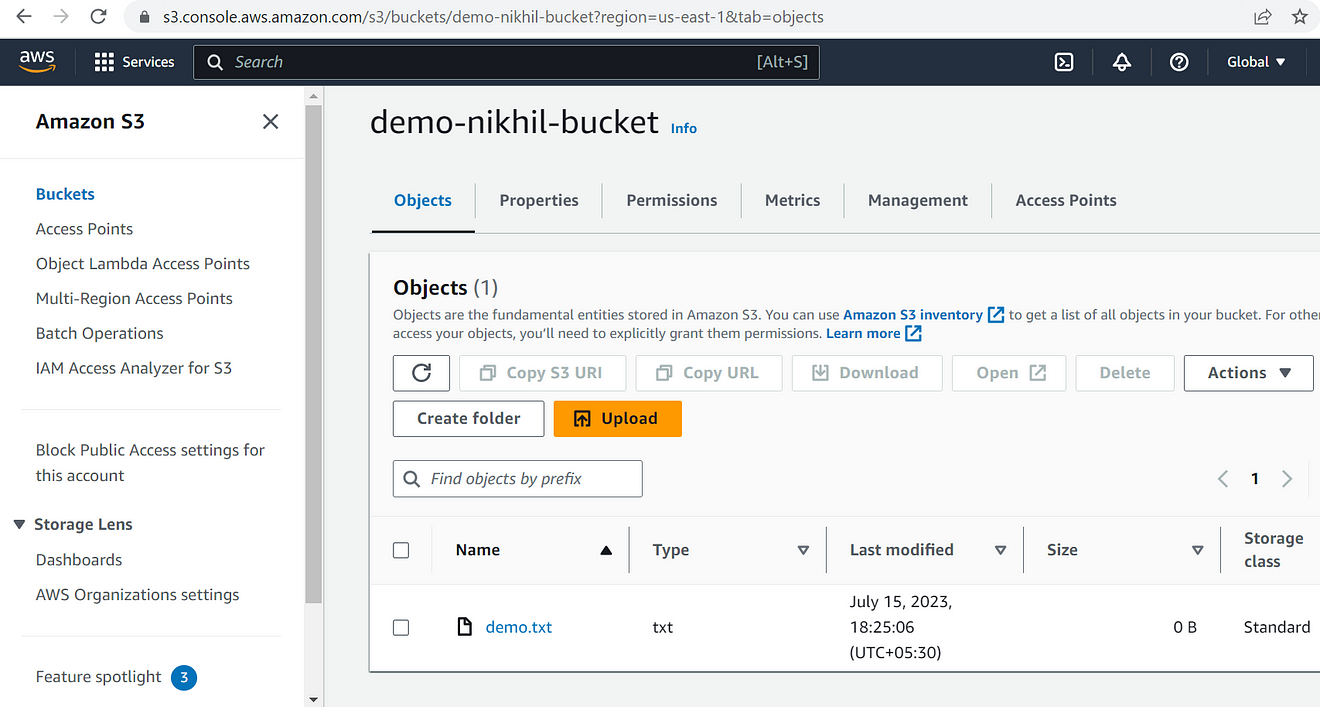
Now, the file is also added to the s3 bucket.
So far, we discovered the immense potential of deploying Ceph, a distributed storage system, on Amazon Web Services (AWS). Ceph offers scalability, high availability, fault tolerance, and storage flexibility. By combining the strengths of Ceph with the robust AWS infrastructure, businesses can build a scalable, reliable, and cost-effective storage solution. We walked through the process of deploying a Ceph cluster on AWS, configuring the cluster, and integrating it with an S3 bucket. With Ceph on AWS, you can meet your storage needs efficiently, whether it’s storing virtual machine images, hosting databases, or managing large-scale file repositories.
Now it’s your turn to harness the power of Ceph on AWS. Follow the steps outlined in this blog, and start leveraging the distributed storage capabilities of Ceph for your organization’s data demands. Unleash the potential of Ceph on AWS and revolutionize your storage infrastructure.
Thank you for joining us on this journey. If you have any questions or insights to share, feel free to leave a comment below.
Happy Ceph-ing on AWS!
Nikhil Kumar
Nikhil Kumar is a DevOps Engineer with 5years of experience in the field. Alongside a successful career in technology, he has also cultivated a passion for writing, having authored several articles and blogs on the subjects of DevOps and the Cloud. With a keen interest in exploring the intersection of technology and the written word, he brings a unique perspective to the conversation.
Note
Disclaimer: The views expressed and the content shared in all published articles on this website are solely those of the respective authors, and they do not necessarily reflect the views of the author’s employer or the platform. We strive to ensure the accuracy and validity of the content published on our website. However, we cannot guarantee the absolute correctness or completeness of the information provided. It is the responsibility of the readers and users of this website to verify the accuracy and appropriateness of any information or opinions expressed within the articles. If you come across any content that you believe to be incorrect or invalid, please contact us immediately so that we can address the issue promptly.