
Ansible / Automation / DevOps / How To
How to Create a FREE Ansible Lab in Public Cloud (AWS, GCP, Azure)

Introduction
As we all know, learning Ansible is not just a reading process and you really need to do a lot of hands-on and practice with all use-cases you have. And when it comes to create an ansible lab, you can easily spin-up one using Vagrant/Terraform on top of local virtualization like VirtualBox or Hyper-V.
Other ways to create Quick Ansible Lab to practice.
- Read Use Terraform to Create a FREE Ansible Lab in AWS
- Watch video for How to Setup Lab Vagrant + VirtualBox for Ansible Lab and How to Create Ansible Lab using Vagrant + VirtualBox.
Watch Ansible for Beginners YouTube Playlist
Even though we are creating small lab (eg: nodes with 1GB memory etc), still some of the students wants to setup their Ansible Lab on Public Cloud due to various reasons. (I have a Terraform repository for quick spinning of Ansible Lab on Top of AWS if you prefer automated lab provisioning.) It is good to setup this on Public Cloud as you will automatically learn Public Cloud as well. In this guide, we will learn how to setup an ansible lab from scratch and everything manually, so that you will learn how ansible is connecting to its target nodes etc.
Contents
hide
Prerequisites
- AWS Account – You can Sign up for AWS Free Tier; Credit Card is needed but it won’t be charged if you are using the free tier services. We need only Free tier services to setup this Lab.
- Basic Linux knowledge – To install and configure the nodes.
Create Instances for Ansible Lab
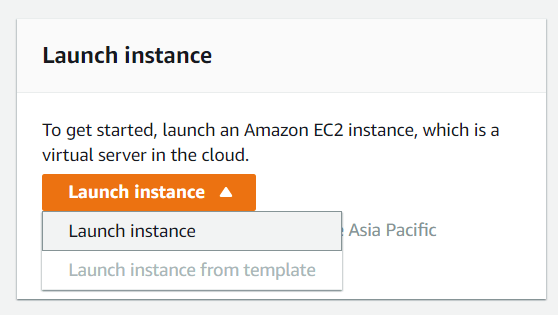
Login to AWS Console and Select EC2. (You can choose any region). Click on Launch Instance.
- Step 1 – Choose AMI : Amazon Linux 2 AMI (HVM), SSD Volume Type (64 bit)
- Step 2 – Instance Type: t2.micro (Free Tier Eligible)
- Step 3 – Number of Instances: 3 (You can add more if need to test with many nodes). Keep other settings as default (Default VPC, Subnet etc)
- Step 4 – Add Storage: Keep default (8G General Purpose SSD)
- Step 5 – Add Tags:
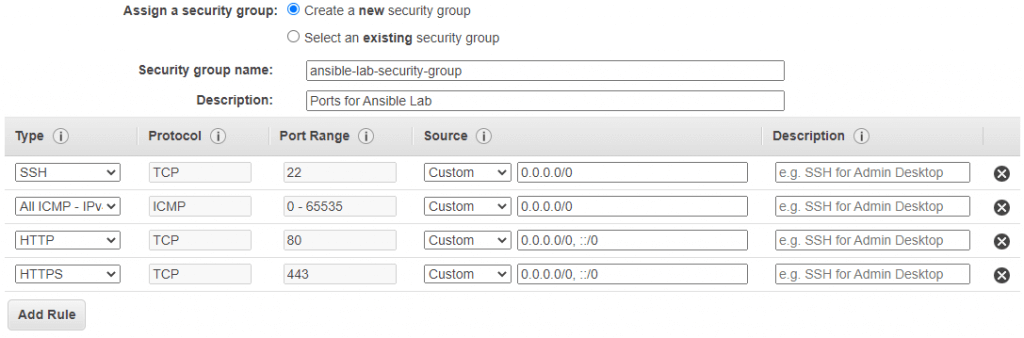
lab = Ansible(Optional but best practice) - Step 6 – Configure Security Group: Select option Create a new Security Group and add below ports to allow. (If you have any existing SG with those ports opened, you can use that as well)
- Step 7 – Review Instance Launch: Verify all values and launch instances.
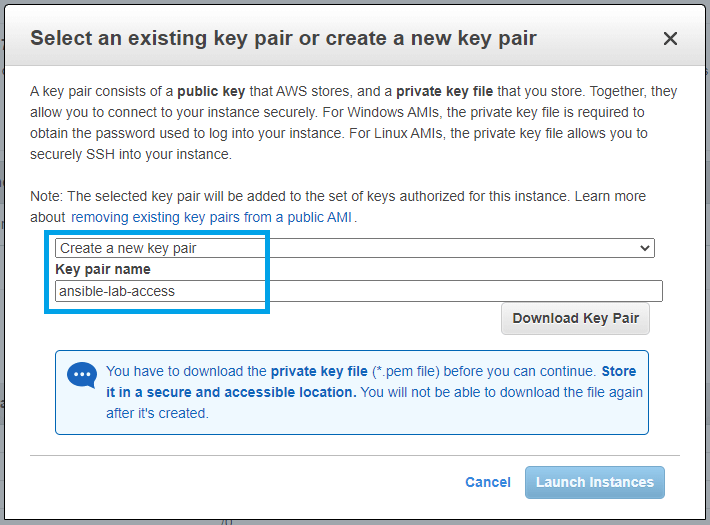
Wizard will popup and ask for selecting the SSH key pair to access the instance once created. If no SSH Key created, choose “Create a new key pair” option and give Key Pair name as shown below.
Download Key Pair and save it to a safe location; you will need this later to connect to the instance once launched.
Click Launch Instances.
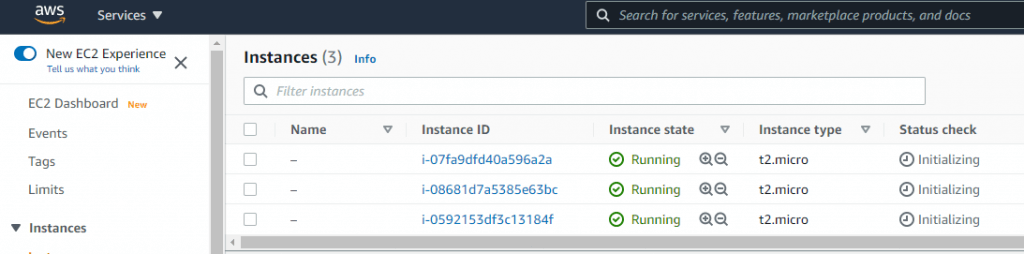
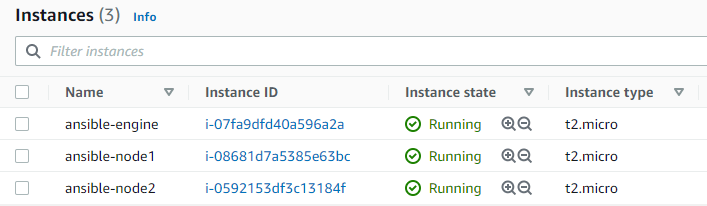
You will get a status message and you can click the button View Instances to see the instances details.
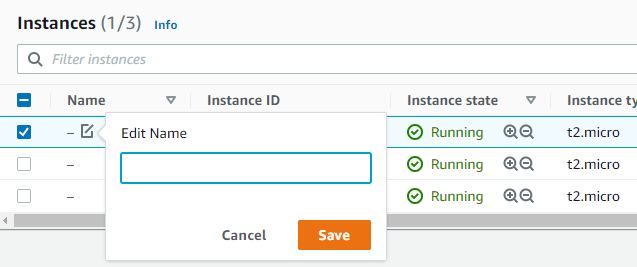
Rename Instance for better visibility
This is optional but highly recommended to identify the instances.
Configure Instances
We will use instance private IP to access the ansible-nodes as the private IP will not change during instance lifetime. (Public IP will change when you Power off the instance as we will power off when we are not using the instances)
You can allocate Elastic IP (EIP) for instance to keep the public IP same but this is not really required for this lab. Please note using Elastic IP is free as long as you are using it with a running instance; otherwise it will charge you !
Verify Public IP or DNS from the console. (You can use IP or DNS; some other cloud providers do not have DNS for instances, so use it as available).
You can use any ssh client applications like Putty, mRemoteNG, MobaXterm etc(in Windows) or native ssh clients (on Linux machines). Please note, the default username in instance will be ec2-user.
Configure ansible-nodes
(Remember to configure the same for both ansible-nodes.)
$ ssh -i ansible-lab-access.pem [email protected]
The authenticity of host '52.221.234.97 (52.221.234.97)' can't be established.
ECDSA key fingerprint is SHA256:yG4T1SVot1ZT5ypjTDlaaLEDRjjM0OarhEsprYk20bc.
Are you sure you want to continue connecting (yes/no/[fingerprint])? yes
Warning: Permanently added '52.221.234.97' (ECDSA) to the list of known hosts.

       __|  __|_  )
       _|  (     /   Amazon Linux 2 AMI
      ___|\___|___|

https://aws.amazon.com/amazon-linux-2/
6 package(s) needed for security, out of 17 available
Run "sudo yum update" to apply all updates.
[ec2-user@ip-172-31-41-72 ~]$
Set the system hostname to identify the machines.
[ec2-user@ip-172-31-41-72 ~]$ sudo hostnamectl set-hostname ansible-node1Create user for ansible remote access and Configure Sudo.
Also read : Password-less SSH Access in Linux
## create devops user (password devops)
[ec2-user@ansible-node1 ~]$ sudo useradd devops
[ec2-user@ansible-node1 ~]$ sudo passwd devops

## Enable password authentication
[ec2-user@ansible-node1 ~]$ sudo sed -i "s/PasswordAuthentication no/PasswordAuthentication yes/g" /etc/ssh/sshd_config

[ec2-user@ansible-node1 ~]$ sudo systemctl restart sshd

## Enable sudo access for devops user;
## create sudo file and add content-> devops ALL=(ALL) NOPASSWD: ALL
[ec2-user@ansible-node1 ~]$ sudo vim /etc/sudoers.d/devops

## the content of file should be like below
[ec2-user@ansible-node1 ~]$ sudo cat /etc/sudoers.d/devops
devops ALL=(ALL) NOPASSWD: ALL
Configure the same for both ansible-nodes.
Configure ansible-engine node
$ ssh -i ansible-lab-access.pem [email protected]
The authenticity of host '13.212.52.30 (13.212.52.30)' can't be established.
ECDSA key fingerprint is SHA256:H5IHPA9+DwjIjxoeidkahDR8juLDkioyu6iLgYYN7TA.
Are you sure you want to continue connecting (yes/no/[fingerprint])? yes
Warning: Permanently added '13.212.52.30' (ECDSA) to the list of known hosts.

       __|  __|_  )
       _|  (     /   Amazon Linux 2 AMI
      ___|\___|___|

https://aws.amazon.com/amazon-linux-2/
6 package(s) needed for security, out of 17 available
Run "sudo yum update" to apply all updates.
[ec2-user@ip-172-31-38-142 ~]$
[ec2-user@ip-172-31-38-142 ~]$ cat /etc/*release
Set the system hostname to identify the machines.
[ec2-user@ip-172-31-38-142 ~]$ sudo hostnamectl set-hostname ansible-engine
[ec2-user@ip-172-31-38-142 ~]$ sudo hostnamectl
   Static hostname: ansible-engine
         Icon name: computer-vm
           Chassis: vm
        Machine ID: ec2d0f46985d6ec5013a525e909aa54e
           Boot ID: ac2e93325a7d4bbeb843c1776f632bef
    Virtualization: xen
  Operating System: Amazon Linux 2
       CPE OS Name: cpe:2.3:o:amazon:amazon_linux:2
            Kernel: Linux 4.14.231-173.361.amzn2.x86_64
      Architecture: x86-64
Install Ansible
## Confirm Python is installed (python2 or python3)
[ec2-user@ansible-engine ~]$ sudo yum list installed python*

## Install EPEL from amazon
[ec2-user@ansible-engine ~]$ sudo amazon-linux-extras install epel

## Install Ansible
[ec2-user@ansible-engine ~]$ sudo yum install ansible

## Check Ansible Version and Configuration
[ec2-user@ansible-engine ~]$ ansible --version
ansible 2.9.21
  config file = /etc/ansible/ansible.cfg
  configured module search path = [u'/home/ec2-user/.ansible/plugins/modules', u'/usr/share/ansible/plugins/modules']
  ansible python module location = /usr/lib/python2.7/site-packages/ansible
  executable location = /usr/bin/ansible
  python version = 2.7.18 (default, Feb 18 2021, 06:07:59) [GCC 7.3.1 20180712 (Red Hat 7.3.1-12)]
You can use other installation methods as well, refer documentation.
Configure Ansible
We will create a basic ansible.cfg and inventory to verify installation.
Create Ansible Configuration
## Create a Demo directory
[ec2-user@ansible-engine ~]$ mkdir ansible-demo
[ec2-user@ansible-engine ~]$ cd ansible-demo/

## Create an ansible.cfg as below and add content; see sample content below
[ec2-user@ansible-engine ansible-demo]$ vim ansible.cfg

## Sample file content
[ec2-user@ansible-engine ansible-demo]$ cat ansible.cfg
[defaults]
# inventory file to use
inventory = ./inventory

# ansible remote user
remote_user = devops
Create Ansible Inventory
## Create inventory with our ansible-nodes as below; see sample content below
[ec2-user@ansible-engine ansible-demo]$ vim inventory

## Sample inventory
[ec2-user@ansible-engine ansible-demo]$ cat inventory
[local]
ansible-engine ansible_connection=local

[nodes]
node1 ansible_host=172.31.41.72
node2 ansible_host=172.31.46.218
Add node details to /etc/hosts
We can use in-build private DNS to access the nodes but those are not so easy to remember or type. Hence we will create entries in /etc/hosts with private IPs for easy access
## add entries in /etc/hosts for eazy access; see sample below
[ec2-user@ansible-engine ~]$ sudo vim /etc/hosts

## sample /etc/hosts
[ec2-user@ansible-engine ~]$ sudo cat /etc/hosts
127.0.0.1   localhost localhost.localdomain localhost4 localhost4.localdomain4
::1         localhost6 localhost6.localdomain6

## ansible nodes with private IP
172.31.41.72  node1
172.31.46.218 node2
Install optional packages
## Optional: Install git
$ sudo yum install git
Configure SSH Key based Access from ansible-engine
Since we are talking automation, password-less but safe access is very important. We will implement password-less ssh key access from ansible-engine to ansible-nodes.
Read Password-less SSH Access in Linux for more details on this topic.
Create SSH Key on ansible-engine
## Step 1: Create SSH Keys

[ec2-user@ansible-engine ~]$ ssh-keygen
Generating public/private rsa key pair.
Enter file in which to save the key (/home/ec2-user/.ssh/id_rsa):
Enter passphrase (empty for no passphrase):
Enter same passphrase again:
Your identification has been saved in /home/ec2-user/.ssh/id_rsa.
Your public key has been saved in /home/ec2-user/.ssh/id_rsa.pub.
The key fingerprint is:
SHA256:xGmknVQ6WpmsqNWir8PQIZWgq0SvC1Tg5Ymh1t2a9hY ec2-user@ansible-engine
The key's randomart image is:
+---[RSA 2048]----+
|.+ o    o..      |
|+ X o .B *       |
|o* = ...#        |
|+.+  oo* .       |
|.= o+++ES        |
|= o+... .        |
|o+o    o         |
|. +.  .          |
| ..o.            |
+----[SHA256]-----+
Add SSH public key to nodes
Remember to do this for both ansible-nodes.
## Step 2 - copy public keys to ansible-nodes

[ec2-user@ansible-engine ~]$ ssh-copy-id devops@node1
/usr/bin/ssh-copy-id: INFO: Source of key(s) to be installed: "/home/ec2-user/.ssh/id_rsa.pub"
The authenticity of host 'node1 (172.31.41.72)' can't be established.
ECDSA key fingerprint is SHA256:yG4T1SVot1ZT5ypjTDlaaLEDRjjM0OarhEsprYk20bc.
ECDSA key fingerprint is MD5:e3:be:23:24:7a:dc:a5:ec:09:7a:af:92:8a:a2:93:4c.
Are you sure you want to continue connecting (yes/no)? yes
/usr/bin/ssh-copy-id: INFO: attempting to log in with the new key(s), to filter out any that are already installed
/usr/bin/ssh-copy-id: INFO: 1 key(s) remain to be installed -- if you are prompted now it is to install the new keys
devops@node1's password:

Number of key(s) added: 1

Now try logging into the machine, with:   "ssh 'devops@node1'"
and check to make sure that only the key(s) you wanted were added.
Verify node access using keys
## Step3. Verify node access using keys

[ec2-user@ansible-engine ~]$ ssh devops@node1

[devops@ansible-node1 ~]$

## Verify sudo access on node for devops user
[devops@ansible-node1 ~]$ sudo -i
[root@ansible-node1 ~]#

## Exit from sudo and then nodes
[root@ansible-node1 ~]# exit
logout
[devops@ansible-node1 ~]$ exit
logout
Connection to node1 closed.
[ec2-user@ansible-engine ~]$
Let’s Test Ansible
Now we have one ansible-engine and two ansible-nodes; we will test the ansible with nodes now.
[ec2-user@ansible-engine ~]$ cd ansible-demo/
[ec2-user@ansible-engine ansible-demo]$ ll
total 8
-rw-rw-r-- 1 ec2-user ec2-user 103 Jun  7 13:57 ansible.cfg
-rw-rw-r-- 1 ec2-user ec2-user 123 Jun  7 13:55 inventory
Run a simple ansible ping job to confirm access.
[ec2-user@ansible-engine ansible-demo]$ ansible all -m ping
ansible-engine | SUCCESS => {
    "ansible_facts": {
        "discovered_interpreter_python": "/usr/bin/python"
    },
    "changed": false,
    "ping": "pong"
}
node1 | SUCCESS => {
    "ansible_facts": {
        "discovered_interpreter_python": "/usr/bin/python"
    },
    "changed": false,
    "ping": "pong"
}
node2 | SUCCESS => {
    "ansible_facts": {
        "discovered_interpreter_python": "/usr/bin/python"
    },
    "changed": false,
    "ping": "pong"
}
Great ! we are good to go. Ansible engine is able to access the nodes and all working as expected. Get your hands dirty now !
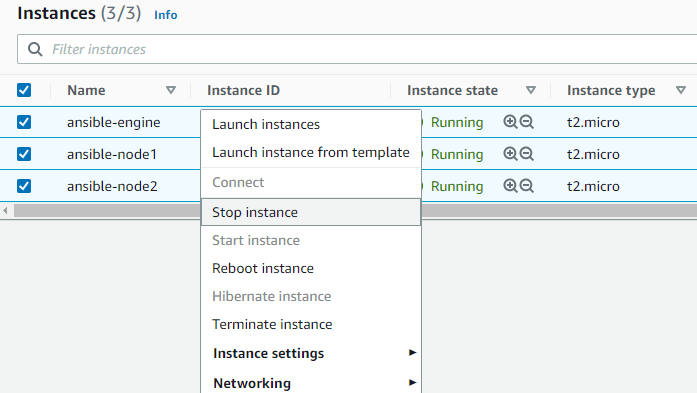
Maintaining the Lab Instance
As we know the FREE tier is limited (eg; 750hrs of ec2 instance in AWS etc), we are not going to keep this instance running all the time. Once you have finished your lab (learning, testing or development), you can shutdown (Stop Instance) the instances.
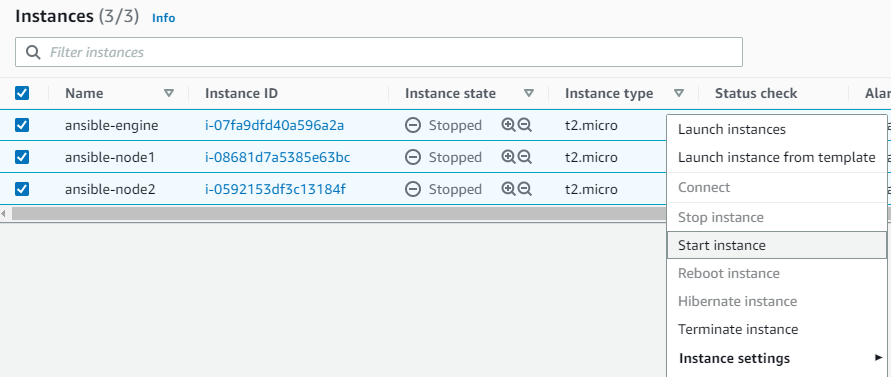
So, when you want to use the lab again, just login to the AWS Console and Start those instances again.
Warning
- Make sure you stop the instances once you finished testing; running instances in background may exceed your AWS Free Tier Quota and may results in charging your billing account.
- As I informed earlier, when you stop and start instance Public IP address of the instance will be changed. Remember to find the correct public IP of nodes and use it to connect via ssh.
Final Thoughts
All of the steps mentioned above are same for other public cloud providers (Other than provisioning the instances) and hence you are free to try any public cloud platforms like Google Cloud Platform (GCP Free Tier), Microsoft Azure (Azure Free Tier) etc.
Disclaimer:
The views expressed and the content shared in all published articles on this website are solely those of the respective authors, and they do not necessarily reflect the views of the author’s employer or the techbeatly platform. We strive to ensure the accuracy and validity of the content published on our website. However, we cannot guarantee the absolute correctness or completeness of the information provided. It is the responsibility of the readers and users of this website to verify the accuracy and appropriateness of any information or opinions expressed within the articles. If you come across any content that you believe to be incorrect or invalid, please contact us immediately so that we can address the issue promptly.
Tags:
Latest posts


Comments
10 Responses
Leave a Reply
[…] How to Create a FREE Ansible Lab in Public Cloud (AWS, GCP, Azure) – June 7, 2021 […]
[…] Also read : How to create an Ansible lab using Vagrant ? […]
is this the same setup followed in production also ?
if not please give assist me .
This is just a lab setup and not recommended for production. This lab is for your to practice Ansible with multiple use cases on multiple nodes.
For production, you can install it manually on a machine (or use any deployment method) and safely configure your ssh keys and other credentials.
If you are using Ansible Tower/Ansible Automation Platform, then its different again.
Find Ansible Best Practices:
1) https://www.youtube.com/watch?v=V-1zUY3eVsg
2) https://docs.ansible.com/ansible/2.8/user_guide/playbooks_best_practices.html
It was all going so well up until this step which lost me “- ## Install EPEL from amazon – [ec2-user@ansible-engine ~]$ sudo amazon-linux-extras install epel”. What is the user ‘amazon-linux-extras’ or is that some package to also install? What is the correct command(s)?. really appreciated the time you took to document & add screenshots to this proc btw. Just need clarification on this aforementioned step if possible. Thanks for any/all help!
@Jm, this for enabling the EPEL repo in Amazon Linux.
https://aws.amazon.com/premiumsupport/knowledge-center/ec2-enable-epel/
If you are using different AMI (Fedora, CentOS, RHEL, etc) then use appropriate commands 🙂
Please join t.me/techbeatly for community chat.
@Jm, this for enabling the EPEL repo in Amazon Linux.
https://aws.amazon.com/premiumsupport/knowledge-center/ec2-enable-epel/
If you are using different AMI (Fedora, CentOS, RHEL, etc) then use appropriate commands 🙂
Please join t.me/techbeatly for community chat.
why did you use Amazon Linux and not RHEL?
Nothing like that Just used the default Free OS available in AWS 🙂
If I specifically use RHEL, people will think that Ansible can be installed and used only on RHEL 😀
(Actually happened)
[…] How to Create a FREE Ansible Lab in Public Cloud (AWS, GCP, Azure) […]