Install the RHACM operator – import an existing cluster – Deploy a new cluster
-
 Jin Zhang
- Aws, Infrastructre & hardware, Kubernetes
- November 10, 2022
This blog shows how to prepare RHACM and manage the cluster on AWS.
- Install the RHACM operator from OperatorHub.
- Create the
MultiClusterHubobject. - Import an existing cluster into RHACM.
- Deploy a New Cluster
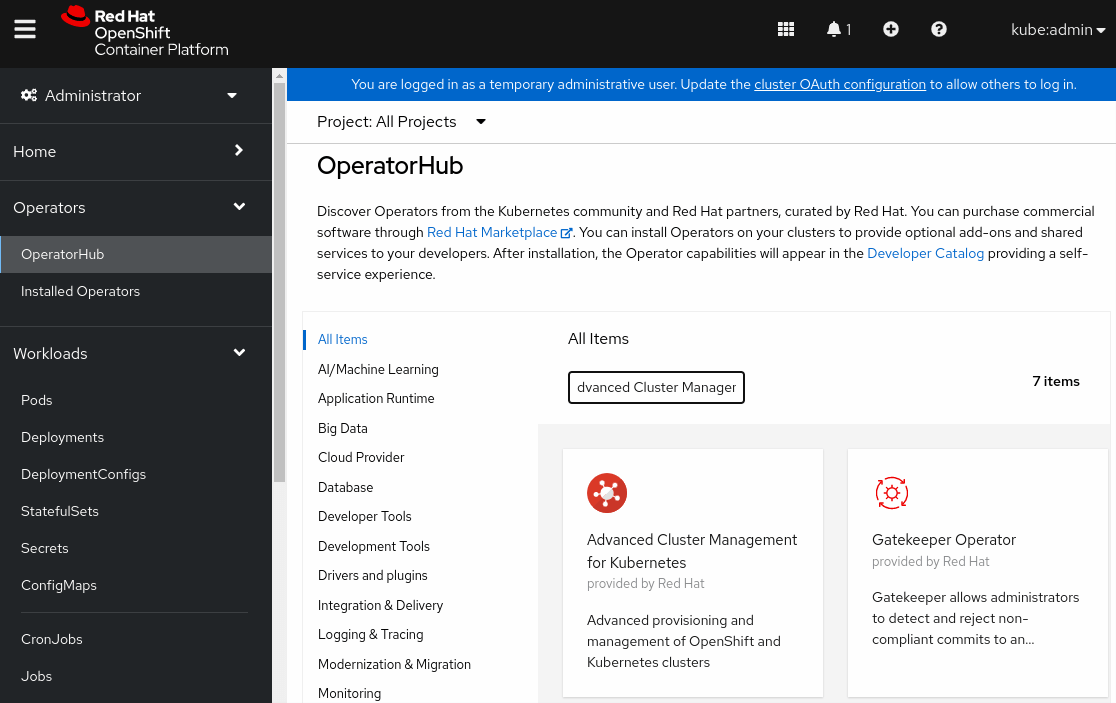
Installing Red Hat Advanced Cluster Management
Using OperatorHub, install the Advanced Cluster Management for Kubernetes operator in the cluster-bn7z2.sandbox1558.opentlc.com cluster.
Navigate to Operators → OperatorHub and type Advanced Cluster Management in the Filter by keyword field.
Click Advanced Cluster Management for Kubernetes , and then click Install .
In the Update Channel, ensure that the release-2. 6 radio button is selected. In the Update approval section, select the Manual radio button to select a manual approval strategy. Then, click Install.

Next, you must approve the installation or updates to the RHACM operator manually.
Click Approve in the next step. The installation can take a few minutes to complete.
When the operator is installed, you see the following message:

Click Create MulticlusterHub .
On the Create MulticlusterHub page, leave the default values, and click Create. You are redirected to the MultiClusterHubs tab.

Initially, the multiclusterhub object has a Phase: Installing status.
After some minutes, the status Phase: Running displays in the Status column.

Retrieve the route to the RHACM web console, named multicloud-console on hub cluster
$ oc get route multicloud-console -n open-cluster-management
NAME                 HOST/PORT                                                       PATH   SERVICES             PORT    TERMINATION          WILDCARD
multicloud-console   multicloud-console.apps.cluster-bn7z2.sandbox1558.opentlc.com          management-ingress   https   reencrypt/Redirect   None
Open the RHACM web console at https://multicloud-console.apps.cluster-bn7z2.sandbox1558.opentlc.com with the hub “kubeadmin” credential.

Import an existing cluster
Explore the Infrastructure → Clusters menu.
From the Infrastructure menu, click Clusters. Scroll down to locate the managed clusters. Notice that the local-cluster cluster-bn7z2.sandbox1558.opentlc.com cluster, where the hub cluster runs, is automatically managed.

On the Import an existing cluster page, type the name to identify this cluster as follows:
- Name: bn7z2-m-prod-01
Leave the rest of the values unchanged and click Save import and generate code .

The Save import and generate code button now displays the Code generated successfully message.
Click Copy command .

From the terminal, log in to the bn7z2-m-pod.sandbox1558.opentlc.com cluster as the admin user. The API server address is https://api.bn7z2-m-pod.sandbox1558.opentlc.com:6443
Paste the import code into the terminal and then press Enter to run it. The paste command is quite long and most of it is base64 encoded.
$ echo "Ci0tLQphcGlWZXJzaW9uOiB...CBhZ2Fpbi4=" | base64 -d
Deploy Managed OpenShift Clusters
Set Up Credentials for AWS
Create a new Namespace called opentlc-aws to hold the configuration for AWS.
$ oc create namespace opentlc-aws
In the RHACM console, click Credentials .
Click Add Credentials and select Amazon Web Services .
Specify the following values:
- Name: opentlc-aws
- Namespace: opentlc-aws
- Base DNS Domain:
sandbox1558.opentlc.com (set to your domain)
Click Next .
For Access key ID , paste the access key ID
For Secret access key , paste the secret access key
Click Next and skip the Proxy settings.
Click Next and specify your OpenShift pull secret for the Pull Secret field.
For SSH Private Key , paste the output from the cat HOME/.ssh/{GUID}key.pem command—your private key.
For SSH Public Key , paste the output from the cat HOME/.ssh/{GUID}key.pub; echo command—your public key.
Click Next .
Verify that your entries are correct, then click Add .
Deploy New Development Cluster
I deploy one managed OpenShift cluster for development. Because you do not actually use these clusters for any productive work, you deploy single-node OpenShift (SNO) clusters. These clusters consist of only a single VM that acts as the control plane and worker.
- Under Infrastructure on the left, select Clusters , and then click Create Cluster .

- Select Amazon Web Services as the provider.
- Select the credential you created earlier as your Infrastructure provider credential (opentlc-aws).
- Click Next.

- Cluster Name: bn7z2-m-dev
- Base DNS Domain: sandbox1558.opentlc.com
- Release Image: 4.9.51 (or the latest available OpenShift 4.9 image)
- Additional Labels: purpose=development

- For Node pools, specify the following parameters, and then click Next: Region: ap-southeast-2 Architecture: (do not set) Control plane pool → Zones: (do not set) Control plane pool → Instance type: m5.2xlarge Control plane pool → Root storage: 100 (do not change) Worker pool 1 → Pool name: (do not change) Worker pool 1 → Zones: (do not set) Worker pool 1 → Instance Type: m5.xlarge (do not change) Node Count: 0


- For Networking, click Next.
- For Proxy, click Next.
- For Automation, click Next.
- For Review, specify the following parameters:

- At the top, select YAML to show the YAML editor on the right.
- Find the MachinePool YAML resource in the editor and add skipMachinePools: true under the MachinePool spec.
- In the YAML editor switch to the install-config tab, then change the number of replicas for the control plane to 1 and verify that the number of replicas for workers is set to 0.
- Click Create.


Watch the deployment logs until the production cluster is successfully deployed.

Remove a managed cluster
# Managed Cluster

$ oc login -u admin -p redhat https://api.<cluster name>.<base domain>:6443

$ oc delete clusterrole klusterlet

$ oc delete clusterrole open-cluster-management:klusterlet-admin-aggregate-clusterrole
Now we have a “playground” to test RHACM GitOps. I will talk about it in the next Blog.
Jin Zhang
I’m Jin, Red Hat ASEAN Senior Platform Consultant. My primary focus is Ansible Automation (Infrastructure as Code), OpenShift, and OpenStack.
Note
Disclaimer: The views expressed and the content shared in all published articles on this website are solely those of the respective authors, and they do not necessarily reflect the views of the author’s employer or the platform. We strive to ensure the accuracy and validity of the content published on our website. However, we cannot guarantee the absolute correctness or completeness of the information provided. It is the responsibility of the readers and users of this website to verify the accuracy and appropriateness of any information or opinions expressed within the articles. If you come across any content that you believe to be incorrect or invalid, please contact us immediately so that we can address the issue promptly.