On-premise SQL Server to Azure SQL Migration using Log Replay Service (LRS)-Part 4 Additional steps

- Part 1: Introduction and requirements
- Part 2: Preparing for migration
- Part 3: Migration procedure
- Part 4: Additional steps (This article)
Migration of multiple databases
You must place backup files for different databases in separate folders inside Azure Blob Storage container. All backup files for a single database must be placed inside the same folder, as there must not exist subfolders for an individual database. LRS must be started separately for each database pointing to the full URI path of Azure Blob storage container and the individual database folder.
Below is an example of the folder structure and URI specification required when invoking LRS for multiple databases. Start LRS separately for each database, specifying the full URI path to the Azure Blob Storage container and the individual database folder.
-- Place all backup files for database 1 in its own separate folder within a storage container. No further subfolders are allowed under database1 folder for this database.
https://<mystorageaccountname>.blob.core.windows.net/<mycontainername>/database1/<all database 1 backup files>

-- Place all backup files for database 2 in its own separate folder within a storage container. No further subfolders are allowed under database2 folder for this database.
https://<mystorageaccountname>.blob.core.windows.net/<mycontainername>/database2/<all database 2 backup files>

-- Place all backup files for database 2 in its own separate folder within a storage container. No further subfolders are allowed under database3 folder for this database.
https://<mystorageaccountname>.blob.core.windows.net/<mycontainername>/database3/<all database 3 backup files>
Automating database migration for multiple databases.
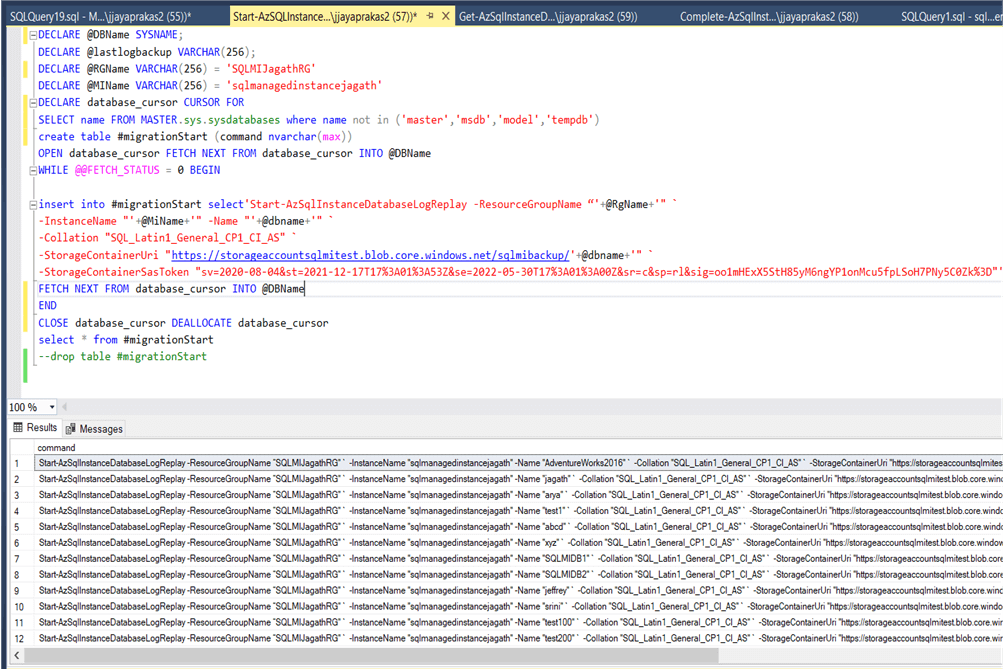
Below is a T-SQL script to generate the Start operation on LRS scripts for more than one database. Once you run this script you can get the powershell script generated as shown below.
DECLARE @DBName SYSNAME;
DECLARE @lastlogbackup VARCHAR(256);
DECLARE @RGName VARCHAR(256) = 'SQLMIJagathRG'
DECLARE @MIName VARCHAR(256) = 'sqlmanagedinstancejagath'
DECLARE database_cursor CURSOR FOR

SELECT name FROM MASTER.sys.sysdatabases where name not in ('master','msdb','model','tempdb')

create table #migrationStart (command nvarchar(max))

OPEN database_cursor FETCH NEXT FROM database_cursor INTO @DBName
WHILE @@FETCH_STATUS = 0 BEGIN

insert into #migrationStart select'Start-AzSqlInstanceDatabaseLogReplay -ResourceGroupName “'+@RgName+'" `
-InstanceName "'+@MiName+'" -Name "'+@dbname+'" `
-Collation "SQL_Latin1_General_CP1_CI_AS" `
-StorageContainerUri "https://storageaccountsqlmitest.blob.core.windows.net/sqlmibackup/'+@dbname+'" `
-StorageContainerSasToken "mySASToken"'
FETCH NEXT FROM database_cursor INTO @DBName
END

CLOSE database_cursor DEALLOCATE database_cursor
select * from #migrationStart
--drop table #migrationStart
Now we can run the migrations via powershell job to execute them parallelly and save time. Please refer to the section here. Below screenshot shows once we start the LRS jobs
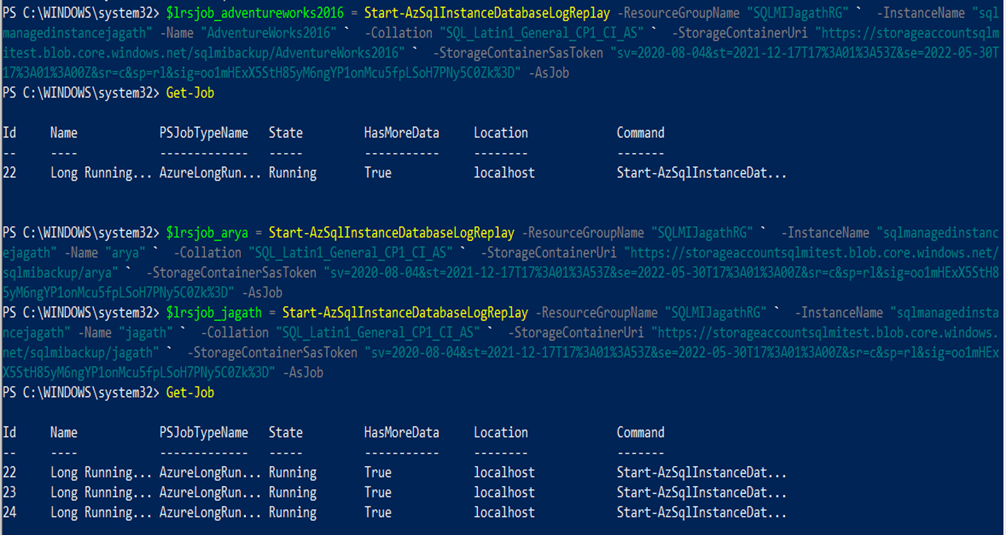
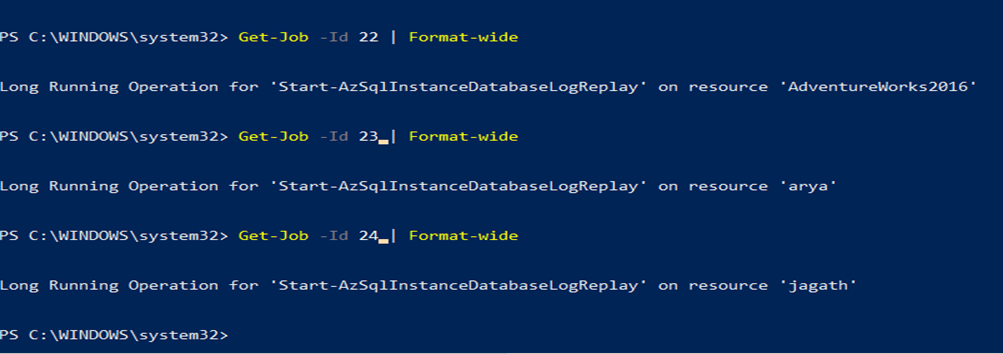
To identify the jobs tagged to which databases, run the command: Get-Job -Id<Id> | Format-Wide
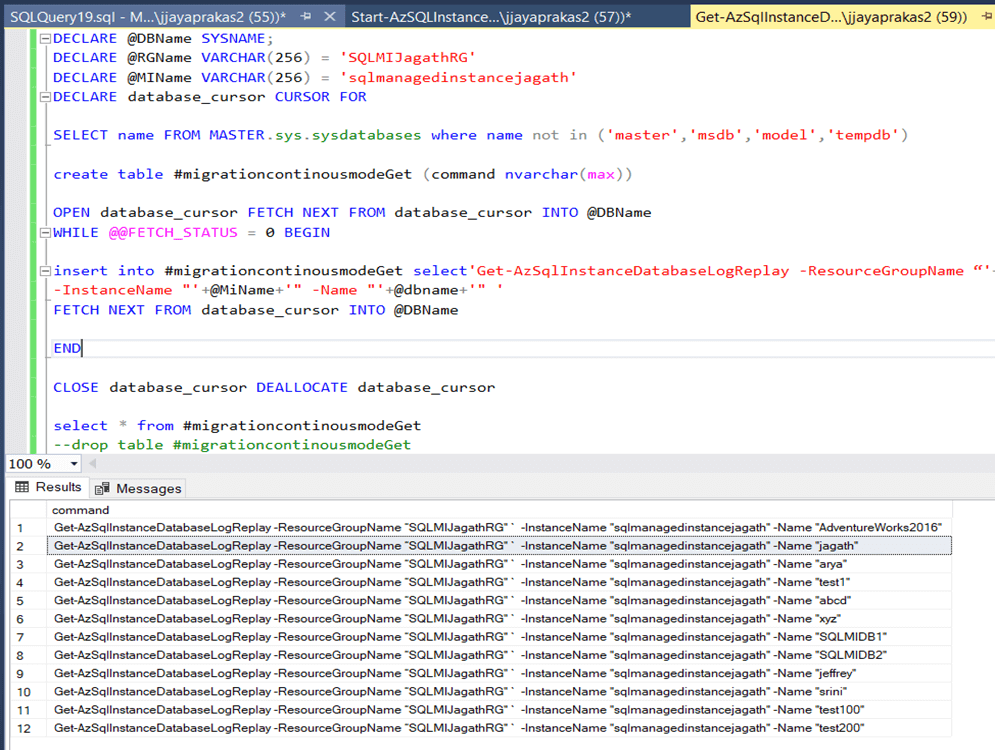
Next is to monitor the progress of the migration. For that we need to use the below script. Once you run the script can get the powershell script.
DECLARE @DBName SYSNAME;
DECLARE @RGName VARCHAR(256) = 'SQLMIJagathRG'
DECLARE @MIName VARCHAR(256) = 'sqlmanagedinstancejagath'
DECLARE database_cursor CURSOR FOR

SELECT name FROM MASTER.sys.sysdatabases where name not in ('master','msdb','model','tempdb')

create table #migrationcontinousmodeGet (command nvarchar(max))

OPEN database_cursor FETCH NEXT FROM database_cursor INTO @DBName
WHILE @@FETCH_STATUS = 0 BEGIN

insert into #migrationcontinousmodeGet select'Get-AzSqlInstanceDatabaseLogReplay -ResourceGroupName “'+@RgName+'" `
-InstanceName "'+@MiName+'" -Name "'+@dbname+'" '
FETCH NEXT FROM database_cursor INTO @DBName

END

CLOSE database_cursor DEALLOCATE database_cursor

select * from #migrationcontinousmodeGet
--drop table #migrationcontinousmodeGet
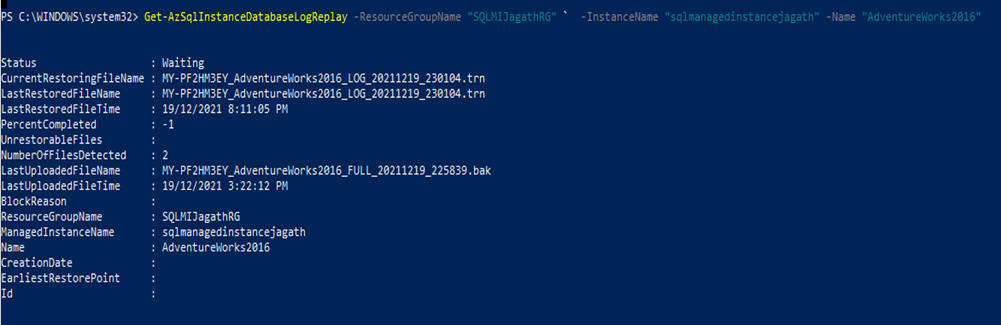
Below screenshot shows the progress of migration for database: AdventureWorks2016
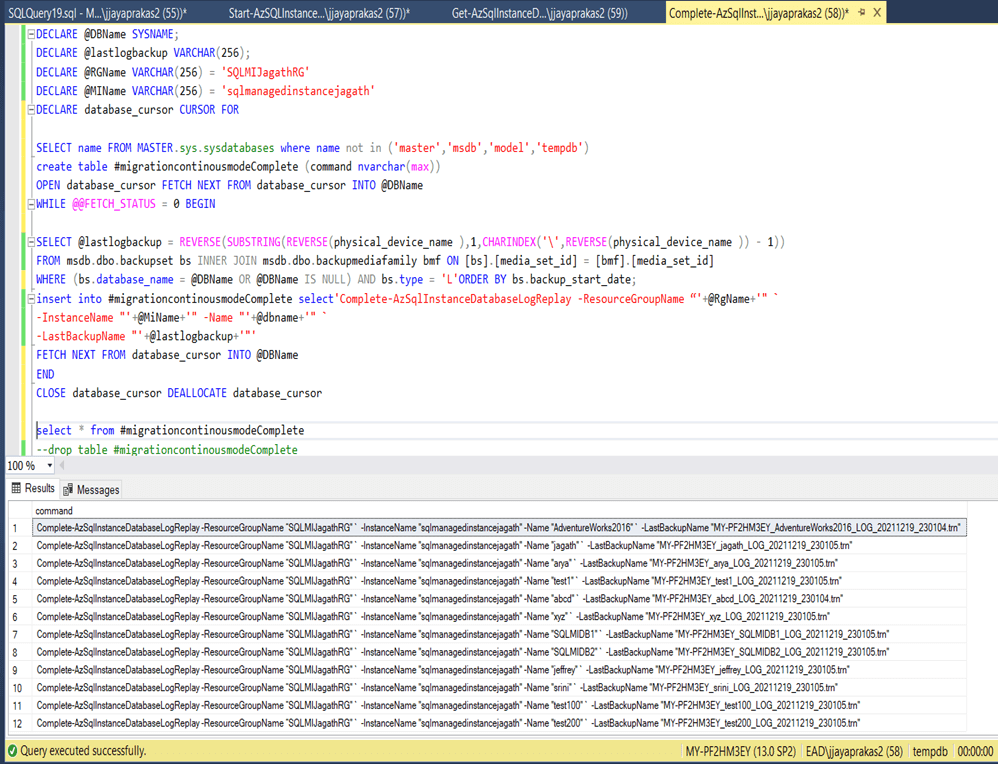
Final Step is to complete migration(Continuous Mode). For that we need to use the below script. Once you run the script can get the powershell script as displayed in the below screenshot.
DECLARE @DBName SYSNAME;
DECLARE @lastlogbackup VARCHAR(256);
DECLARE @RGName VARCHAR(256) = 'SQLMIJagathRG'
DECLARE @MIName VARCHAR(256) = 'sqlmanagedinstancejagath'
DECLARE database_cursor CURSOR FOR

SELECT name FROM MASTER.sys.sysdatabases where name not in ('master','msdb','model','tempdb')
create table #migrationcontinousmodeComplete (command nvarchar(max))
OPEN database_cursor FETCH NEXT FROM database_cursor INTO @DBName
WHILE @@FETCH_STATUS = 0 BEGIN

SELECT @lastlogbackup = REVERSE(SUBSTRING(REVERSE(physical_device_name ),1,CHARINDEX('\',REVERSE(physical_device_name )) - 1))
FROM msdb.dbo.backupset bs INNER JOIN msdb.dbo.backupmediafamily bmf ON [bs].[media_set_id] = [bmf].[media_set_id]
WHERE (bs.database_name = @DBName OR @DBName IS NULL) AND bs.type = 'L'ORDER BY bs.backup_start_date;
insert into #migrationcontinousmodeComplete select'Complete-AzSqlInstanceDatabaseLogReplay -ResourceGroupName “'+@RgName+'" `
-InstanceName "'+@MiName+'" -Name "'+@dbname+'" `
-LastBackupName "'+@lastlogbackup+'"'
FETCH NEXT FROM database_cursor INTO @DBName
END
CLOSE database_cursor DEALLOCATE database_cursor

select * from #migrationcontinousmodeComplete
--drop table #migrationcontinousmodeComplete
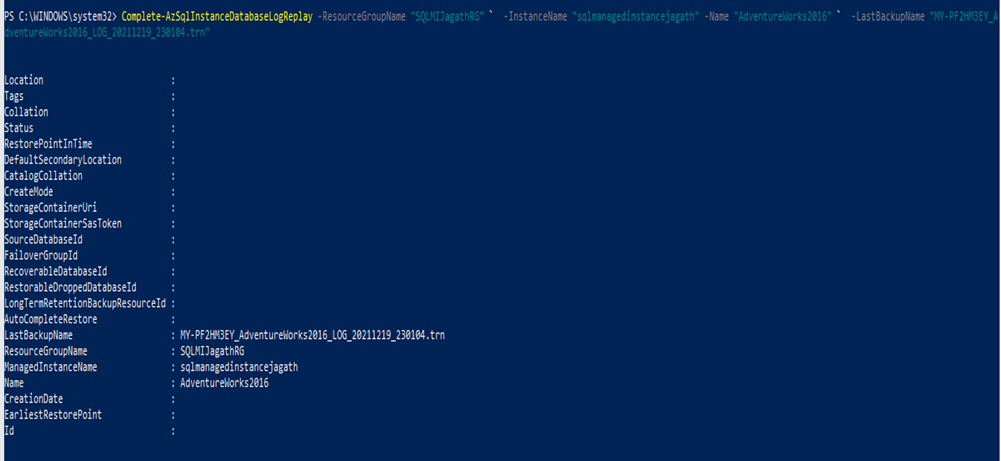
Below screenshot shows the completion of migration of AdventureWorks2016 database.
Functional limitations of LRS are:
- The database that you’re restoring can’t be used for read-only access during the migration process.
- System-managed software patches are blocked for 36 hours after you start LRS. After this time window expires, the next software update will stop LRS. You then need to restart LRS from scratch.
- LRS requires databases on SQL Server to be backed up with the
CHECKSUMoption enabled. - The SAS token that LRS will use must be generated for the entire Azure Blob Storage container, and it must have only read and list permissions.
- Backup files for different databases must be placed in separate folders on Blob Storage.
- Backup files containing % and $ characters in the file name cannot be consumed by LRS. Consider renaming such file names.
- Placing backups into subfolders for an individual database is not supported. All backups for a single database must be placed in the root of a single folder.
- In case of multiple databases, backup files must be placed in a separate folder for each database. LRS must be started separately for each database pointing to the full URI path containing an individual database folder.
- LRS can support up to 100 simultaneous restore processes per single managed instance.
Troubleshooting
After you start LRS, use the monitoring cmdlet (get-azsqlinstancedatabaselogreplay or az_sql_midb_log_replay_show) to see the status. If LRS fails to start after some time and you get an error, check for the most common issues:
- Does an existing database on SQL Managed Instance have the same name as the one you’re trying to migrate from SQL Server? Resolve this conflict by renaming one of databases.
- Was the database backup on SQL Server made via the CHECKSUM option?
- Are the permissions on the SAS token only read and list for LRS?
- Did you copy the SAS token for LRS after the question mark (?), with content starting like this: sv=2020-02-10…?
- Is the SAS token validity time applicable for the time window of starting and completing the migration? There might be mismatches due to the different time zones used for SQL Managed Instance and the SAS token. Try regenerating the SAS token and extending the token validity of the time window before and after the current date.
- Are the database name, resource group name, and managed instance name spelled correctly?
- If you started LRS in autocomplete mode, was a valid filename for the last backup file specified?
Disclaimer:
The views expressed and the content shared in all published articles on this website are solely those of the respective authors, and they do not necessarily reflect the views of the author’s employer or the techbeatly platform. We strive to ensure the accuracy and validity of the content published on our website. However, we cannot guarantee the absolute correctness or completeness of the information provided. It is the responsibility of the readers and users of this website to verify the accuracy and appropriateness of any information or opinions expressed within the articles. If you come across any content that you believe to be incorrect or invalid, please contact us immediately so that we can address the issue promptly.
Tags:
Latest posts


Comments
3 Responses
Leave a Reply
[…] Part 1: Introduction and requirements […]
[…] Part 1: Introduction and requirements […]
[…] Part 1: Introduction and requirements (This article) […]