
Automation / AWS / DevOps / Jenkins
Ultimate Guide to Deploying a Jenkins Multinode Cluster on AWS with Linux and Windows Slave Nodes
Jenkins is an open-source automation server that helps automate parts of the software development process, including building, testing, and deploying software. It provides a platform for continuous integration and delivery, allowing developers to quickly and easily build, test, and deploy their code. Jenkins can help improve software quality, reduce manual errors, and increase productivity for development teams.
Benefits of Using Jenkins
- Continuous Integration: Jenkins automates the process of building and testing code changes as soon as they are committed to a shared repository. This helps identify and fix issues early in the development cycle, reducing the risk of bugs and errors in the final product.
- Continuous Delivery: Jenkins automates the deployment of software to production, making it faster and easier to release new features and updates. This helps organizations stay competitive by delivering new functionality to customers more quickly.
- Customizable: Jenkins provides a vast library of plugins and integrations that allow developers to customize the platform to their specific needs. This includes plugins for source control management, testing frameworks, and deployment tools.
- Open-Source: Jenkins is free and open-source software, meaning that anyone can use, modify, and distribute it without any licensing fees. This makes Jenkins accessible to small and large organizations alike and helps foster a vibrant community of contributors who can improve and enhance the platform over time.
Deploying Jenkins Multinode Cluster on AWS
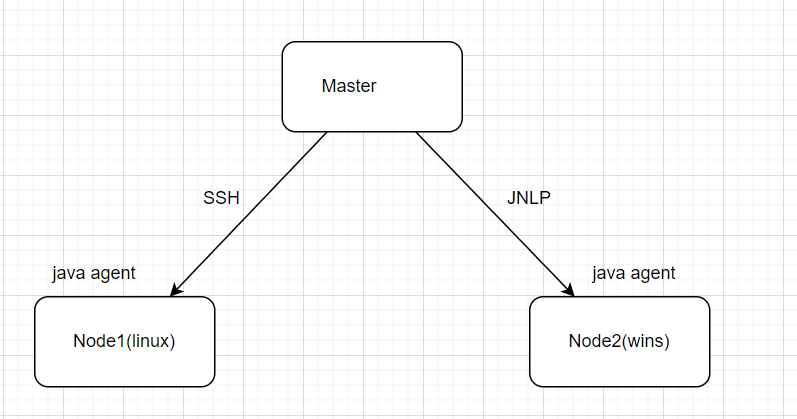
In this we are going to create 3 instances, of which one will be a master node on which Jenkins is deployed for this am using a Linux instance and the other two will be windows and Linux, both will be slave nodes that will be attached to the master.
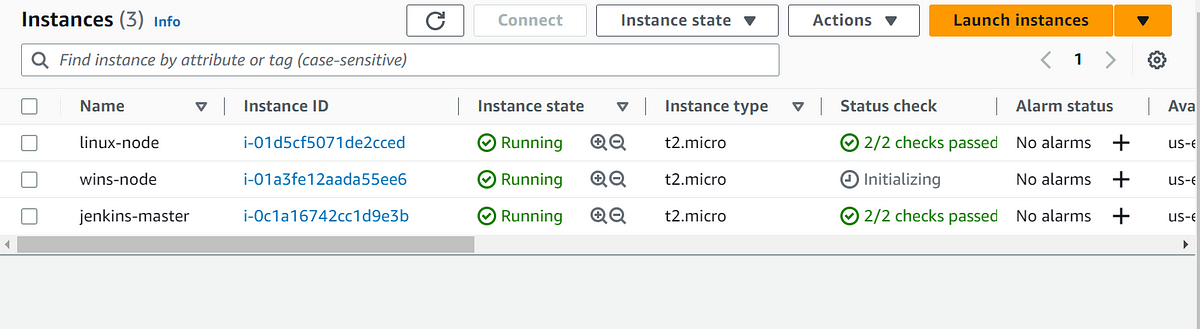
Here I have already deployed three AWS instances two Linux and one Windows
Steps to deploy Jenkins on Linux VM:
- First, we need to configure the yum repository to install Jenkins and the java package, using the below command:
these commands will configure the yum repository and import the rpm keys.
[root@ip-172-31-53-78 ~]# wget -O /etc/yum.repos.d/jenkins.repo https://pkg.jenkins.io/redhat-stable/jenkins.repo
--2023-03-19 09:34:47--  https://pkg.jenkins.io/redhat-stable/jenkins.repo
Resolving pkg.jenkins.io (pkg.jenkins.io)... 146.75.34.133, 2a04:4e42:78::645
Connecting to pkg.jenkins.io (pkg.jenkins.io)|146.75.34.133|:443... connected.
HTTP request sent, awaiting response... 200 OK
Length: 85
Saving to: '/etc/yum.repos.d/jenkins.repo'

/etc/yum.repos.d/jenkins.repo         100%[=========================================================================>]      85  --.-KB/s    in 0s

2023-03-19 09:34:47 (5.42 MB/s) - '/etc/yum.repos.d/jenkins.repo' saved [85/85]

[root@ip-172-31-53-78 ~]# rpm --import https://pkg.jenkins.io/redhat-stable/jenkins.io.key
[root@ip-172-31-53-78 ~]# cat /etc/yum.repos.d/jenkins.repo
[jenkins]
name=Jenkins-stable
baseurl=http://pkg.jenkins.io/redhat-stable
gpgcheck=1
[root@ip-172-31-53-78 ~]#
2. Once, yum got configured we can install java (openjdk) and Jenkins Package. We must need java installed on all the nodes whether it’s a master or slave node as Jenkins is developed using Java.
[root@ip-172-31-53-78 ~]# yum install fontconfig java-11-openjdk
Updating Subscription Management repositories.
Unable to read consumer identity

This system is not registered with an entitlement server. You can use subscription-manager to register.

Jenkins-stable                                                                                                           90 kB/s |  26 kB     00:00
Dependencies resolved.
========================================================================================================================================================
 Package                                      Architecture     Version                                       Repository                            Size
========================================================================================================================================================
Installing:
 fontconfig                                   x86_64           2.14.0-2.el9_1                                rhel-9-appstream-rhui-rpms           301 k
 java-11-openjdk                              x86_64           1:11.0.18.0.10-2.el9_1                        rhel-9-appstream-rhui-rpms           443 k
Installing dependencies:
 ModemManager-glib                            x86_64           1.18.2-3.el9                                  rhel-9-baseos-rhui-rpms              304 k
 adwaita-cursor-theme                         noarch           40.1.1-3.el9                                  rhel-9-appstream-rhui-rpms           655 k
 adwaita-icon-theme                           noarch           40.1.1-3.el9                                  rhel-9-appstream-rhui-rpms            12 M
 alsa-lib                                     x86_64           1.2.7.2-1.el9                                 rhel-9-appstream-rhui-rpms           522 k
 at-spi2-atk                                  x86_64           2.38.0-4.el9
                                rhel-9-appstream-rhui-rpms            90 k
[root@ip-172-31-53-78 ~]# yum install jenkins -y
Updating Subscription Management repositories.
Unable to read consumer identity

This system is not registered with an entitlement server. You can use subscription-manager to register.

Last metadata expiration check: 0:01:49 ago on Sun 19 Mar 2023 09:38:09 AM UTC.
Dependencies resolved.
========================================================================================================================================================
 Package                            Architecture                      Version                                  Repository                          Size
========================================================================================================================================================
Installing:
 jenkins                            noarch                            2.387.1-1.1                              jenkins                             94 M

Transaction Summary
========================================================================================================================================================
Install  1 Package

Total download size: 94 M
Installed size: 94 M
Downloading Packages:
jenkins-2.387.1-1.1.noarch.rpm                                                                                           11 MB/s |  94 MB     00:08
--------------------------------------------------------------------------------------------------------------------------------------------------------
Total                                                                                                                    11 MB/s |  94 MB     00:08
Running transaction check
Transaction check succeeded.
Running transaction test
Transaction test succeeded.
Running transaction
  Preparing        :                                                                                                                                1/1
  Running scriptlet: jenkins-2.387.1-1.1.noarch                                                                                                     1/1
  Installing       : jenkins-2.387.1-1.1.noarch                                                                                                     1/1
  Running scriptlet: jenkins-2.387.1-1.1.noarch                                                                                                     1/1
  Verifying        : jenkins-2.387.1-1.1.noarch                                                                                                     1/1
Installed products updated.

Installed:
  jenkins-2.387.1-1.1.noarch

Complete!
[root@ip-172-31-53-78 ~]#
To verify whether java is installed or not. We can use the below command
[root@ip-172-31-53-78 ~]# java --version
openjdk 11.0.18 2023-01-17 LTS
OpenJDK Runtime Environment (Red_Hat-11.0.18.0.10-2.el9_1) (build 11.0.18+10-LTS)
OpenJDK 64-Bit Server VM (Red_Hat-11.0.18.0.10-2.el9_1) (build 11.0.18+10-LTS, mixed mode, sharing)
[root@ip-172-31-53-78 ~]#
Once the java and Jenkins got installed we need to start the Jenkins service
[root@ip-172-31-53-78 ~]# systemctl start jenkins
[root@ip-172-31-53-78 ~]# systemctl status jenkins
● jenkins.service - Jenkins Continuous Integration Server
Loaded: loaded (/usr/lib/systemd/system/jenkins.service; disabled; vendor preset: disabled)
Active: active (running) since Sun 2023-03-19 09:44:05 UTC; 13s ago
Main PID: 11896 (java)
Tasks: 43 (limit: 5704)
Memory: 347.1M
CPU: 56.627s
CGroup: /system.slice/jenkins.service
└─11896 /usr/bin/java -Djava.awt.headless=true -jar /usr/share/java/jenkins.war --webroot=/var/cache/jenkins/war --httpPort=8080
Mar 19 09:43:18 ip-172-31-53-78.ec2.internal jenkins[11896]: a1283d0925c64152a2a907d84bd0bd19
Mar 19 09:43:18 ip-172-31-53-78.ec2.internal jenkins[11896]: This may also be found at: /var/lib/jenkins/secrets/initialAdminPassword
Mar 19 09:43:18 ip-172-31-53-78.ec2.internal jenkins[11896]: *************************************************************
Mar 19 09:43:18 ip-172-31-53-78.ec2.internal jenkins[11896]: *************************************************************
Mar 19 09:43:18 ip-172-31-53-78.ec2.internal jenkins[11896]: *************************************************************
Mar 19 09:44:05 ip-172-31-53-78.ec2.internal jenkins[11896]: 2023-03-19 09:44:05.602+0000 [id=29] INFO jenkins.InitReactorRunner$1#onAtta>
Mar 19 09:44:05 ip-172-31-53-78.ec2.internal jenkins[11896]: 2023-03-19 09:44:05.639+0000 [id=22] INFO hudson.lifecycle.Lifecycle#onReady>
Mar 19 09:44:05 ip-172-31-53-78.ec2.internal systemd[1]: Started Jenkins Continuous Integration Server.
Mar 19 09:44:05 ip-172-31-53-78.ec2.internal jenkins[11896]: 2023-03-19 09:44:05.742+0000 [id=44] INFO h.m.DownloadService$Downloadable#l>
Mar 19 09:44:05 ip-172-31-53-78.ec2.internal jenkins[11896]: 2023-03-19 09:44:05.743+0000 [id=44] INFO hudson.util.Retrier#start: Perform>
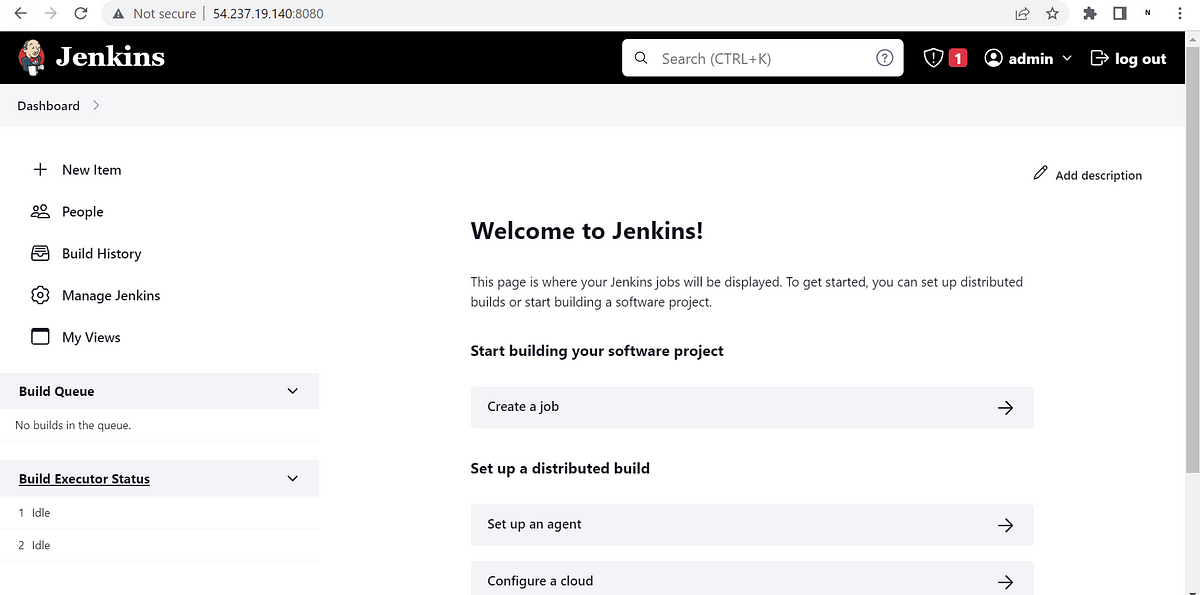
[root@ip-172-31-53-78 ~]#To connect with Jenkins Server we can use any browser and Jenkins uses Port 8080 by default
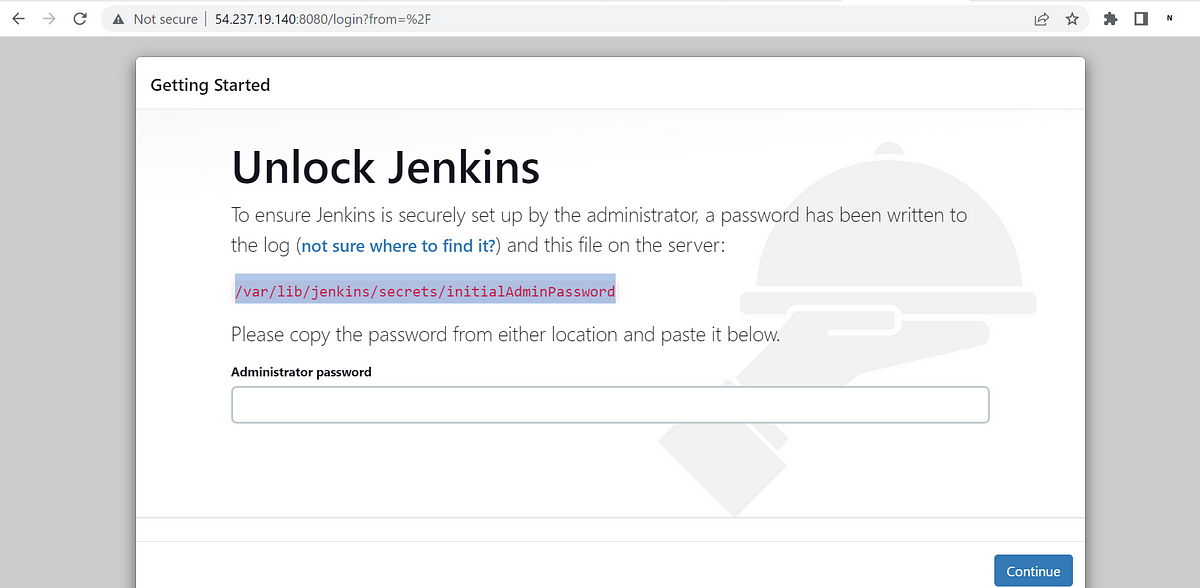
Jenkins is up and running, we are able to connect with Jenkins but we need to pick the Admin password from the location which is mentioned by Jenkins
[root@ip-172-31-53-78 ~]# cat /var/lib/jenkins/secrets/initialAdminPassword
a1283d0925c64152a2a907d84bd0bd19
[root@ip-172-31-53-78 ~]#
By using this Credential we can log in to the Jenkins server and it will ask you to set up an account
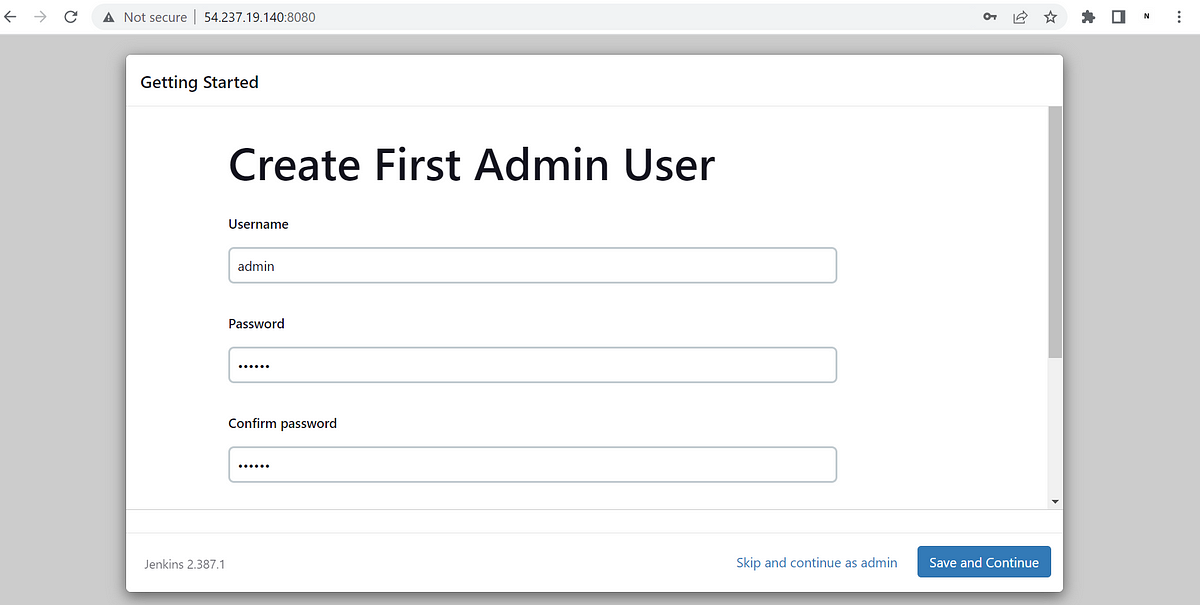
Now, Jenkins Master is deployed.
To Add the Linux node as a slave node in the cluster we need to go to “manage Jenkins”, then “Manage Nodes and Cloud”
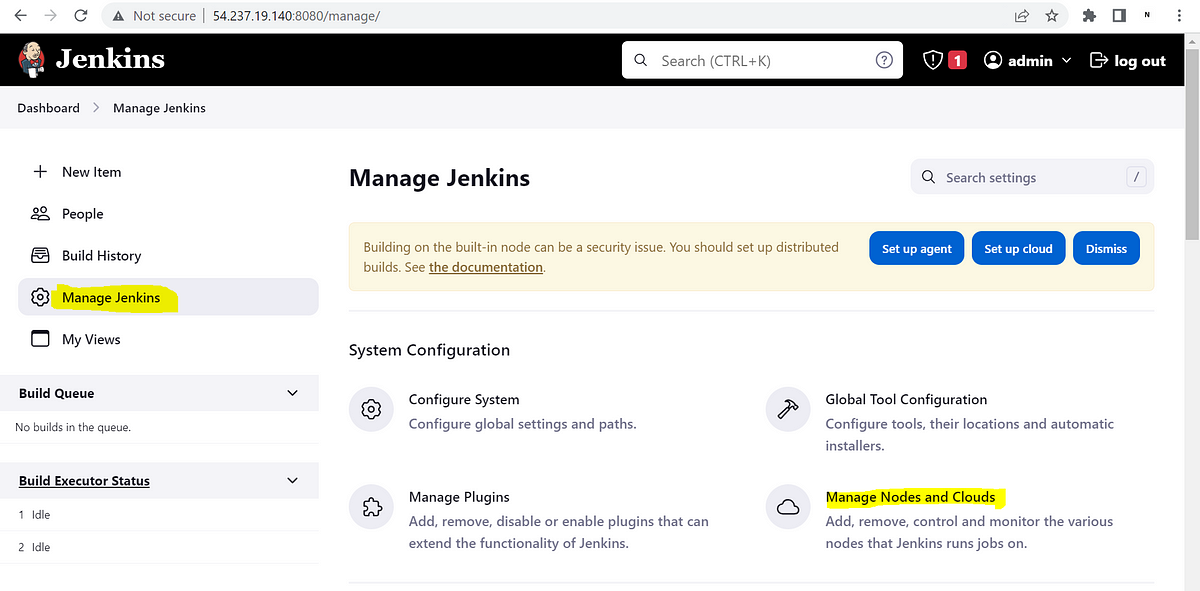
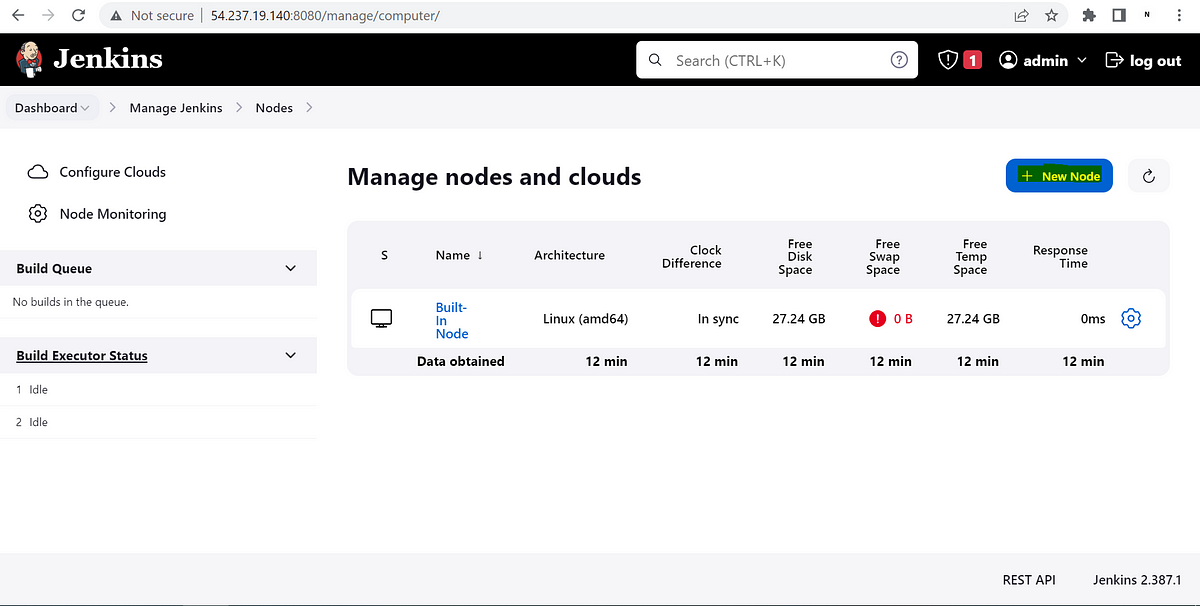
Here Master node information is shown and to add a new node need to click on the “New Node” option
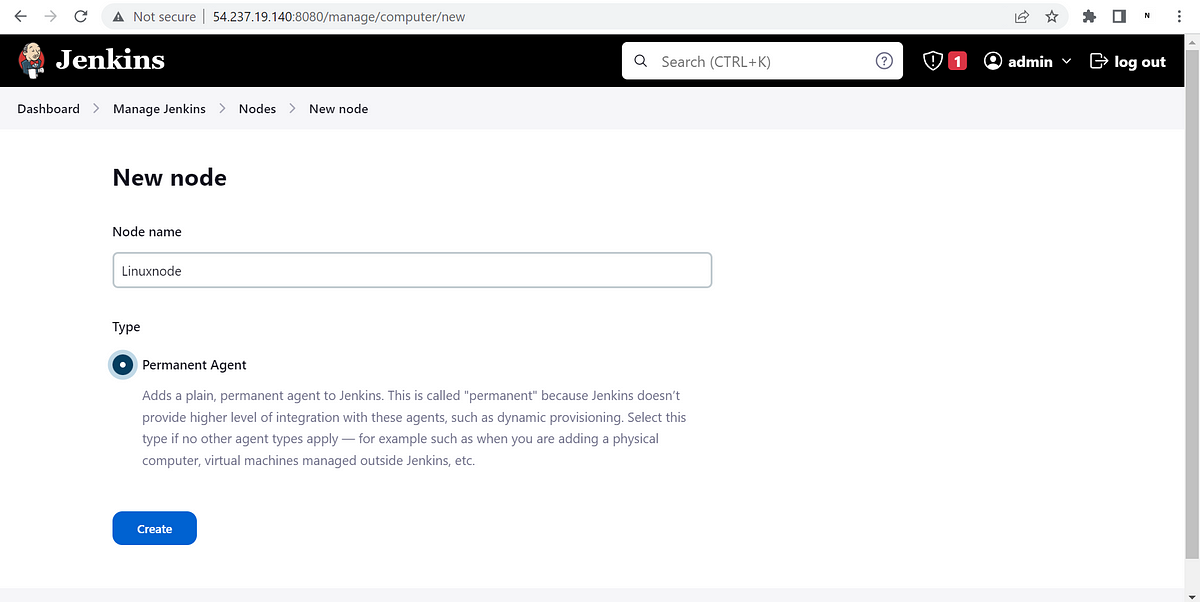
We need to provide the node name and click on create then we need to provide information number of executors, Remote root directory, launch method etc.

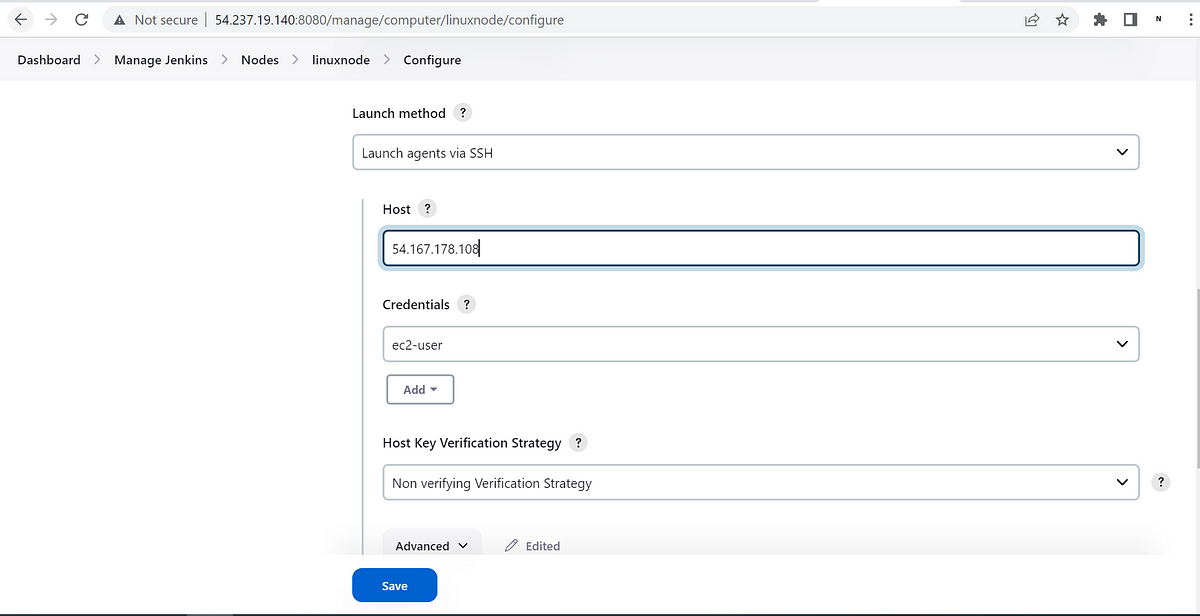
Java needs to be installed on the Linux node as Jenkins will send a java agent which will be launched on the slave node to establish a connection and performs an action on the slave node.

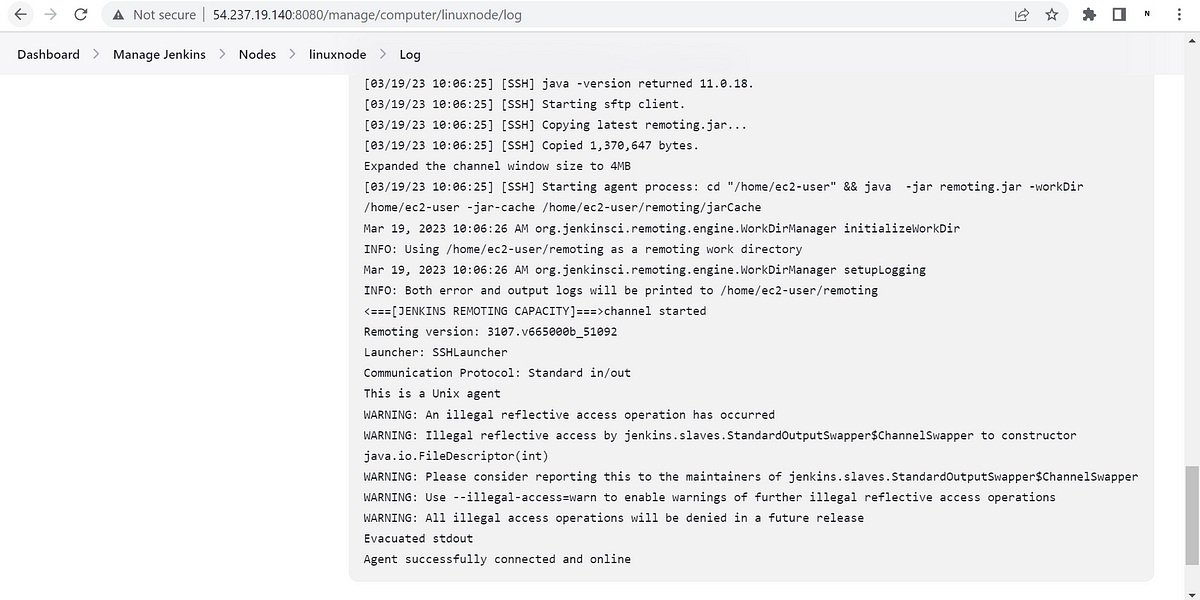
In the above screenshots, Jenkins sent a Java agent on the Linux node to establish a connection, Once a node got connected it will show like this in Jenkins master.
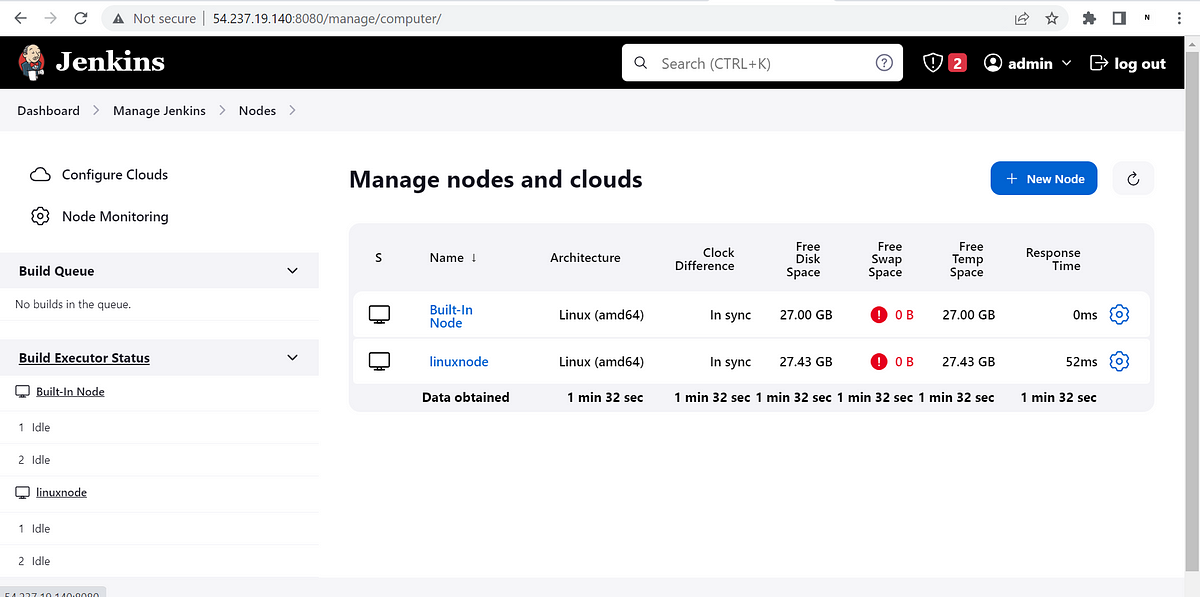
Now Linux node is connected to the master and it has two executors just like the master.
Executors mean how many jobs can be run on the node parallelly so now both the nodes master and slave node can run 2 jobs each.
Now, it’s time to attach the Windows node. Before adding the node let me explain to you the use of adding two different OS nodes in the Jenkins cluster.
Sometimes there might be a use case in which we need a windows machine to perform some action for that kind of action we can’t perform on Linux nodes so we can bind any job to that specific node to perform the action.
To add a windows node we need to go into manage Jenkins and manage node & cloud just like we did for the Linux node but we need to change the launch method for Linux SSH will be used to transfer the agent but in the case of windows we can’t use SSH so for that we need to use JNLP protocol and we need to manually run the command on windows node to connect it with the master.
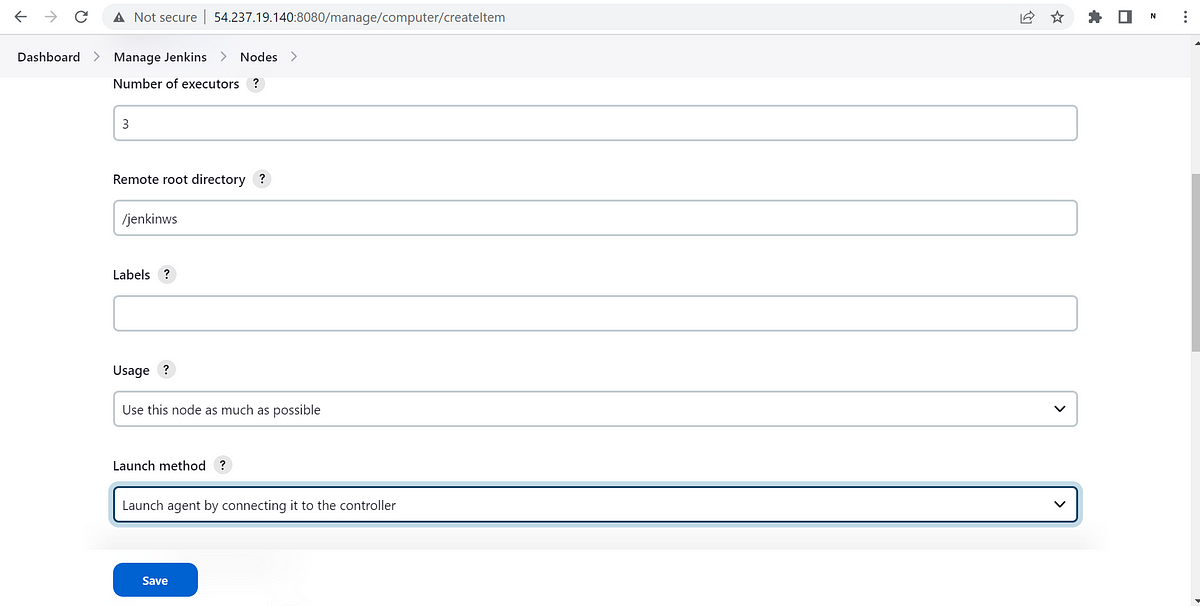
For windows, I have selected 3 executors and the launch method will be “Launch agent by connecting it to the controller”
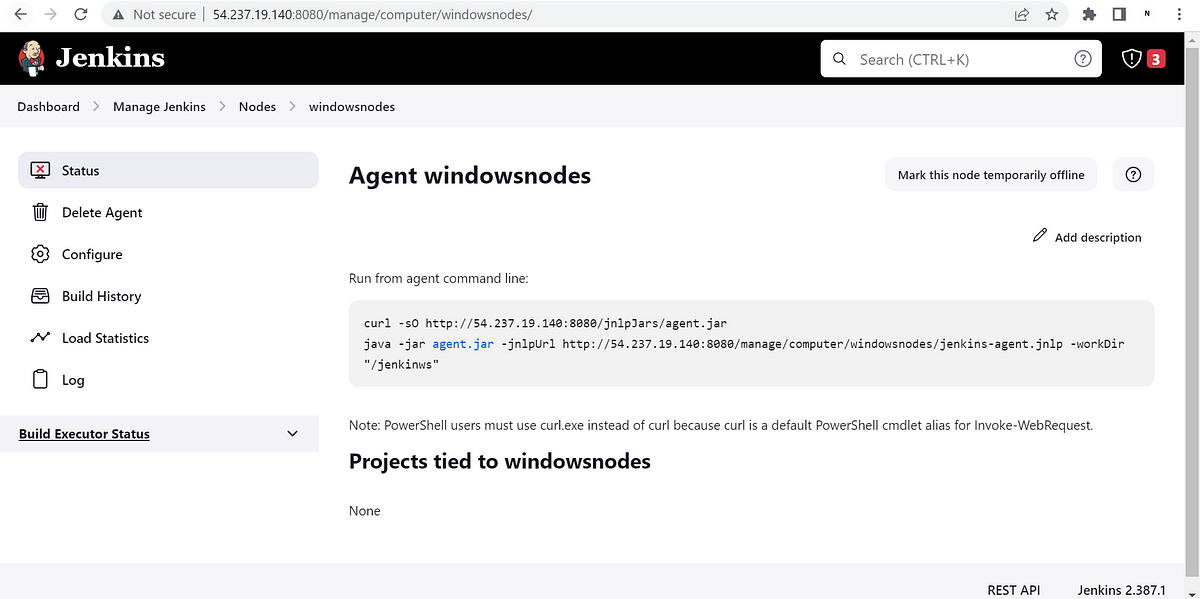
Once we will click on save it will show us the command to download the agent and launch it on the windows node on windows also we need to install Java before running these commands.
C:\Users\Administrator>java -version
openjdk version "11.0.18" 2023-01-17
OpenJDK Runtime Environment OpenLogic-OpenJDK (build 11.0.18+10-adhoc..jdk11u)
OpenJDK 64-Bit Server VM OpenLogic-OpenJDK (build 11.0.18+10-adhoc..jdk11u, mixed mode)
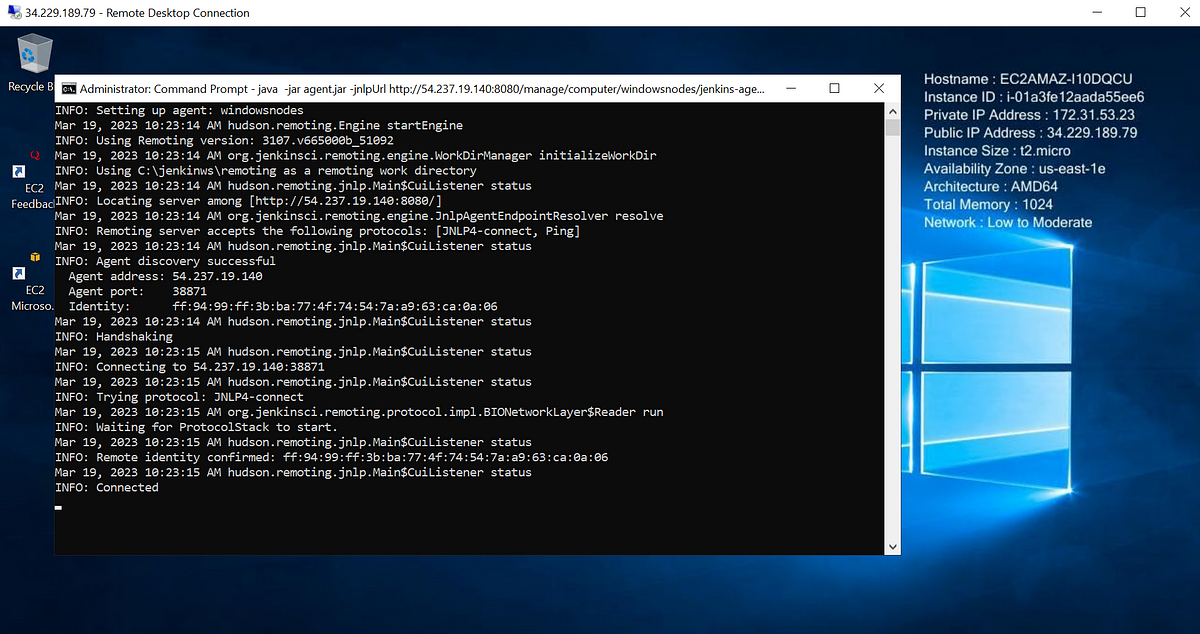
C:\Users\Administrator>curl -sO http://54.237.19.140:8080/jnlpJars/agent.jar
C:\Users\Administrator>java -jar agent.jar -jnlpUrl http://54.237.19.140:8080/manage/computer/windowsnodes/jenkins-agent.jnlp -workDir "/jenkinws"
Mar 19, 2023 10:23:13 AM org.jenkinsci.remoting.engine.WorkDirManager initializeWorkDir
INFO: Using \jenkinws\remoting as a remoting work directory
Mar 19, 2023 10:23:13 AM org.jenkinsci.remoting.engine.WorkDirManager setupLogging
INFO: Both error and output logs will be printed to \jenkinws\remoting
Mar 19, 2023 10:23:14 AM hudson.remoting.jnlp.Main createEngine
INFO: Setting up agent: windowsnodes
Mar 19, 2023 10:23:14 AM hudson.remoting.Engine startEngine
INFO: Using Remoting version: 3107.v665000b_51092
Mar 19, 2023 10:23:14 AM org.jenkinsci.remoting.engine.WorkDirManager initializeWorkDir
INFO: Using C:\jenkinws\remoting as a remoting work directory
Mar 19, 2023 10:23:14 AM hudson.remoting.jnlp.Main$CuiListener status
INFO: Locating server among [http://54.237.19.140:8080/]
Mar 19, 2023 10:23:14 AM org.jenkinsci.remoting.engine.JnlpAgentEndpointResolver resolve
INFO: Remoting server accepts the following protocols: [JNLP4-connect, Ping]
Mar 19, 2023 10:23:14 AM hudson.remoting.jnlp.Main$CuiListener status
INFO: Agent discovery successful
Agent address: 54.237.19.140
Agent port: 38871
Identity: ff:94:99:ff:3b:ba:77:4f:74:54:7a:a9:63:ca:0a:06
Mar 19, 2023 10:23:14 AM hudson.remoting.jnlp.Main$CuiListener status
INFO: Handshaking
Mar 19, 2023 10:23:15 AM hudson.remoting.jnlp.Main$CuiListener status
INFO: Connecting to 54.237.19.140:38871
Mar 19, 2023 10:23:15 AM hudson.remoting.jnlp.Main$CuiListener status
INFO: Trying protocol: JNLP4-connect
Mar 19, 2023 10:23:15 AM org.jenkinsci.remoting.protocol.impl.BIONetworkLayer$Reader run
INFO: Waiting for ProtocolStack to start.
Mar 19, 2023 10:23:15 AM hudson.remoting.jnlp.Main$CuiListener status
INFO: Remote identity confirmed: ff:94:99:ff:3b:ba:77:4f:74:54:7a:a9:63:ca:0a:06
Mar 19, 2023 10:23:15 AM hudson.remoting.jnlp.Main$CuiListener status
INFO: ConnectedIt shows node is now connected with the Jenkins master.
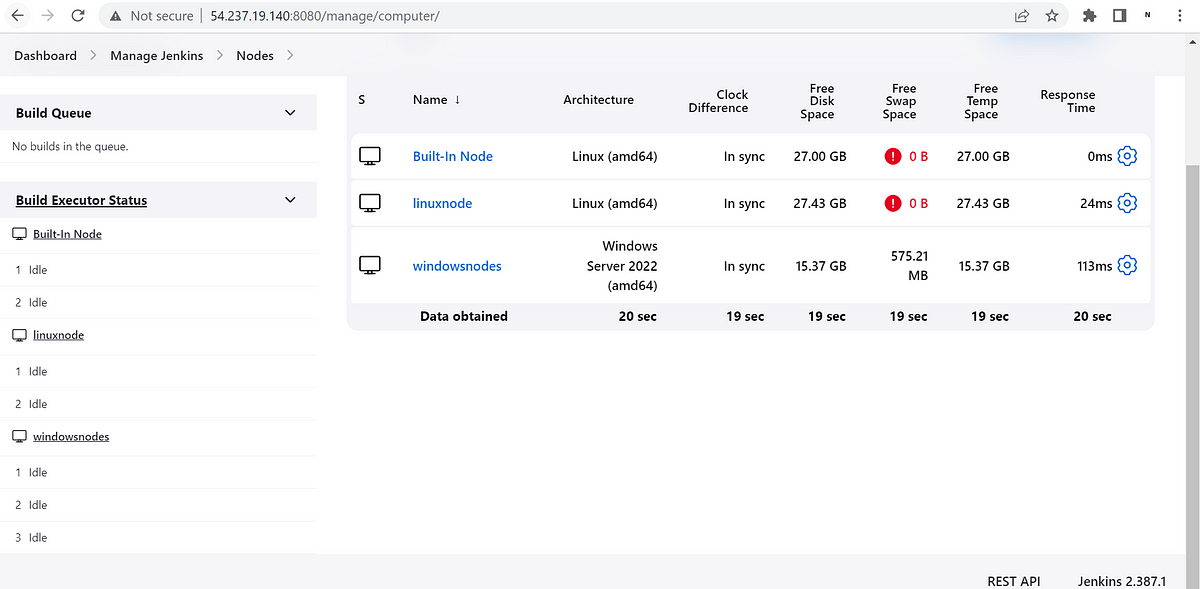
Now all the nodes are connected and we can see different executors for each node on the left side.
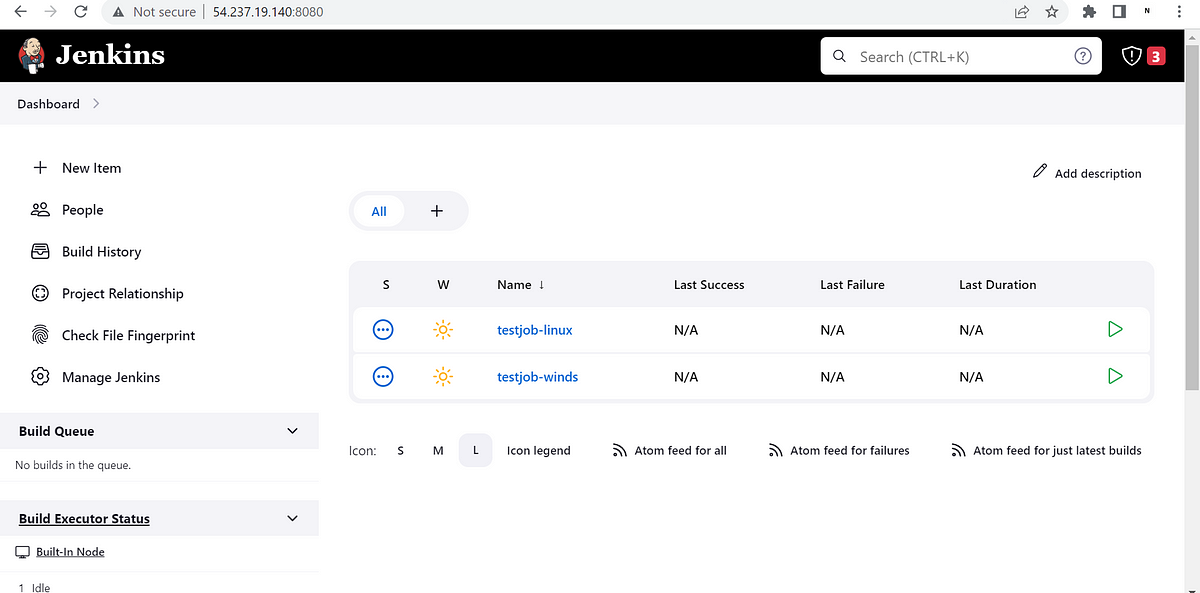
It’s time to test the cluster by running different jobs on each
Here am creating a freestyle job for testing the Linux node.
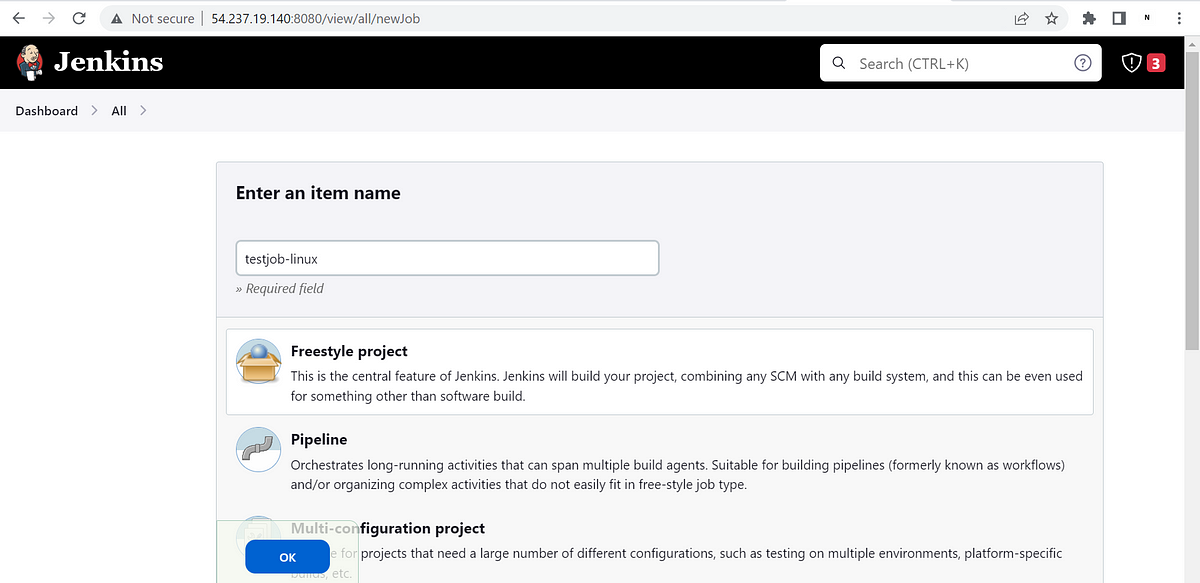
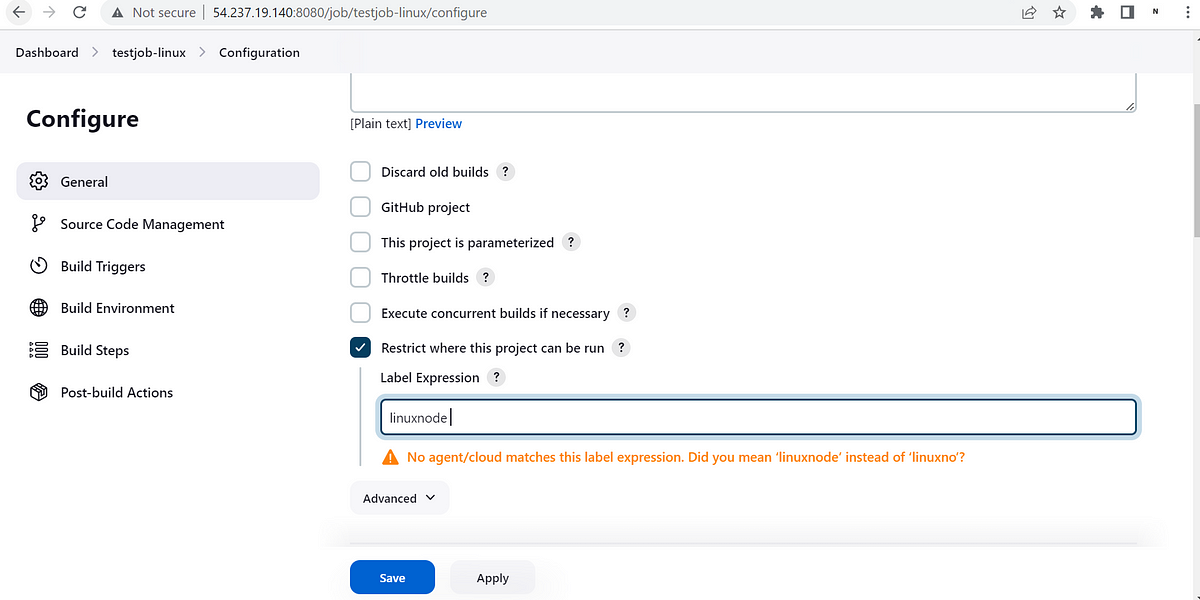
Here am restricting the job to run on only the Linux node.
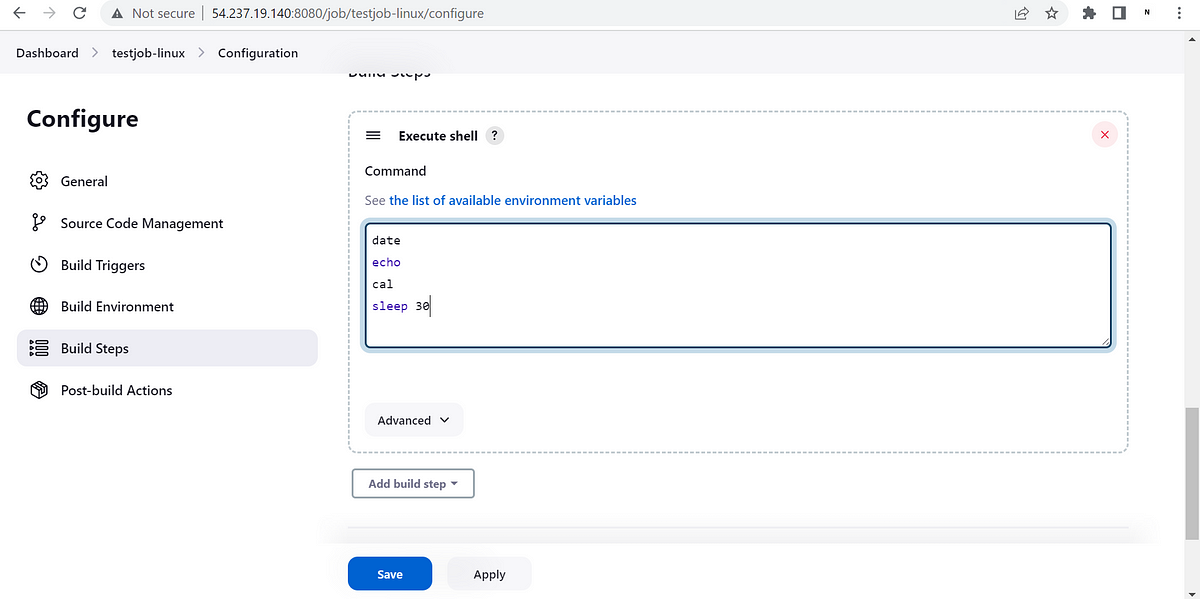
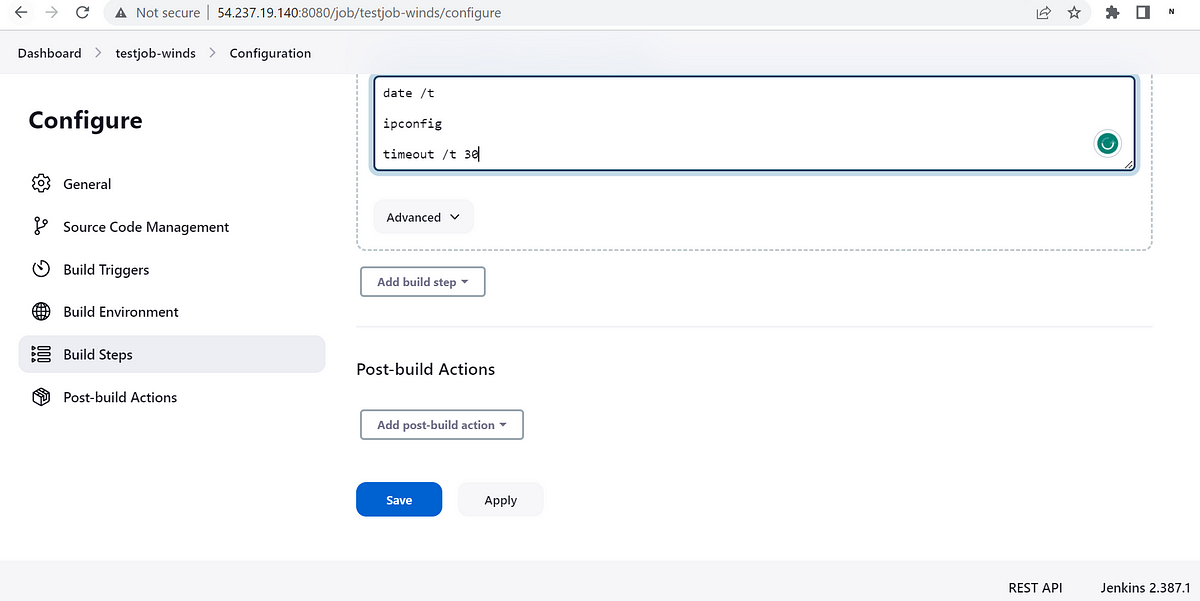
adding some shell commands to test the job
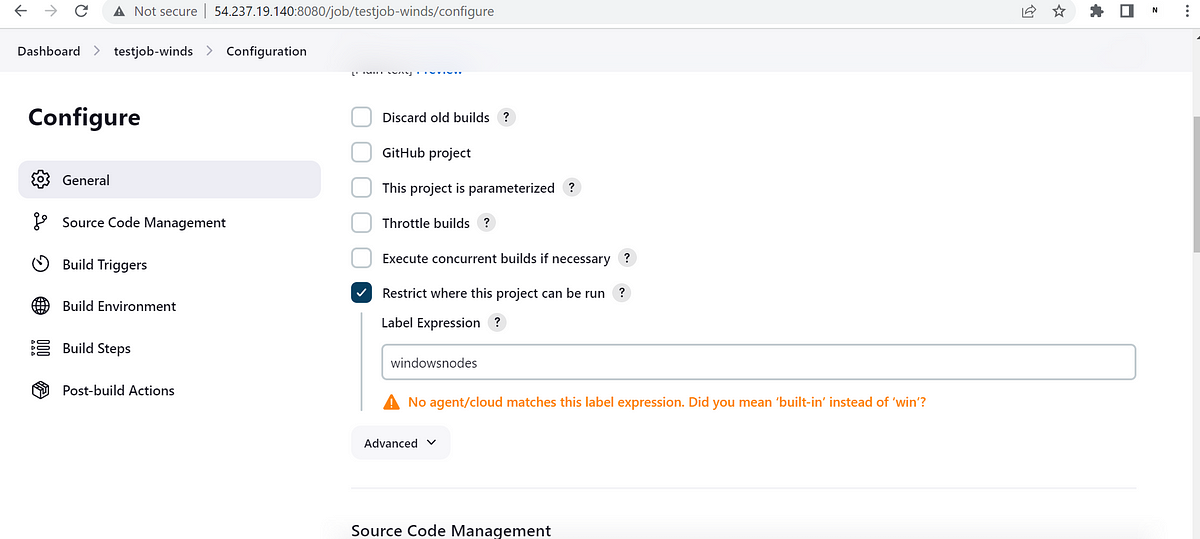
In the same way, I am creating a job for windows that will be restricted to running on windows node only and there, I will run the windows batch commands.
Now both the jobs are ready and will trigger at the same time and both jobs will be running on their respective nodes.
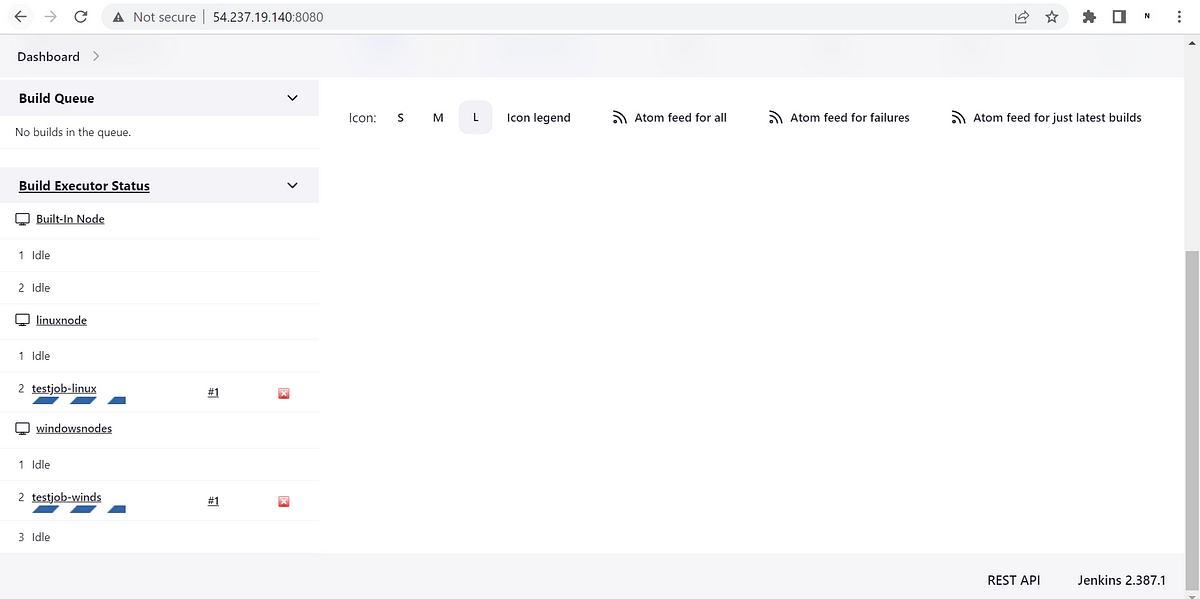
Here we can see both jobs are running on their respective restricted node.
Console output of job which ran on Linux node
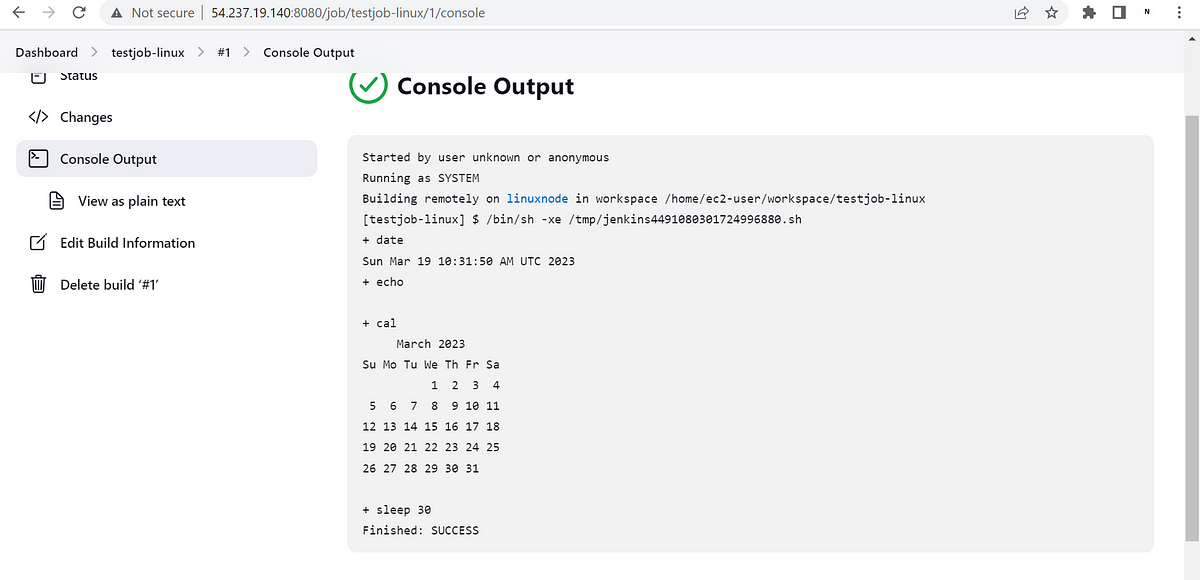
In the above screenshot, we can verify that this job runs on a Linux node
This job got failed timeout command got failed.
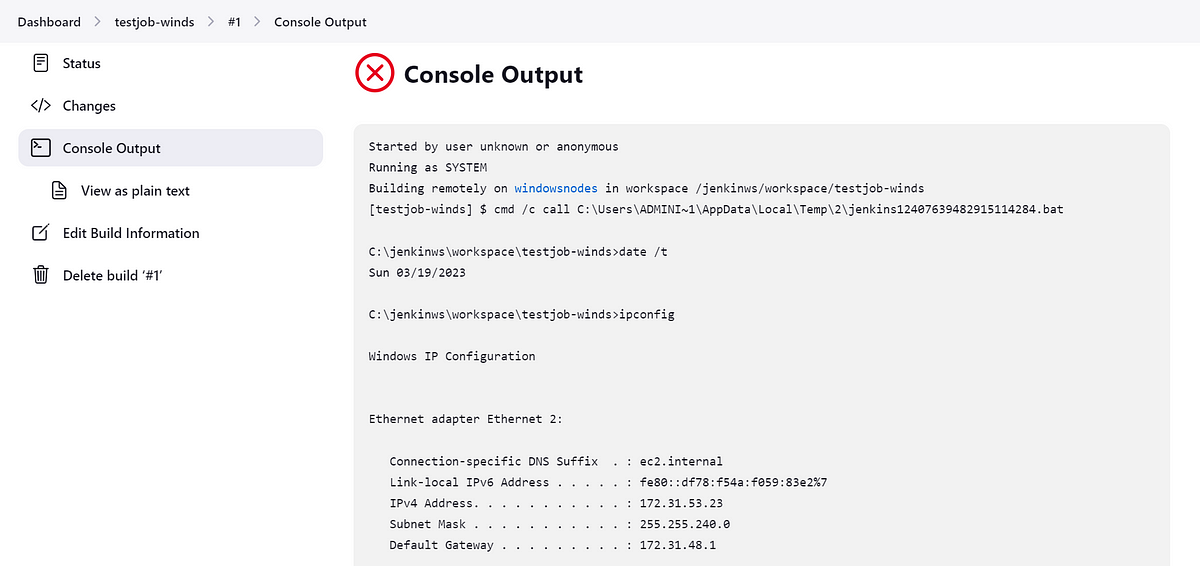
Here is the windows command output and we can see that it also runs on the windows node only.
Advantages of a multimode cluster of Jenkins:
- A Jenkins multinode cluster with Linux and Windows OS provides greater flexibility for developers to build, test and deploy software across a wider range of environments.
- By adding more nodes to the Jenkins cluster, teams can increase their computing power and speed up build and deployment times, leading to faster releases and improved productivity.
- With both Linux and Windows nodes in the cluster, developers can build and test their code on multiple platforms simultaneously, which helps ensure that their software works correctly across different environments.
- The cluster architecture also provides greater reliability and fault tolerance, as the workload can be distributed across multiple nodes, reducing the risk of downtime or failure.
By deploying a Jenkins multinode cluster with Linux and Windows slave nodes in AWS, development teams can achieve faster release cycles, improved software quality, and greater flexibility in building and testing their code. With Jenkins, teams can automate their software delivery pipeline and optimize their development process, helping them stay competitive in today’s fast-paced technology landscape
Disclaimer:
The views expressed and the content shared in all published articles on this website are solely those of the respective authors, and they do not necessarily reflect the views of the author’s employer or the techbeatly platform. We strive to ensure the accuracy and validity of the content published on our website. However, we cannot guarantee the absolute correctness or completeness of the information provided. It is the responsibility of the readers and users of this website to verify the accuracy and appropriateness of any information or opinions expressed within the articles. If you come across any content that you believe to be incorrect or invalid, please contact us immediately so that we can address the issue promptly.
Tags:
Latest posts


Comments
Leave a Reply