
Automation / AWS / DevOps / Docker / How To / Infrastructre & Hardware / Jenkins
Dynamic Provisioning for Jenkins Clusters: A Practical Guide Using Docker on AWS
Dynamic provisioning in Jenkins clusters:
In Jenkins multinode clusters with static nodes, a significant disadvantage is that if there are no jobs coming to Jenkins, the slave nodes will continue running, resulting in unnecessary resource wastage. To overcome this problem, we can utilize the concept of dynamic provisioning in Jenkins.
Dynamic provisioning offers a solution where, upon the arrival of a job to the Jenkins master node, it dynamically launches a slave node to process the job. Once the job is completed, Jenkins automatically terminates the slave node, preventing resource wastage.
There are various tools and platforms that can be used for dynamic provisionings in Jenkins, such as AWS, VMware, Docker, Kubernetes, and more. These platforms enable the seamless creation and destruction of slave nodes based on job demand, ensuring optimal resource utilization within the Jenkins cluster.
By implementing dynamic provisioning, Jenkins clusters become more efficient, as resources are provisioned on-demand, reducing idle time and unnecessary resource consumption. This approach improves scalability and cost-effectiveness, making the cluster more responsive to varying workloads.
Benefits of using Docker for dynamic provisioning:
- Streamlined Resource Utilization: Docker enables efficient utilization of resources by dynamically provisioning Jenkins slave nodes only when required, minimizing resource waste during idle periods.
- Rapid Provisioning: Docker’s lightweight containerization allows for quick and automated provisioning of Jenkins slave containers, reducing the time it takes to scale the Jenkins cluster.
- Portability and Consistency: Docker’s container-based approach ensures consistent environments across different deployments, enabling easy replication of Jenkins slave nodes with the same configurations and dependencies.
- Scalability and Flexibility: Docker provides seamless scaling capabilities, allowing Jenkins clusters to dynamically scale up or down based on workload demands, ensuring optimal performance and resource allocation.
- Isolation and Security: Docker containers offer isolation between Jenkins slave nodes, ensuring that jobs are executed within their own secure and isolated environments, reducing the risk of conflicts and ensuring data privacy.
- Ecosystem Integration: Docker integrates well with other DevOps tools and platforms, such as orchestration frameworks like Kubernetes, enabling comprehensive automation and management of the Jenkins cluster ecosystem.
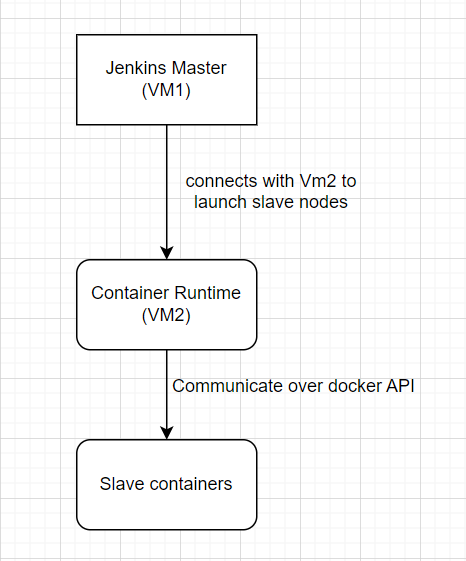
In this blog, we will guide you through the process of configuring a Jenkins Cluster with dynamic provisioning using the Docker engine. We will specifically focus on using AWS instances for practical implementation. The setup will involve two instances: one serving as the Jenkins master and the other as the Docker engine VM.
The Jenkins master instance will be responsible for managing the Jenkins cluster and orchestrating the dynamic provisioning of slave containers. The Docker engine VM will play a vital role in launching and managing these slave containers on demand.
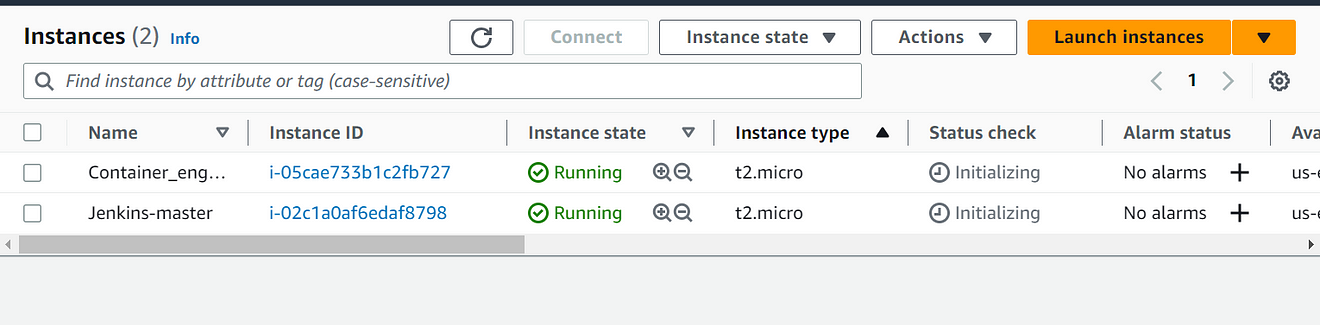
Here I have already launched two Ec2 instance
Steps to deploy Jenkins on Linux VM:
- First, we need to configure the yum repository to install Jenkins and the Java package, using the below command:
these commands will configure the Yum repository and import the rpm keys.
[root@ip-172-31-90-197 ~]# wget -O /etc/yum.repos.d/jenkins.repo https://pkg.jenkins.io/redhat-stable/jenkins.repo
--2023-06-03 07:48:32--  https://pkg.jenkins.io/redhat-stable/jenkins.repo
Resolving pkg.jenkins.io (pkg.jenkins.io)... 146.75.38.133, 2a04:4e42:78::645
Connecting to pkg.jenkins.io (pkg.jenkins.io)|146.75.38.133|:443... connected.
HTTP request sent, awaiting response... 200 OK
Length: 85
Saving to: '/etc/yum.repos.d/jenkins.repo'

/etc/yum.repos.d/jenkins.repo         100%[=========================================================================>]      85  --.-KB/s    in 0s

2023-06-03 07:48:33 (5.75 MB/s) - '/etc/yum.repos.d/jenkins.repo' saved [85/85]

[root@ip-172-31-90-197 ~]# rpm --import https://pkg.jenkins.io/redhat-stable/jenkins.io-2023.key
[root@ip-172-31-90-197 ~]# cat /etc/yum.repos.d/jenkins.repo
[jenkins]
name=Jenkins-stable
baseurl=http://pkg.jenkins.io/redhat-stable
gpgcheck=1
[root@ip-172-31-90-197 ~]#
2. Once, yum got configured we can install Java (OpenJDK) and Jenkins Package. We must need Java installed on all the nodes whether it’s a master or slave node as Jenkins is developed using Java.
[root@ip-172-31-90-197 ~]# yum install fontconfig java-11-openjdk -y
Updating Subscription Management repositories.
Unable to read consumer identity

This system is not registered with an entitlement server. You can use subscription-manager to register.

Jenkins-stable                                                                                                          164 kB/s |  26 kB     00:00
Dependencies resolved.
========================================================================================================================================================
 Package                                      Architecture     Version                                       Repository                            Size
========================================================================================================================================================
Installing:
 fontconfig                                   x86_64           2.14.0-2.el9_1                                rhel-9-appstream-rhui-rpms           301 k
 java-11-openjdk                              x86_64           1:11.0.19.0.7-4.el9                           rhel-9-appstream-rhui-rpms           443 k
Installing dependencies:
 ModemManager-glib                            x86_64           1.20.2-1.el9                                  rhel-9-baseos-rhui-rpms              337 k
 adobe-source-code-pro-fonts                  noarch           2.030.1.050-12.el9.1                          rhel-9-appstream-rhui-rpms           836 k
 adwaita-cursor-theme                         noarch           40.1.1-3.el9                                  rhel-9-appstream-rhui-rpms           655 k
[root@ip-172-31-90-197 ~]# yum install jenkins
Updating Subscription Management repositories.
Unable to read consumer identity

This system is not registered with an entitlement server. You can use subscription-manager to register.

Last metadata expiration check: 0:03:15 ago on Sat 03 Jun 2023 07:49:22 AM UTC.
Dependencies resolved.
========================================================================================================================================================
 Package                            Architecture                      Version                                  Repository                          Size
========================================================================================================================================================
Installing:
 jenkins                            noarch                            2.401.1-1.1                              jenkins                             94 M

Transaction Summary
========================================================================================================================================================
Install  1 Package

Total size: 94 M
Installed size: 94 M
Is this ok [y/N]: y
Downloading Packages:
[SKIPPED] jenkins-2.401.1-1.1.noarch.rpm: Already downloaded
Running transaction check
Transaction check succeeded.
Running transaction test
Transaction test succeeded.
Running transaction
  Preparing        :                                                                                                                                1/1
  Running scriptlet: jenkins-2.401.1-1.1.noarch                                                                                                     1/1
  Installing       : jenkins-2.401.1-1.1.noarch                                                                                                     1/1
  Running scriptlet: jenkins-2.401.1-1.1.noarch                                                                                                     1/1
  Verifying        : jenkins-2.401.1-1.1.noarch                                                                                                     1/1
Installed products updated.

Installed:
  jenkins-2.401.1-1.1.noarch

Complete!
[root@ip-172-31-90-197 ~]#
To verify whether Java is installed or not. We can use the below command
[root@ip-172-31-90-197 ~]# java --version
openjdk 11.0.19 2023-04-18 LTS
OpenJDK Runtime Environment (Red_Hat-11.0.19.0.7-2) (build 11.0.19+7-LTS)
OpenJDK 64-Bit Server VM (Red_Hat-11.0.19.0.7-2) (build 11.0.19+7-LTS, mixed mode, sharing)
[root@ip-172-31-90-197 ~]#
Once the java and Jenkins got installed we need to start the Jenkins service
[root@ip-172-31-90-197 ~]# systemctl start jenkins
[root@ip-172-31-90-197 ~]# systemctl status jenkins
● jenkins.service - Jenkins Continuous Integration Server
Loaded: loaded (/usr/lib/systemd/system/jenkins.service; disabled; preset: disabled)
Active: active (running) since Sat 2023-06-03 07:54:59 UTC; 23s ago
Main PID: 14995 (java)
Tasks: 42 (limit: 4421)
Memory: 330.8M
CPU: 47.582s
CGroup: /system.slice/jenkins.service
└─14995 /usr/bin/java -Djava.awt.headless=true -jar /usr/share/java/jenkins.war --webroot=/var/cache/jenkins/war --httpPort=8080
Jun 03 07:54:22 ip-172-31-90-197.ec2.internal jenkins[14995]: 666314ed789d4eee849d8d0c51ba7445
Jun 03 07:54:22 ip-172-31-90-197.ec2.internal jenkins[14995]: This may also be found at: /var/lib/jenkins/secrets/initialAdminPassword
Jun 03 07:54:22 ip-172-31-90-197.ec2.internal jenkins[14995]: *************************************************************
Jun 03 07:54:22 ip-172-31-90-197.ec2.internal jenkins[14995]: *************************************************************
Jun 03 07:54:22 ip-172-31-90-197.ec2.internal jenkins[14995]: *************************************************************
Jun 03 07:54:59 ip-172-31-90-197.ec2.internal jenkins[14995]: 2023-06-03 07:54:59.766+0000 [id=28] INFO jenkins.InitReactorRunner$1#onAtt>
Jun 03 07:54:59 ip-172-31-90-197.ec2.internal jenkins[14995]: 2023-06-03 07:54:59.791+0000 [id=22] INFO hudson.lifecycle.Lifecycle#onRead>
Jun 03 07:54:59 ip-172-31-90-197.ec2.internal systemd[1]: Started Jenkins Continuous Integration Server.
Jun 03 07:54:59 ip-172-31-90-197.ec2.internal jenkins[14995]: 2023-06-03 07:54:59.884+0000 [id=44] INFO h.m.DownloadService$Downloadable#>
Jun 03 07:54:59 ip-172-31-90-197.ec2.internal jenkins[14995]: 2023-06-03 07:54:59.884+0000 [id=44] INFO hudson.util.Retrier#start: Perfor>
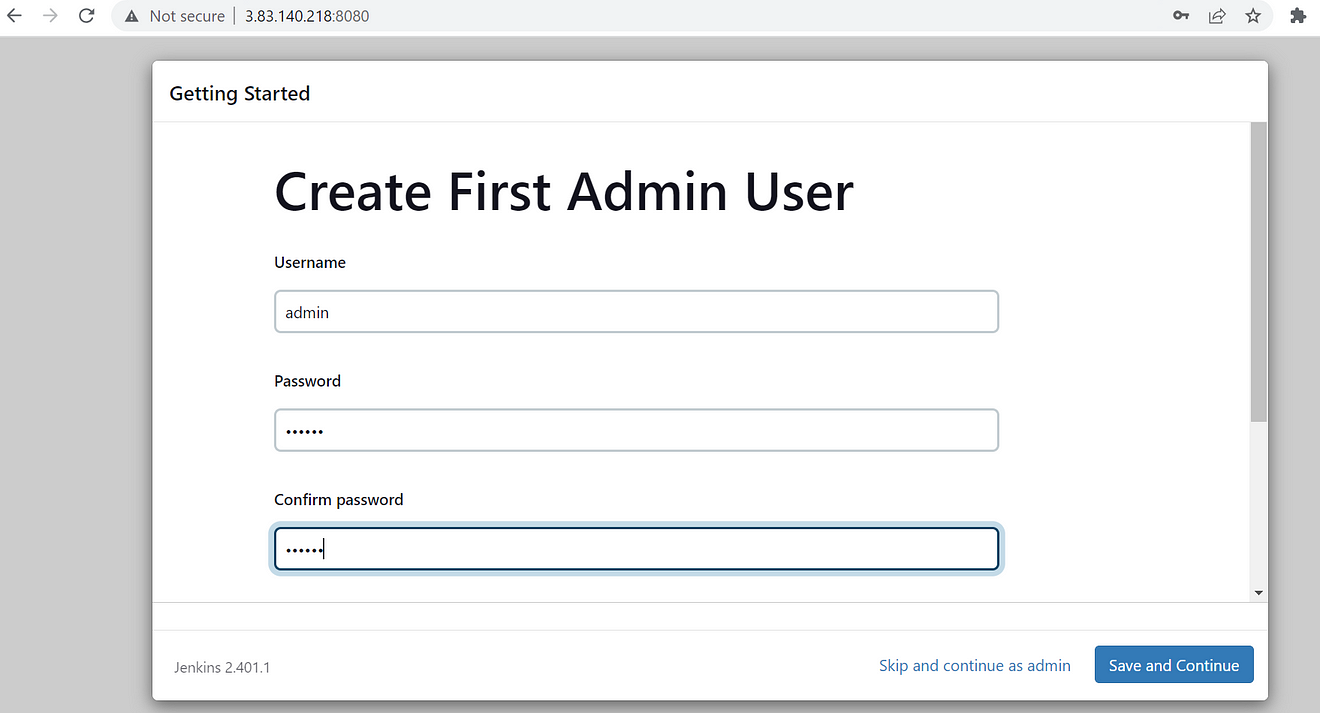
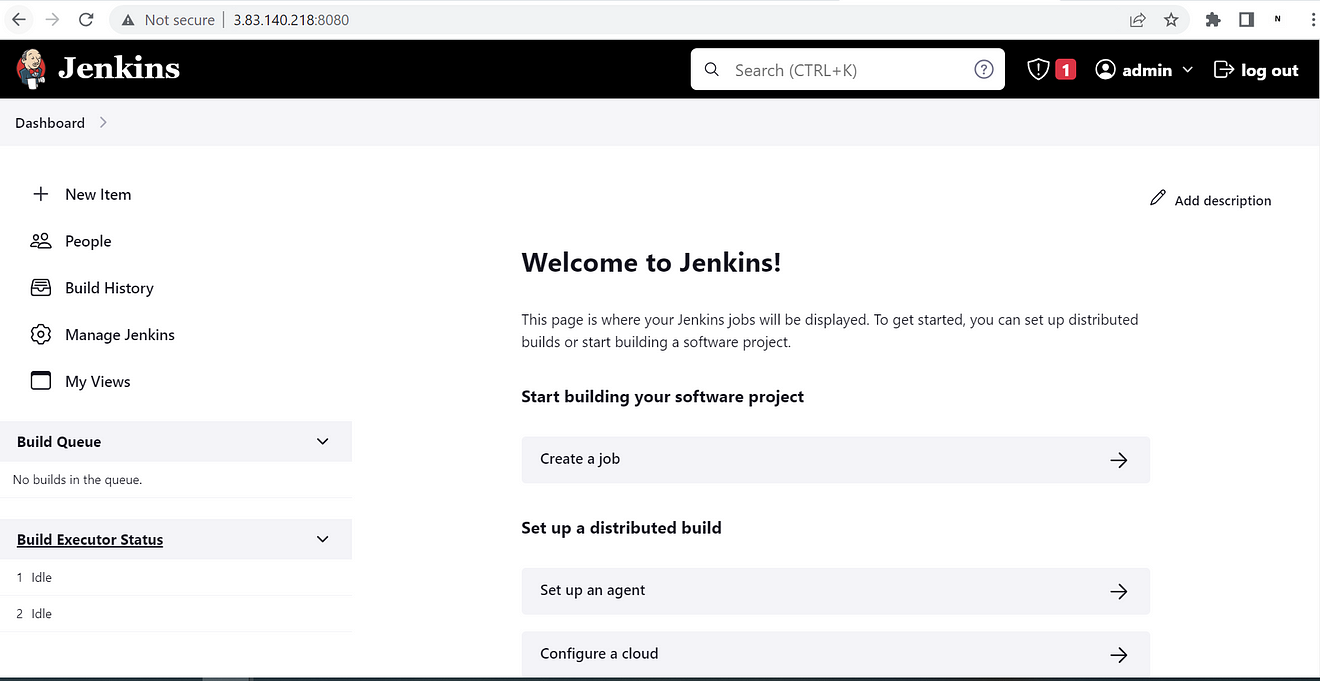
[root@ip-172-31-90-197 ~]#To connect with Jenkins Server we can use any browser and Jenkins uses Port 8080 by default

Jenkins is up and running, we are able to connect with Jenkins but we need to pick the Admin password from the location which is mentioned by Jenkins
[root@ip-172-31-90-197 ~]# cat /var/lib/jenkins/secrets/initialAdminPassword
666314ed789d4eee849d8d0c51ba7445
[root@ip-172-31-90-197 ~]#
By using this Credential we can log in to the Jenkins server and it will ask you to set up an account.
Now, Jenkins Master is deployed.
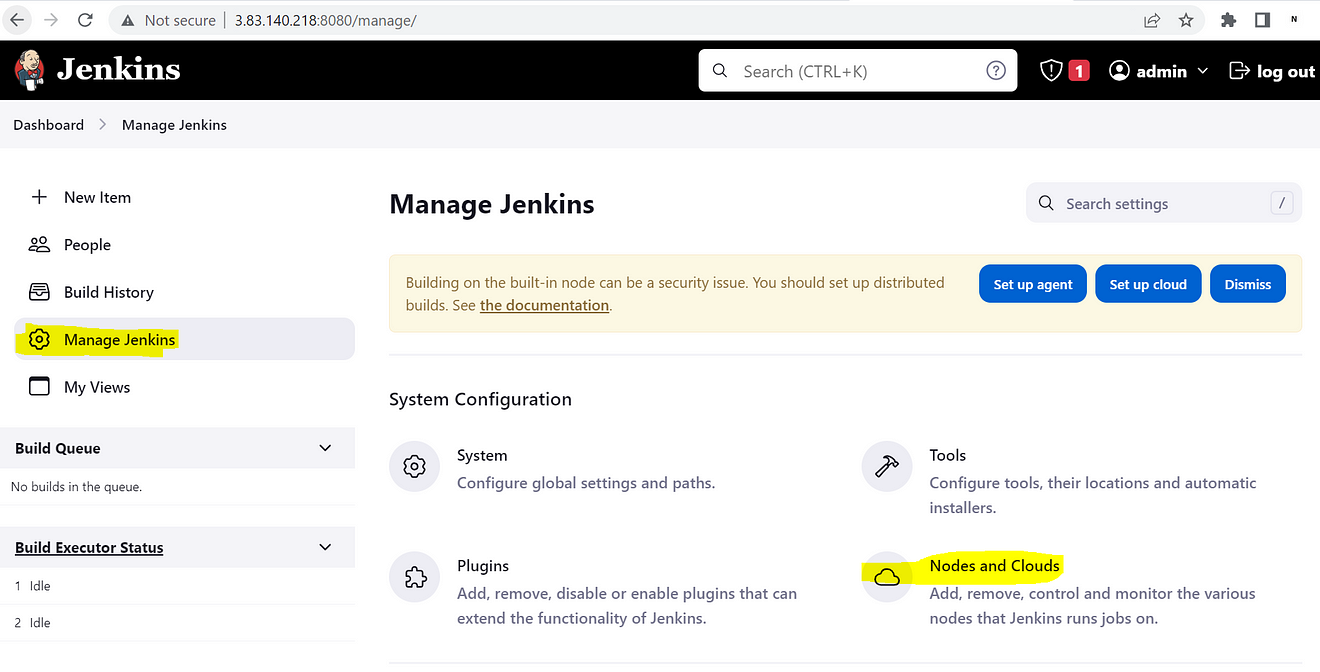
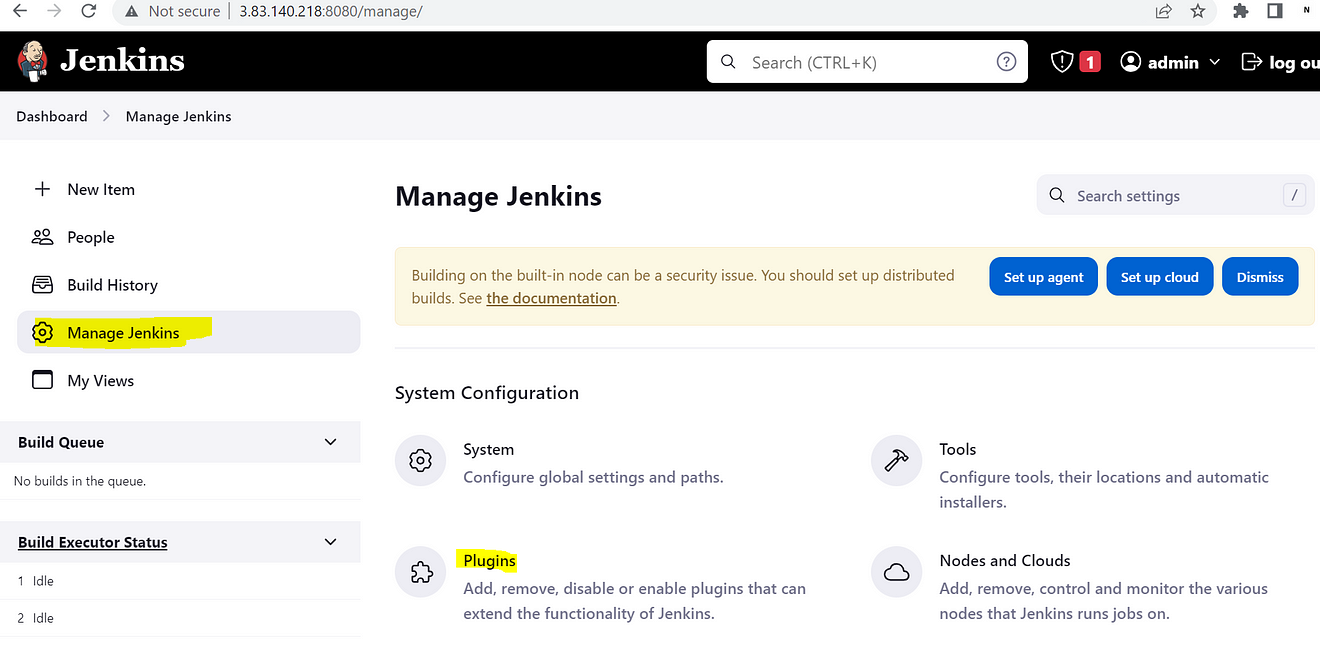
Now, to enable dynamic Provisioning in Jenkins, we need to go to Manage Jenkins > Nodes & Clouds.
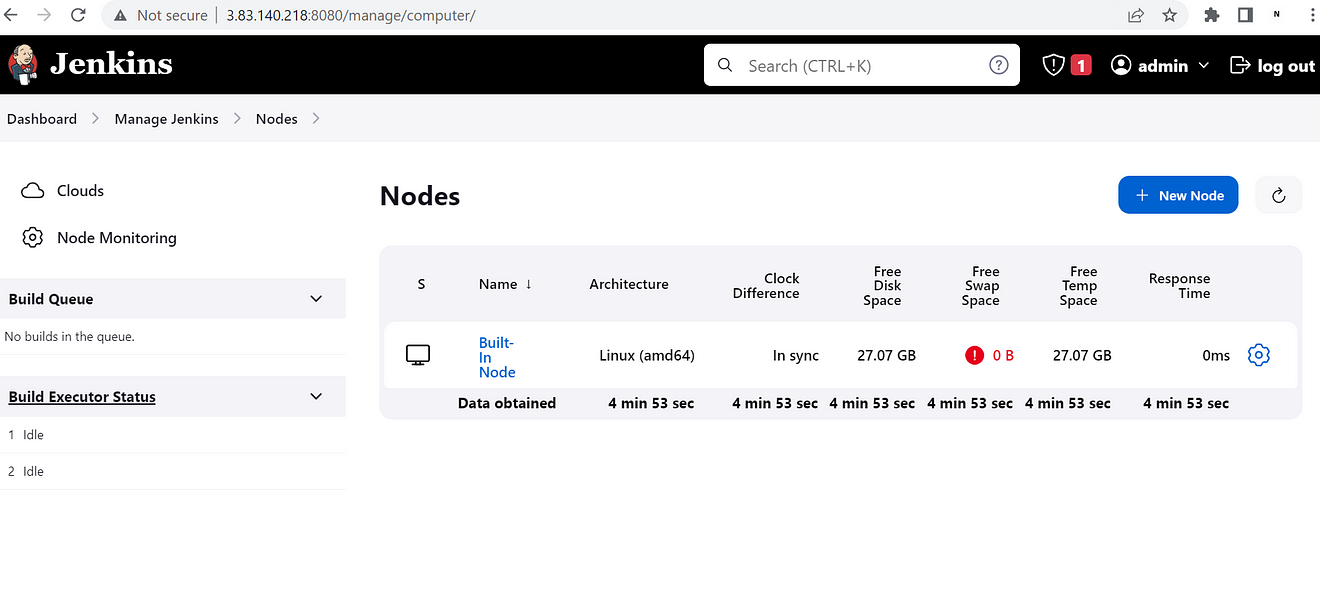
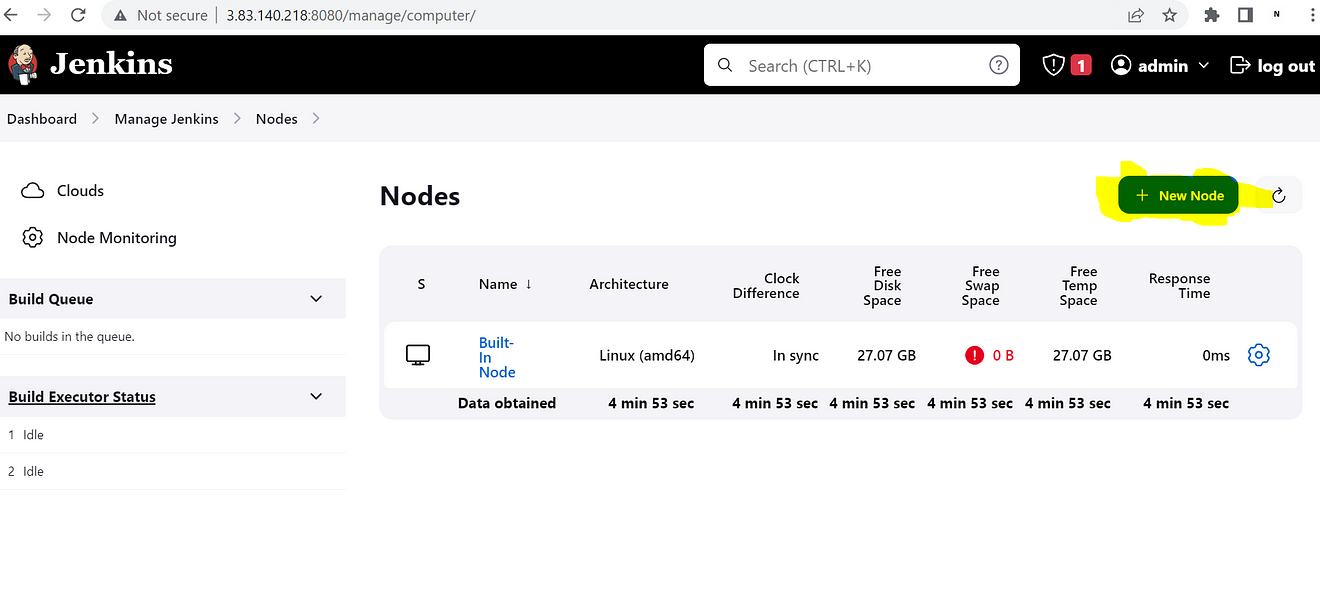
Right now only the master is coming in nodes and if we want to add a static node we need to click on the “New Node” option on this page.
If you want to do this configuration for a static multi-node cluster practically, so refer to my blog.
Ultimate Guide to Deploying a Jenkins Multinode Cluster on AWS with Linux and Windows Slave Nodes
In this practical, we are going to do dynamic provisioning so we need to click on “clouds”.

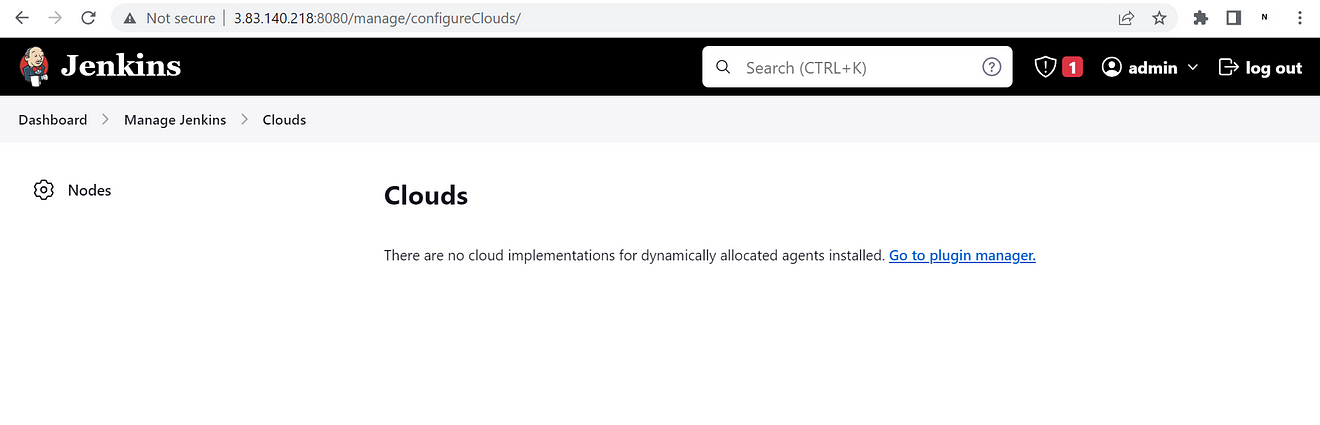
Currently, we are not getting an option to add any cloud node, to get that option we need to install the “Docker” plugin as we are going to do dynamic provisioning using a Docker container. To install the plugin we need to click on Manage Jenkins > Plugins.
Then search for the docker plugin by clicking on Available plugins.

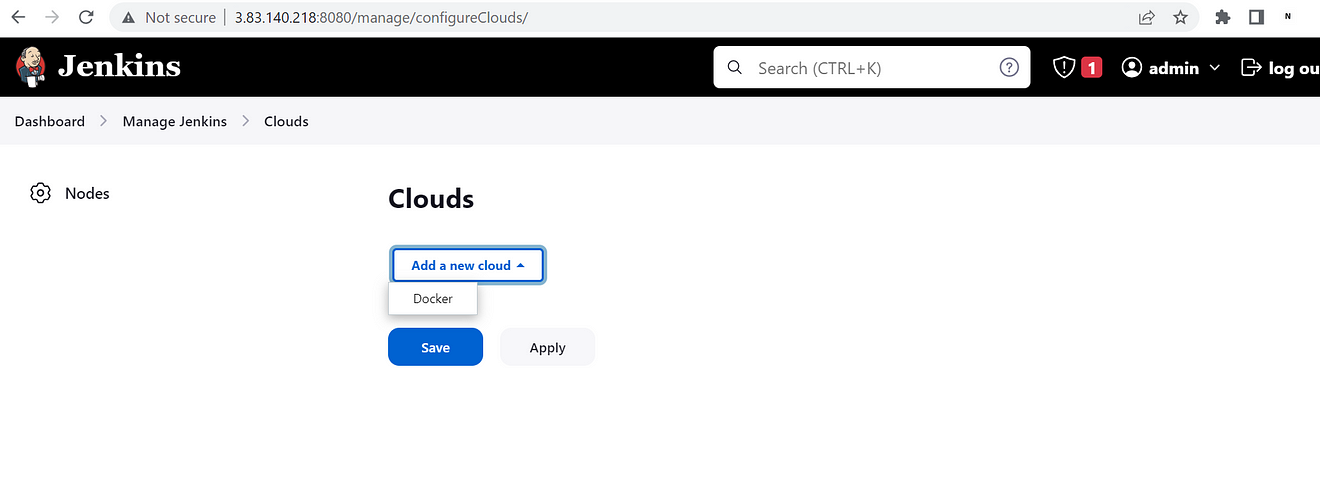
Once the plugin got installed we will get an option to add Docker nodes in the Nodes & Clouds option.
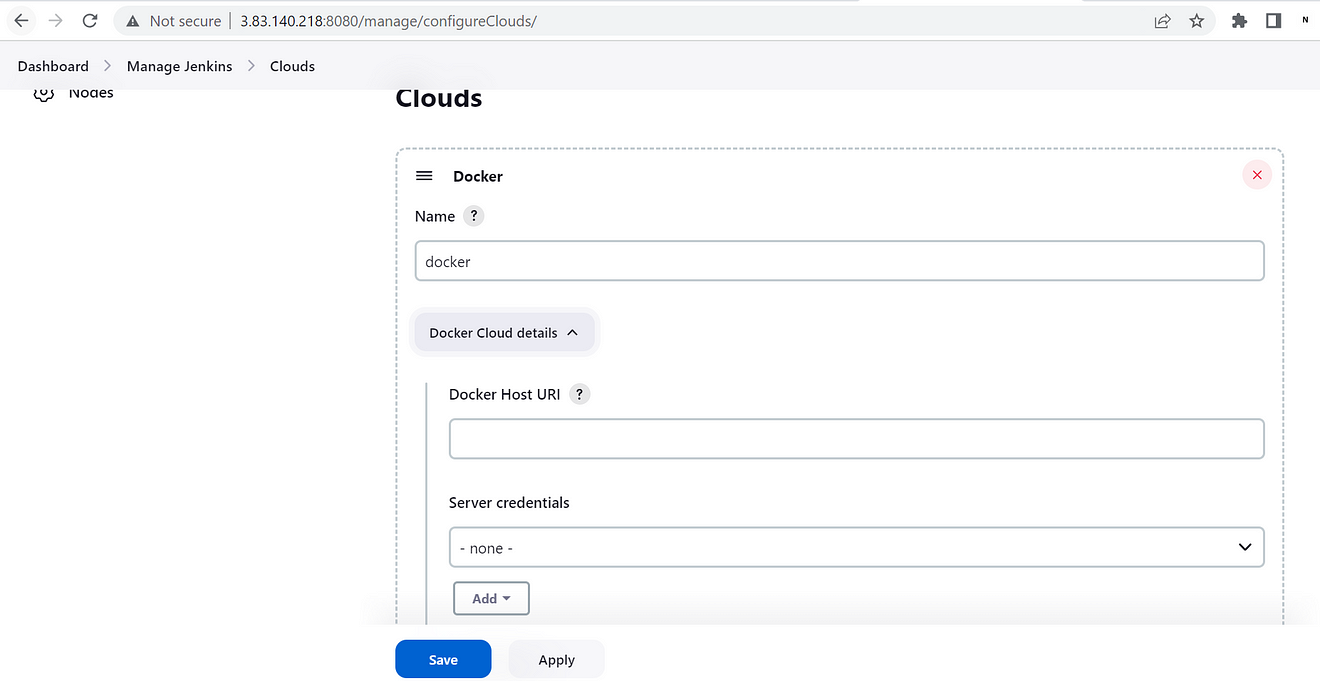
Now, we are getting an option to enter docker host details. Before entering details we need to configure our other instance on which we need to deploy docker. I have already installed docker on other instances.
[root@ip-172-31-91-154 ~]# systemctl status docker
● docker.service - Docker Application Container Engine
     Loaded: loaded (/usr/lib/systemd/system/docker.service; disabled; preset: disabled)
     Active: active (running) since Sat 2023-06-03 08:14:35 UTC; 1s ago
TriggeredBy: ● docker.socket
       Docs: https://docs.docker.com
   Main PID: 15514 (dockerd)
      Tasks: 8
     Memory: 41.9M
        CPU: 326ms
     CGroup: /system.slice/docker.service
             └─15514 /usr/bin/dockerd -H fd:// --containerd=/run/containerd/containerd.sock

Jun 03 08:14:35 ip-172-31-91-154.ec2.internal systemd[1]: Starting Docker Application Container Engine...
Jun 03 08:14:35 ip-172-31-91-154.ec2.internal dockerd[15514]: time="2023-06-03T08:14:35.248001872Z" level=info msg="Starting >
Jun 03 08:14:35 ip-172-31-91-154.ec2.internal dockerd[15514]: time="2023-06-03T08:14:35.294507013Z" level=info msg="Loading c>
Jun 03 08:14:35 ip-172-31-91-154.ec2.internal dockerd[15514]: time="2023-06-03T08:14:35.789555814Z" level=info msg="Loading c>
Jun 03 08:14:35 ip-172-31-91-154.ec2.internal dockerd[15514]: time="2023-06-03T08:14:35.828053639Z" level=info msg="Docker da>
Jun 03 08:14:35 ip-172-31-91-154.ec2.internal dockerd[15514]: time="2023-06-03T08:14:35.828360355Z" level=info msg="Daemon ha>
Jun 03 08:14:35 ip-172-31-91-154.ec2.internal dockerd[15514]: time="2023-06-03T08:14:35.895178003Z" level=info msg="API liste>
Jun 03 08:14:35 ip-172-31-91-154.ec2.internal systemd[1]: Started Docker Application Container Engine.
[root@ip-172-31-91-154 ~]#
By default docker only supports local functionality means Docker can launch the instance by taking inputs locally from the machine but in this setup, we need to launch the container via network using TCP, so we need to enable settings in docker to support TCP services.
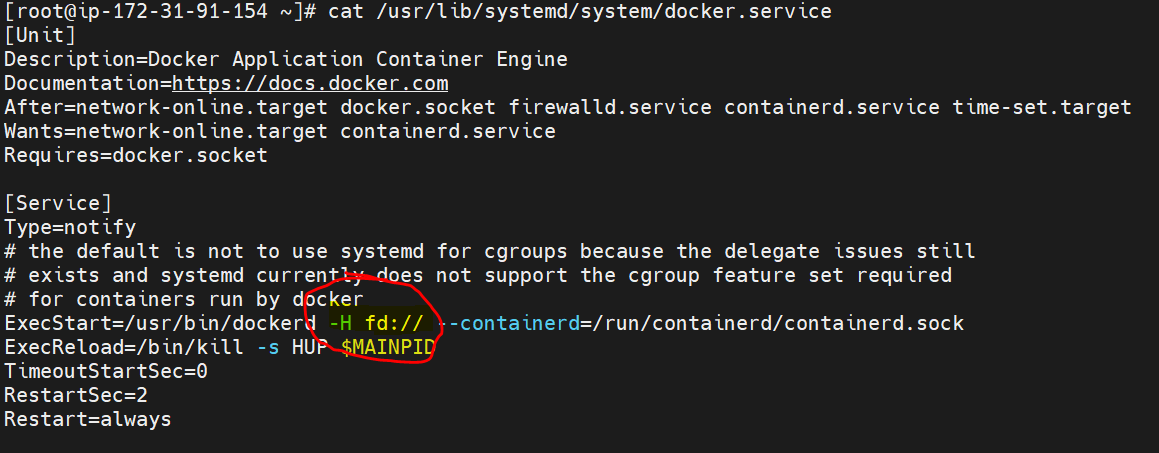
fd: // — means it will support local functionality only. To support TCP we need to add the below line in this section.
[root@ip-172-31-91-154 ~]# cat /usr/lib/systemd/system/docker.service
[Unit]
Description=Docker Application Container Engine
Documentation=https://docs.docker.com
After=network-online.target docker.socket firewalld.service containerd.service time-set.target
Wants=network-online.target containerd.service
Requires=docker.socket

[Service]
Type=notify
# the default is not to use systemd for cgroups because the delegate issues still
# exists and systemd currently does not support the cgroup feature set required
# for containers run by docker
ExecStart=/usr/bin/dockerd -H fd:// -H tcp://54.91.109.50:2376 --containerd=/run/containerd/containerd.sock
ExecReload=/bin/kill -s HUP $MAINPID
TimeoutStartSec=0
RestartSec=2
Restart=always
-----------------------------------------------------
#Ip_address: enter your machine IP
#port number: you can use any port number as per your environment but here i have used 2376
This process is also known as socket binding
Then we need to reload systemd as we have updated systemd file and then restart the docker.
[root@ip-172-31-91-154 ~]# systemctl daemon-reload
[root@ip-172-31-91-154 ~]# systemctl restart docker
Once this setup got completed we need to go back to the Jenkins to enter the details of the docker host.
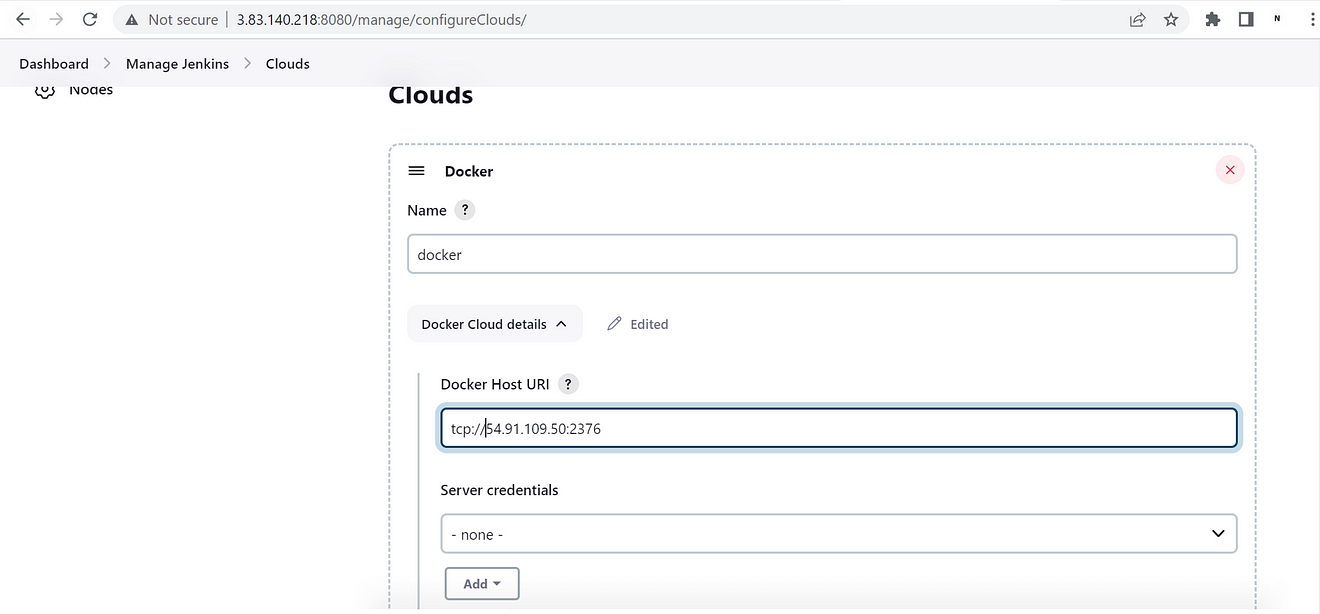
Now, enter the docker-machine details that we set up in the container instance.
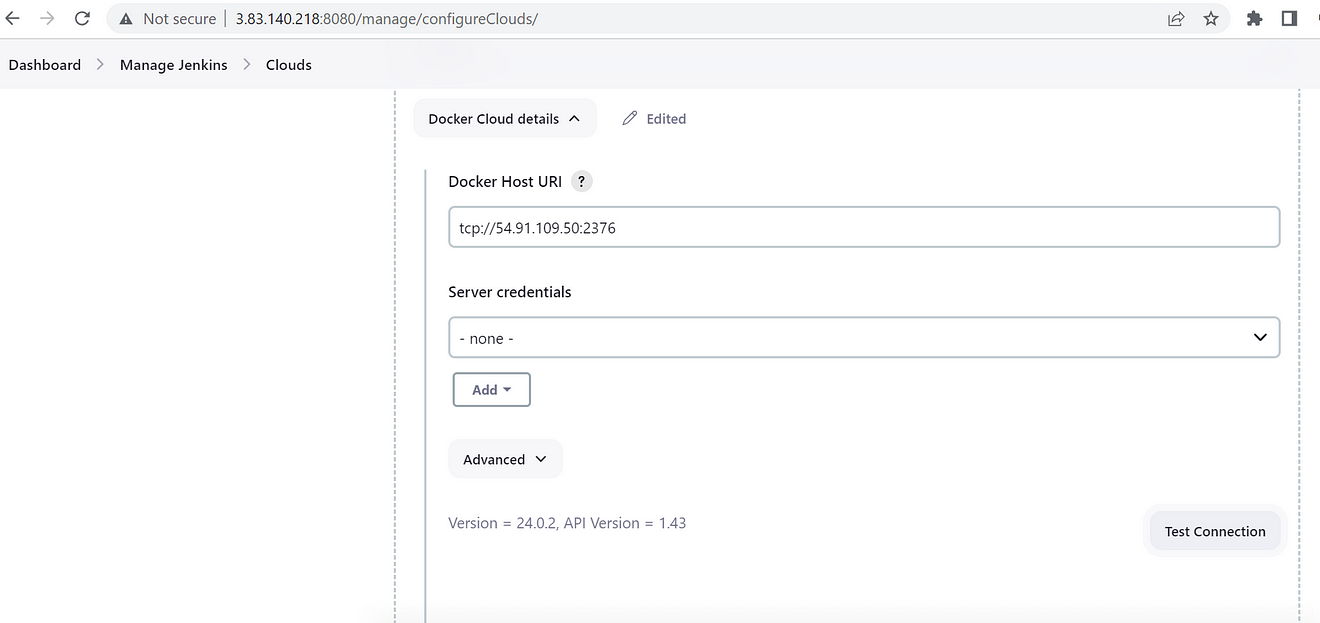
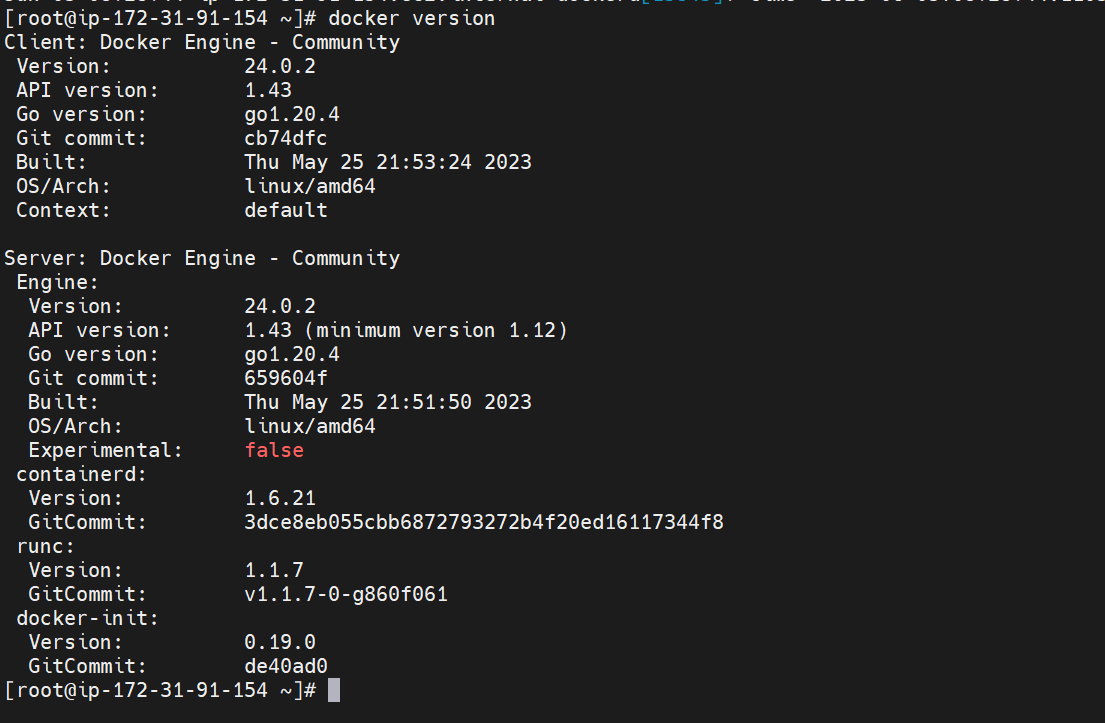
After entering the details click on “Test Connection” and it will give us a version of the docker engine. If we get the version and API version of docker that means Jenkins has connectivity with the docker and Jenkins will be able to launch containers. To cross-check the details we can check in the container instance by running the “docker version” command.

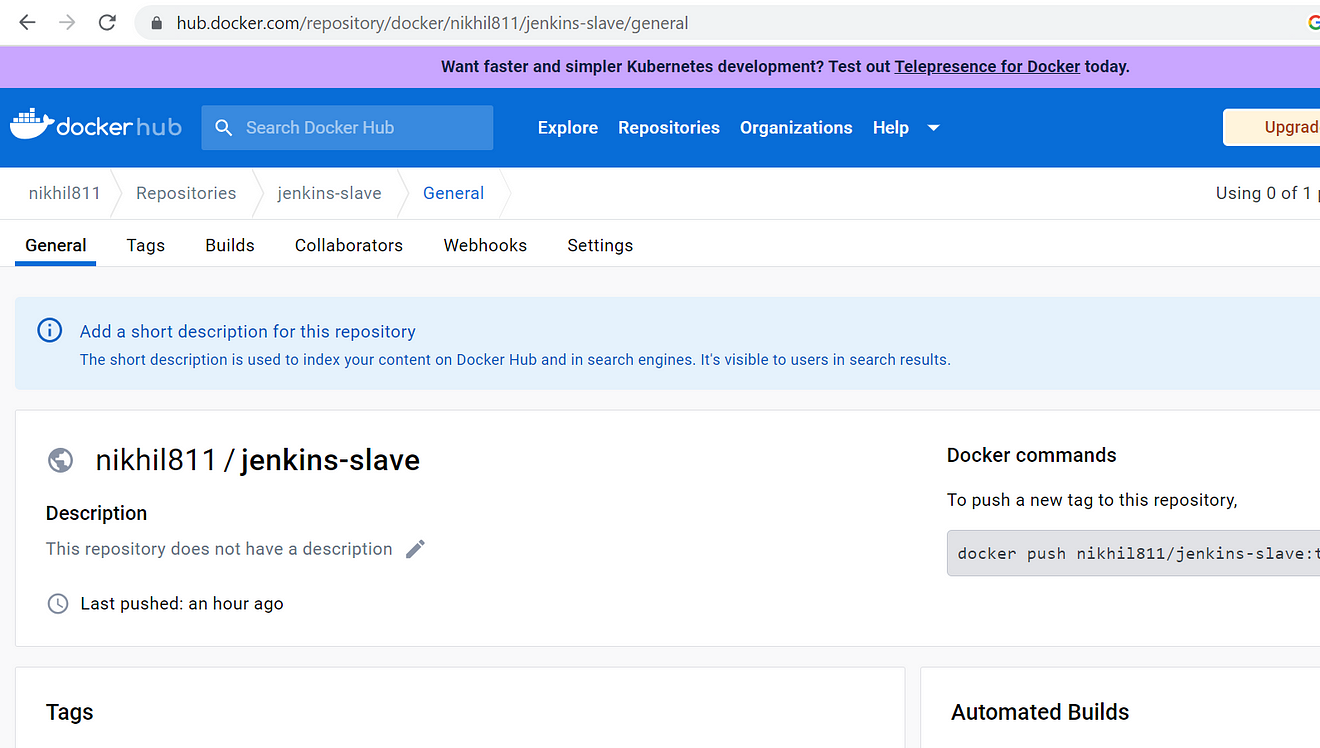
Now, we need to enter the template or image details using which Jenkins will launch the slave containers. As I already have one Jenkins slave image created and pushed on the docker hub so I will be using the same image for this practical.
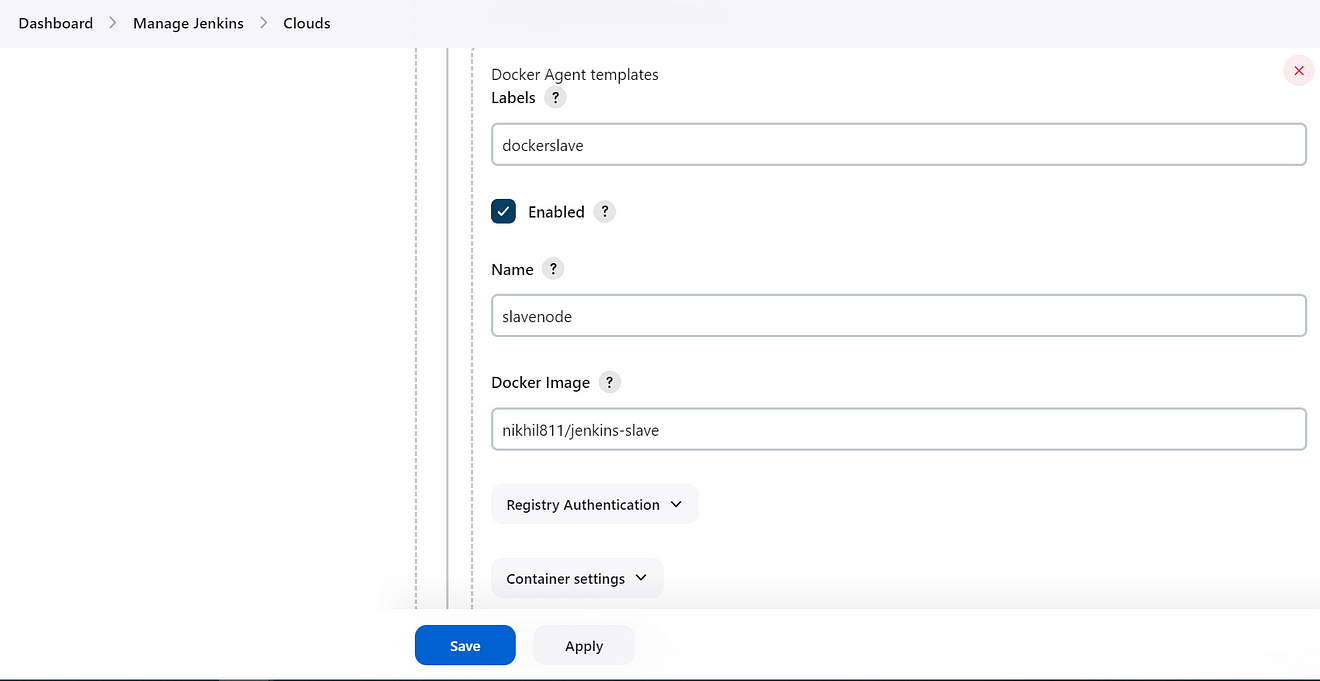
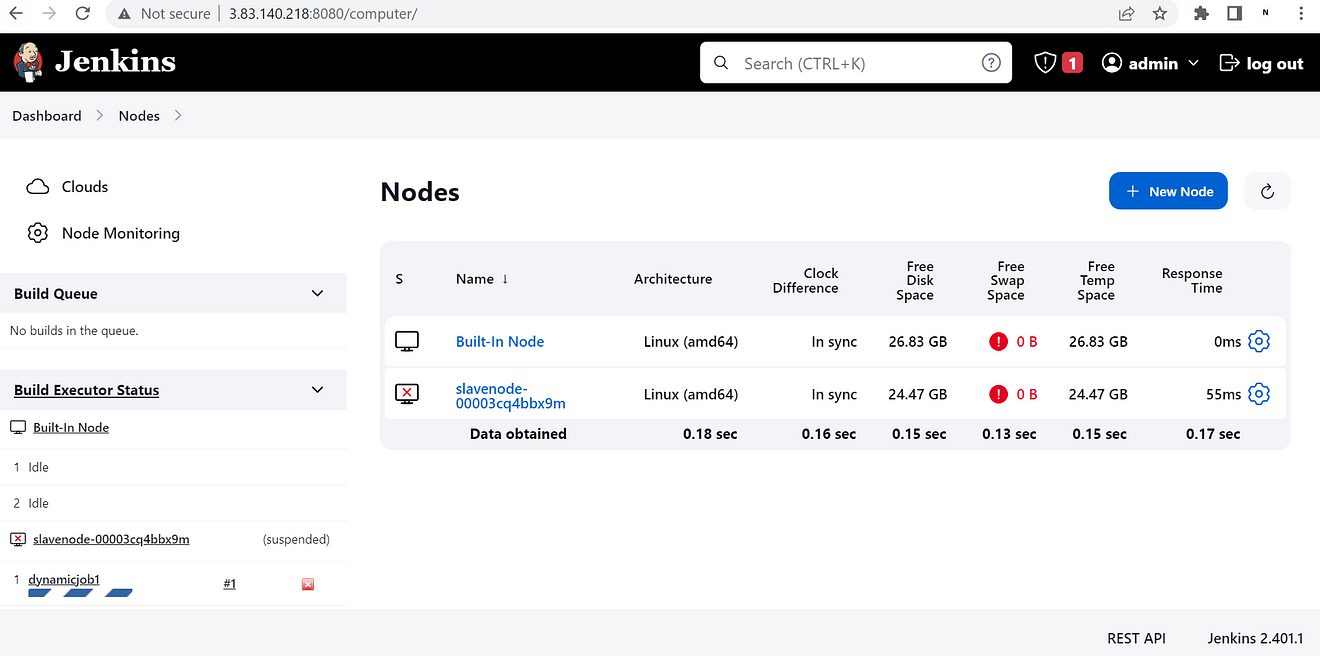
We need to give some labels to the node as the name of the node will be dynamic and we will not be able to get the name so we will be using labels to attach the job to the dynamic node. In this I gave the name “slavenode” and when Jenkins will launch the container it will add some random characters at the end of the name.

After the configuration as also you will be not able to see the node as we have configured it to create a dynamic node so as soon as we get some job triggered here, we can the node coming up.
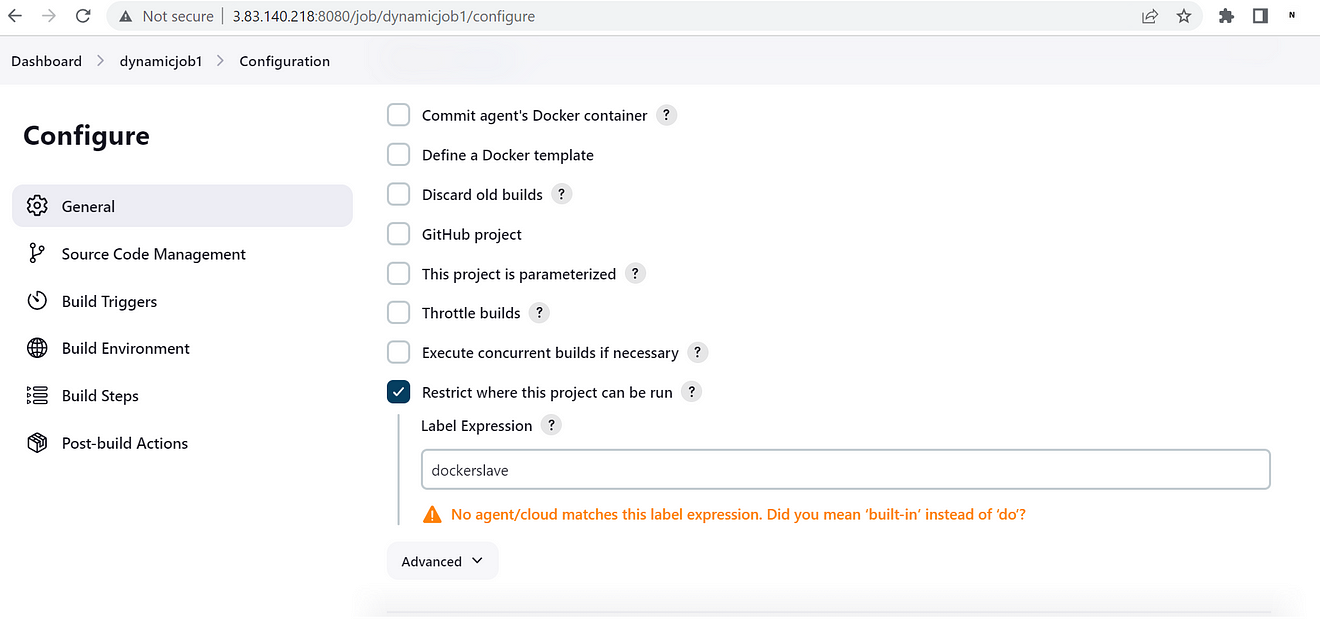
While creating a job we need to add the label to the job which we set at the time of configuration of the dynamic node. Here you will get a warning that there is no agent/cloud matching this label but as soon as will trigger a job it will launch one slave container node.
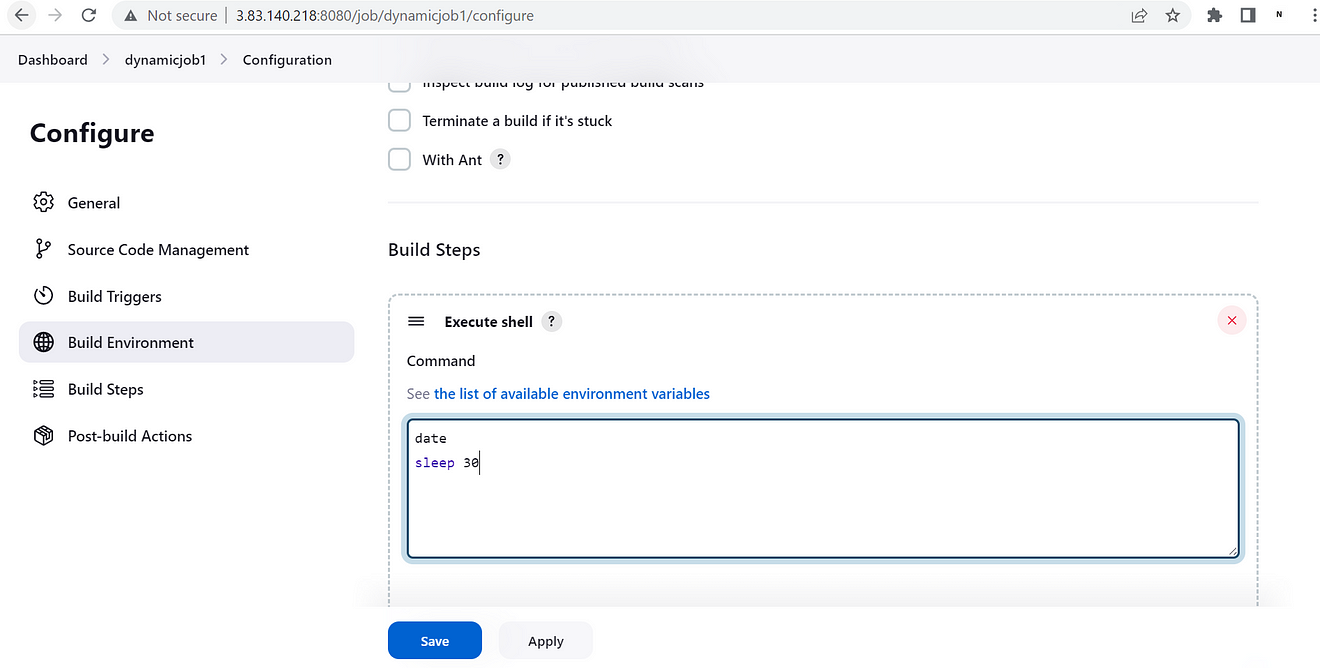
Here am just running some basic Linux commands and adding sleep to see the container information on the container instance.

The container got launched in a container instance.
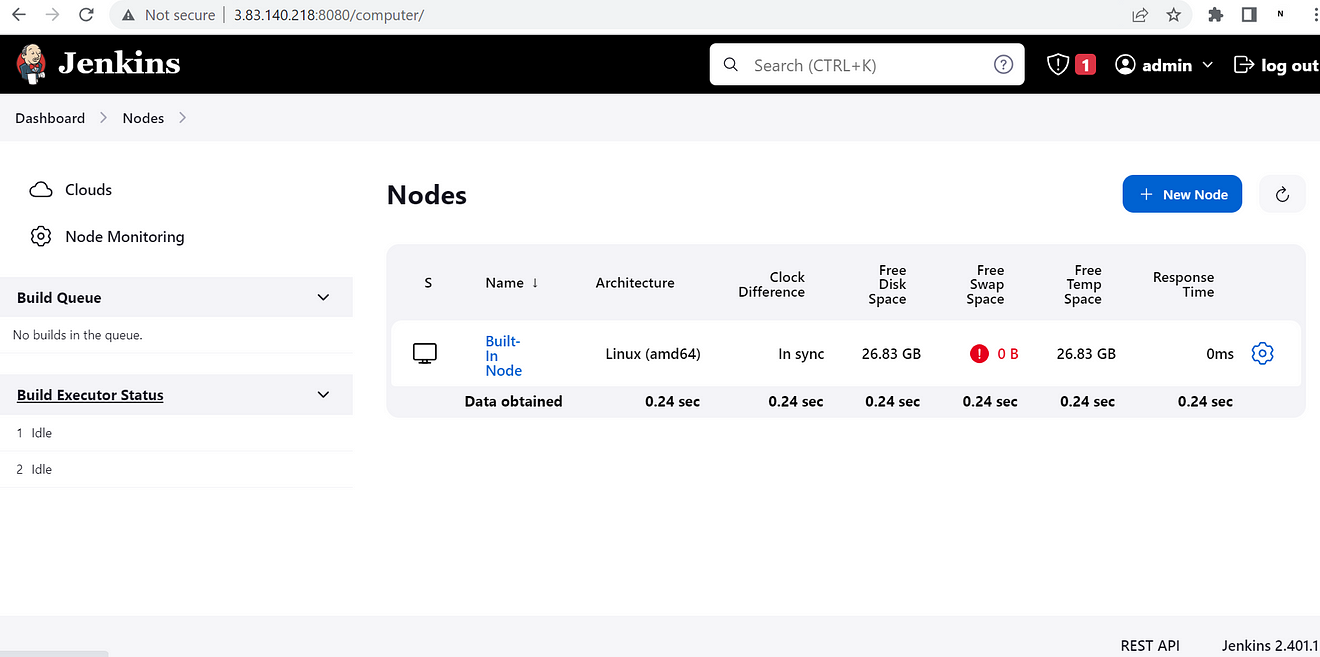
As soon as a new job is triggered it will launch a slave container and it will show in nodes & once the execution got completed node, the node will also be removed.
Using this configuration we can set up dynamic provisioning in the Jenkins cluster with the Docker engine.
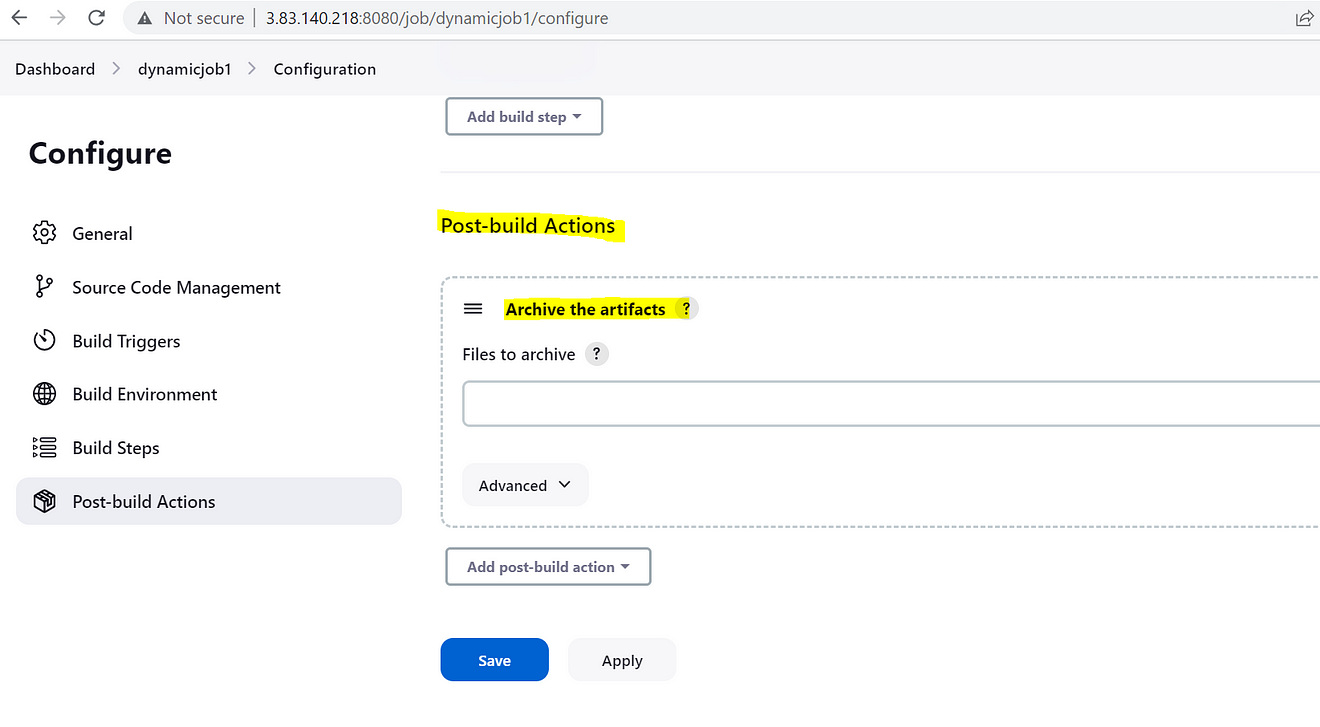
In a Jenkins job triggered within a Docker container, the workspace is provided by Docker itself. However, once the job completes, the Docker container and its workspace are removed, resulting in the potential loss of any generated packages or files. To address this issue, Jenkins offers a solution in the form of a post-build action called “archive the artifacts.” By enabling this option, you can create archives of specific files or directories that you wish to retain for further use. Importantly, these archives are always created on the Jenkins master node, ensuring that you can access the data from the dynamic container even after it has been removed. By leveraging this approach, you can effectively preserve and retrieve the necessary files for future tasks or analysis.
Advantages of Dynamic Provisioning in Jenkins Clusters:
- Resource Efficiency: Dynamic provisioning allows for optimal resource utilization in Jenkins clusters. Instead of keeping all slave nodes constantly running, dynamic provisioning provisions nodes on-demand as jobs arrive. This approach ensures that resources are allocated only when needed, resulting in efficient resource utilization.
- Scalability: With dynamic provisioning, Jenkins clusters can easily scale up or down based on workload demands. As the number of jobs increases, additional slave nodes can be provisioned dynamically to handle the workload. Conversely, when job activity decreases, unnecessary slave nodes can be terminated, freeing up resources.
- Cost Savings: By dynamically provisioning slave nodes, organizations can reduce infrastructure costs. Traditional static clusters require maintaining a fixed number of nodes, even during periods of low job activity. With dynamic provisioning, resources are allocated as needed, allowing organizations to scale their Jenkins infrastructure based on actual demand, resulting in cost savings.
- Rapid Job Execution: With dynamic provisioning, Jenkins can quickly allocate slave nodes and start job execution, minimizing job queue times. Jobs can be processed as soon as they arrive, without waiting for available static nodes. This reduces job execution delays and enhances overall productivity.
In conclusion, dynamic provisioning in Jenkins clusters brings numerous benefits that enhance the efficiency, scalability, and cost-effectiveness of your CI/CD workflows. By leveraging technologies like Docker, you can dynamically provision slave nodes on-demand, optimizing resource utilization and adapting to workload fluctuations. This approach not only improves the speed and scalability of your Jenkins infrastructure but also enables flexible configuration and cost savings. With dynamic provisioning, you can achieve a highly efficient and agile CI/CD pipeline, empowering your development teams to deliver software faster and more reliably. Embrace the power of dynamic provisioning in your Jenkins clusters and unlock the full potential of your continuous integration and delivery processes.
Disclaimer:
The views expressed and the content shared in all published articles on this website are solely those of the respective authors, and they do not necessarily reflect the views of the author’s employer or the techbeatly platform. We strive to ensure the accuracy and validity of the content published on our website. However, we cannot guarantee the absolute correctness or completeness of the information provided. It is the responsibility of the readers and users of this website to verify the accuracy and appropriateness of any information or opinions expressed within the articles. If you come across any content that you believe to be incorrect or invalid, please contact us immediately so that we can address the issue promptly.
Tags:
Latest posts


Comments
Leave a Reply