
Managing your Windows machines and servers using Ansible is pretty easy as there are more than hundred modules available to handle your Windows operations. This is a series of articles and in this article you will learn how to connect Windows from Ansible using HTTPS and SSL certificate.
See other articles to learn how to manage windows using Ansible
- Configure Your Windows Host to be Managed by Ansible
- How to open WinRM ports in the Windows firewall
- Ansible Windows Management using HTTPS and SSL
Note: Most of the steps and commands are copied from the Ansible documentation but added a lot of explanations and additional details to support the process.
Ansible to Windows Authentication
You have multiple authentication options to connect and authenticate to your Windows machine from Ansible.
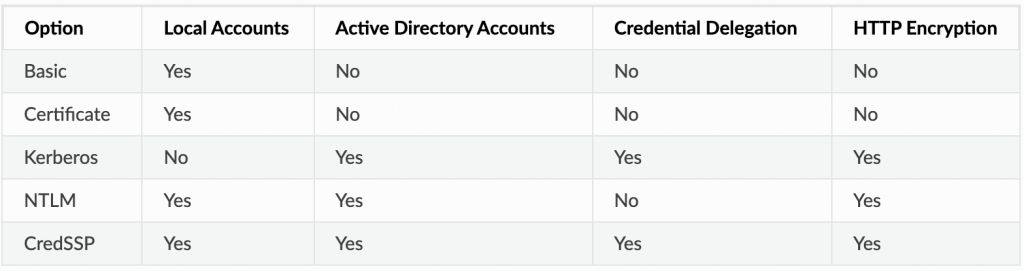
You can see the basic authentication method here in this article – How to configure Windows for Ansible. In this article, you will learn how to connect Windows from Ansible using HTTPS and SSL certificates.
Step 1. Generate SSL Certificate
You can create SSL Certificate from Linux or Windows (PowerShell) and in this guide, we will explain how to generate an SSL certificate from Linux (you can do this from your Ansible controlnode itself).
Set the username which we are going to use to access the Windows machine (eg: ansible)
$ export WINUSERNAME="ansible"Now we need to set some arguments for the openssl and we will create a openssl.conf file for the same. Create openssl.conf file as below.
$ cat > openssl.conf << EOL
distinguished_name = req_distinguished_name
[req_distinguished_name]
[v3_req_client]
extendedKeyUsage = clientAuth
subjectAltName = otherName:1.3.6.1.4.1.311.20.2.3;UTF8:$WINUSERNAME@localhost
EOL
To pass this openssl.conf we can set the OPENSSL_CONF environment variable so that openssl command will take this configuration file and use it during execution.
$ export OPENSSL_CONF=openssl.confCreate SSL Certificate
$ openssl req -x509 -nodes \
  -days 3650 -newkey rsa:2048 \
  -out cert.pem \
  -outform PEM \
  -keyout cert_key.pem \
  -subj "/CN=$WINUSERNAME" \
  -extensions \
  v3_req_client

Generating a 2048 bit RSA private key
.......................................+++
......................................................................+++
writing new private key to 'cert_key.pem'
-----
Delete openssl.conf
$ rm openssl.confStep 2. Import a Certificate to the Certificate Store in Windows
Now you need to import the Certificate to the Windows machine which you want to connect from Ansible. Please note, the below steps have to be executed on the Windows machine.
First, you need to copy cert.pem using any of the methods (eg: WinSCP) to the Windows machine.
Import Issuing Certificate
Now you need to import the Certificate on the Windows machine using PowerShell commands.
$cert = New-Object -TypeName System.Security.Cryptography.X509Certificates.X509Certificate2
$cert.Import("cert.pem")

$store_name = [System.Security.Cryptography.X509Certificates.StoreName]::Root
$store_location = [System.Security.Cryptography.X509Certificates.StoreLocation]::LocalMachine
$store = New-Object -TypeName System.Security.Cryptography.X509Certificates.X509Store -ArgumentList $store_name, $store_location
$store.Open("MaxAllowed")
$store.Add($cert)
$store.Close()
Import the client certificate public key
Since this is a self-signed certificate both the issuing certificate and public key are the same.
$cert = New-Object -TypeName System.Security.Cryptography.X509Certificates.X509Certificate2
$cert.Import("cert.pem")

$store_name = [System.Security.Cryptography.X509Certificates.StoreName]::TrustedPeople
$store_location = [System.Security.Cryptography.X509Certificates.StoreLocation]::LocalMachine
$store = New-Object -TypeName System.Security.Cryptography.X509Certificates.X509Store -ArgumentList $store_name, $store_location
$store.Open("MaxAllowed")
$store.Add($cert)
$store.Close()
Step 3. Mapping a Certificate to an Account in Windows
Now you need to map the Certificate with a use account. It can be the Administrator account or any dedicated account ansible which we have created for this specific purpose.
$username = "ansible"
$password = ConvertTo-SecureString -String "Welcome123" -AsPlainText -Force
$credential = New-Object -TypeName System.Management.Automation.PSCredential -ArgumentList $username, $password

# This is the issuer thumbprint which in the case of a self generated cert
# is the public key thumbprint, additional logic may be required for other
# scenarios
$thumbprint = (Get-ChildItem -Path cert:\LocalMachine\root | Where-Object { $_.Subject -eq "CN=$username" }).Thumbprint

New-Item -Path WSMan:\localhost\ClientCertificate `
    -Subject "$username@localhost" `
    -URI * `
    -Issuer $thumbprint `
    -Credential $credential `
    -Force
You will get some response as below.
   WSManConfig: Microsoft.WSMan.Management\WSMan::localhost\ClientCertificate

Type            Keys                                Name
----            ----                                ----
Container       {URI=*, Issuer=0E2C17459D7C82630... ClientCertificate_2070301166
Step 4. Enabling Certificate Authentication Option in Windows
PS > winrm set winrm/config/service/Auth '@{Certificate="true"}'
Auth
    Basic = true
    Kerberos = true
    Negotiate = true
    Certificate = true
    CredSSP = false
    CbtHardeningLevel = Relaxed
Step 5. Configure Variables in Ansible
I have configured my host variables as below in my inventory. You are free to configure these variables as per your configuration practices. Please note, I have disabled ansible_user and ansible_password to ensure that ansible is using SSL/HTTPS communication.
[windows]
win2019 ansible_host=192.168.99.105

[windows:vars]
ansible_connection=winrm

#ansible_user=ansible
#ansible_password="MySecretPassword"

# enable HTTPS
ansible_winrm_scheme=https
ansible_port=5986
ansible_winrm_transport=certificate
ansible_winrm_cert_pem=/Users/gini/.ssh/cert.pem
ansible_winrm_cert_key_pem=/Users/gini/.ssh/cert_key.pem
ansible_winrm_server_cert_validation=ignore
Step 6. Connect from Ansible to Windows using HTTPS
Now we have configured SSL certificates and Ansible variables. Let’s test the Ansible connection to the Windows machine using a simple win_ping module. I am adding -vvv to enable high verbose mode to see and verify HTTP connection details as below.
$ ansible win2019 -m win_ping -vvv

ansible 2.9.0
  config file = /Users/gini/workarea/windows-ssl-demo/ansible.cfg
  configured module search path = ['/Users/gini/.ansible/plugins/modules', '/usr/share/ansible/plugins/modules']
  ansible python module location = /Users/gini/python-venv/ansible-29/lib/python3.7/site-packages/ansible
  executable location = /Users/gini/python-venv/ansible-29/bin/ansible
  python version = 3.7.3 (default, Nov 15 2019, 04:04:52) [Clang 11.0.0 (clang-1100.0.33.16)]
Using /Users/gini/workarea/windows-ssl-demo/ansible.cfg as config file
host_list declined parsing /Users/gini/workarea/windows-ssl-demo/hosts as it did not pass its verify_file() method
script declined parsing /Users/gini/workarea/windows-ssl-demo/hosts as it did not pass its verify_file() method
auto declined parsing /Users/gini/workarea/windows-ssl-demo/hosts as it did not pass its verify_file() method
Parsed /Users/gini/workarea/windows-ssl-demo/hosts inventory source with ini plugin
META: ran handlers
Using module file /Users/gini/python-venv/ansible-29/lib/python3.7/site-packages/ansible/modules/windows/win_ping.ps1
Pipelining is enabled.
<192.168.99.105> ESTABLISH WINRM CONNECTION FOR USER: ansible on PORT 5986 TO 192.168.99.105
EXEC (via pipeline wrapper)
win2019 | SUCCESS => {
    "changed": false,
    "invocation": {
        "module_args": {
            "data": "pong"
        }
    },
    "ping": "pong"
}
META: ran handlers
META: ran handlers
Great! All is good and we have connected to the Windows machine using Ansible over HTTPS. I want to try one more task using win_whoami the module and see the result. There are so many details but let’s focus few items as highlighted below.
$ ansible win2019 -m win_whoami

win2019 | SUCCESS => {
    "account": {
        "account_name": "ansible",
        "domain_name": "WIN-OCEE554K769",
        "sid": "S-1-5-21-2652326372-650916474-2589809930-1000",
        "type": "User"
    },
    "authentication_package": "NTLM",
    "changed": false,
    "dns_domain_name": "",
    "groups": [
        .
        .
        .
        {
            "account_name": "Local account and member of Administrators group",
            "attributes": [
                "Mandatory",
                "Enabled by default",
                "Enabled"
            ],
            "domain_name": "NT AUTHORITY",
            "sid": "S-1-5-114",
            "type": "WellKnownGroup"
        },
        .
        .
    ],
    "impersonation_level": "SecurityAnonymous",
    "label": {
        "account_name": "High Mandatory Level",
        "domain_name": "Mandatory Label",
        "sid": "S-1-16-12288",
        "type": "Label"
    },
    "login_domain": "WIN-OCEE554K769",
    "login_time": "2021-09-29T21:54:55.8543746-07:00",
    "logon_id": 3606545,
    "logon_server": "WIN-OCEE554K769",
    "logon_type": "Network",
    "privileges": {
        "SeBackupPrivilege": "enabled-by-default",
        "SeChangeNotifyPrivilege": "enabled-by-default",
        "SeCreateGlobalPrivilege": "enabled-by-default",
        "SeCreatePagefilePrivilege": "enabled-by-default",
        "SeCreateSymbolicLinkPrivilege": "enabled-by-default",
        "SeDebugPrivilege": "enabled-by-default",
        "SeDelegateSessionUserImpersonatePrivilege": "enabled-by-default",
        "SeImpersonatePrivilege": "enabled-by-default",
        "SeIncreaseBasePriorityPrivilege": "enabled-by-default",
        "SeIncreaseQuotaPrivilege": "enabled-by-default",
        "SeIncreaseWorkingSetPrivilege": "enabled-by-default",
        "SeLoadDriverPrivilege": "enabled-by-default",
        "SeManageVolumePrivilege": "enabled-by-default",
        "SeProfileSingleProcessPrivilege": "enabled-by-default",
        "SeRemoteShutdownPrivilege": "enabled-by-default",
        "SeRestorePrivilege": "enabled-by-default",
        "SeSecurityPrivilege": "enabled-by-default",
        "SeShutdownPrivilege": "enabled-by-default",
        "SeSystemEnvironmentPrivilege": "enabled-by-default",
        "SeSystemProfilePrivilege": "enabled-by-default",
        "SeSystemtimePrivilege": "enabled-by-default",
        "SeTakeOwnershipPrivilege": "enabled-by-default",
        "SeTimeZonePrivilege": "enabled-by-default",
        "SeUndockPrivilege": "enabled-by-default"
    },
    "rights": [
        "SeNetworkLogonRight",
        "SeInteractiveLogonRight",
        "SeBatchLogonRight",
        "SeRemoteInteractiveLogonRight"
    ],
    "token_type": "TokenPrimary",
    "upn": "",
    "user_flags": []
}
Additional Steps
Once the HTTPS communication has been enabled and verified with WinRM, you may proceed with the additional steps listed below to ensure you are using only secure communication between Ansible and your Windows machine. These are not mandatory but recommended as part of best practices.
Disable Username and Password if any
If you have configured any username or password for the Windows machine, disable the same in your Ansible variable configurations; we do not need this anymore.
#ansible_user=ansible
#ansible_password="MySecretPassword"
Disable unencrypted PowerShell Remoting
PS > winrm set winrm/config/service '@{AllowUnencrypted="false"}'

Service
    RootSDDL = O:NSG:BAD:P(A;;GA;;;BA)(A;;GR;;;IU)S:P(AU;FA;GA;;;WD)(AU;SA;GXGW;;;WD)
    MaxConcurrentOperations = 4294967295
    MaxConcurrentOperationsPerUser = 1500
    EnumerationTimeoutms = 240000
    MaxConnections = 300
    MaxPacketRetrievalTimeSeconds = 120
    AllowUnencrypted = false
    Auth
        Basic = true
        Kerberos = true
        Negotiate = true
        Certificate = false
        CredSSP = false
        CbtHardeningLevel = Relaxed
    DefaultPorts
        HTTP = 5985
        HTTPS = 5986
    IPv4Filter = *
    IPv6Filter = *
    EnableCompatibilityHttpListener = false
    EnableCompatibilityHttpsListener = false
    CertificateThumbprint
    AllowRemoteAccess = true
Disable WinRM Basic Authentication
If you want to disable the WinRM Basic authentication (username & password), then disable the same.
PS > winrm set winrm/config/service/Auth '@{Basic="false"}'
Auth
    Basic = false
    Kerberos = true
    Negotiate = true
    Certificate = true
    CredSSP = false
CbtHardeningLevel = RelaxedDisclaimer:
The views expressed and the content shared in all published articles on this website are solely those of the respective authors, and they do not necessarily reflect the views of the author’s employer or the techbeatly platform. We strive to ensure the accuracy and validity of the content published on our website. However, we cannot guarantee the absolute correctness or completeness of the information provided. It is the responsibility of the readers and users of this website to verify the accuracy and appropriateness of any information or opinions expressed within the articles. If you come across any content that you believe to be incorrect or invalid, please contact us immediately so that we can address the issue promptly.
Tags:
Latest posts


Comments
8 Responses
Leave a Reply
[…] Ansible Windows Management using HTTPS and SSL […]
[…] Ansible Windows Management using HTTPS and SSL […]
[…] Ansible Windows Management using HTTPS and SSL […]
Hi,
I’m getting this issue
New-Item : Cannot validate argument on parameter ‘Issuer’. The argument is
null or empty. Provide an argument that is not null or empty, and then try
the command again.
At line:4 char:13
+ -Issuer $thumbprint `
+ ~~~~~~~~~~~
+ CategoryInfo : InvalidData: (:) [New-Item], ParameterBindingV
alidationException
+ FullyQualifiedErrorId : ParameterArgumentValidationError,Microsoft.Pow
erShell.Commands.NewItemCommand
How can i solve this?
Thank You
Could you please share the windows version ?
Windows 11 Pro
Hello Gineesh,
Thank you for this article!
Little suggestion:
$ set WINUSERNAME=”ansible”
must be
$ export WINUSERNAME=”ansible”
to be homogeneous with linux system.
Good suggestion indeed!
Thank you so much; updated.