Deploying Service Mesh – AWS App Mesh onto AWS EKS
-
 Tan Kai Jian
- Aws, Cloud, How to
- November 3, 2021
https://aws.amazon.com/app-mesh
What is AWS App Mesh?
AWS App Mesh is a service mesh that provides application-level networking to make it easy for your services to communicate with each other across multiple types of compute infrastructure. App Mesh gives end-to-end visibility and high-availability for your applications.
AWS App Mesh makes it easy to run services by providing consistent visibility and network traffic controls for services built across multiple types of compute infrastructure. App Mesh removes the need to update application code to change how monitoring data is collected or traffic is routed between services. App Mesh configures each service to export monitoring data and implements consistent communications control logic across your application. This makes it easy to quickly pinpoint the exact location of errors and automatically re-route network traffic when there are failures or when code changes need to be deployed.
AWS App Mesh is a service mesh based on the Envoy proxy.
Envoy is the data plane of the modern service mesh
Service Mesh Competitors:
Features of AWS App Mesh
-
Network controls AWS App Mesh allows you to control the flow of traffic between services, which can help you experiment with new features. You can use this feature to divert a portion of traffic to a different version of your service. Kubernetes doesn’t allow you define a split for requests distribution between multiple Deployments . With App Mesh , you can create rules to distribute traffic between different versions of a service using simple ratios. AWS App Mesh traffic controls can also make version rollouts significantly safer by enabling canary deployments. In this strategy, you create a new Kubernetes deployment with fewer pods alongside your old deployment and divert a small share of traffic to the new deployment. If the new version performs well, you gradually increase traffic to the new deployment until it ends up serving all the traffic. You can also use App Mesh to improve application resiliency by implementing a connection timeout policy or configuring automatic retries in the proxy.
-
Observability Observability is a property of a system that determines how well its state can be inferred from knowledge of external outputs. In the microservices context, these external outputs are service metrics, traces, and logs. Metrics show the behavior of a system over time. Logs make it easy to troubleshoot by providing causation for potential errors. Distributed traces can help us debug, identify problematic components in the application by providing details for a specific point in time, and understand application workflow within and among microservices. You can measure the health of your application by configuring App Mesh to generate metrics such as total requests, create access logs and traces. As service traffic passes through Envoy , Envoy inspects it and generates statistics, creates access logs, and adds HTTP headers to outbound requests, which can be used to generate traces. Metrics and traces can be forwarded to aggregation services like Prometheus and X-Ray daemon, which can then be consumed to analyze the system’s behavior. Since App Mesh uses Envoy , it is also compatible with a wide range of AWS partner and open source tools for monitoring microservices.
-
Encryption in transit Microservices communicate with each other over the network, which means they may pass classified data over the network. Many customers want to encrypt traffic between services. App Mesh can help you with that – it can encrypt traffic between services using a TLS certificate, and you don’t need to handle TLS negotiation and termination in your application code. You can use your own certificates to encrypt the traffic, or you can use the AWS Certificate Manager . If you choose the latter, ACM will automatically renew certificates that are nearing the end of their validity, and App Mesh will automatically distribute the renewed certificates.
Components of AWS App Mesh
A service mesh is a logical boundary for network traffic between the services that reside within it. In the example, the mesh is named apps, and it contains all other resources for the mesh.
A virtual service is an abstraction of a real service that is provided by a virtual node directly or indirectly by means of a virtual router. Dependent services call your virtual service by its virtualServiceName , and those requests are routed to the virtual node or virtual router that is specified as the provider for the virtual service.
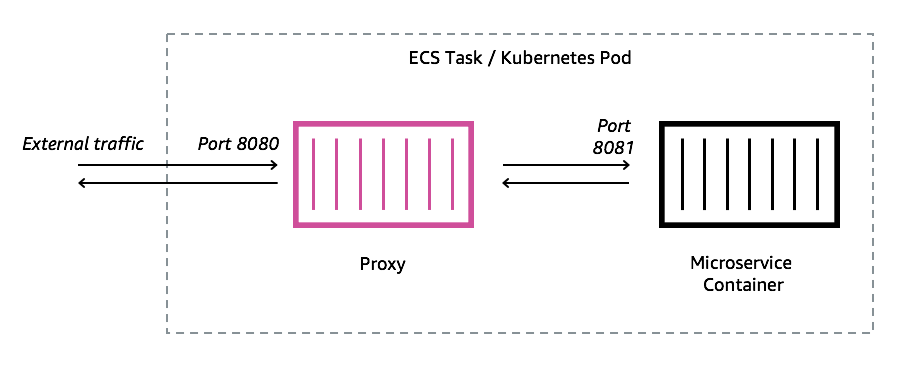
A virtual node acts as a logical pointer to a particular task group, such as an Amazon ECS service or a Kubernetes deployment. When you create a virtual node, you must specify a service discovery method for your task group. Any inbound traffic that your virtual node expects is specified as a listener . Any virtual service that a virtual node sends outbound traffic to is specified as a backend .
A virtual gateway allows resources that are outside of your mesh to communicate to resources that are inside of your mesh. The virtual gateway represents an Envoy proxy running in an Amazon ECS service, in a Kubernetes service, or on an Amazon EC2 instance. Unlike a virtual node, which represents Envoy running with an application, a virtual gateway represents Envoy deployed by itself.
A gateway route is attached to a virtual gateway and routes traffic to an existing virtual service. If a route matches a request, it can distribute traffic to a target virtual service. This topic helps you work with gateway routes in a service mesh.
(including Routes ) resources through the App Mesh API.
Virtual routers handle traffic for one or more virtual services within your mesh. After you create a virtual router, you can create and associate routes for your virtual router that direct incoming requests to different virtual nodes.

Deploying AWS App Mesh onto Amazon EKS
I am using the guide from AWS blogs to provision AWS App Mesh and AWS EKS : Link
(
Note: For the AWS blog, it is using
AWS Cloud9
 which is a Cloud IDE managed by AWS to provision all the resources. Alternatively, you can also use
Visual Studio Code

to provision all your resources and configurations)
Objectives
-
Deploy AWS App Mesh into existing container application as sidecar
-
Create upgraded versions of App and shape traffics to the new app version
-
Gradual route of user traffics to the new app version
Prerequisites:
- Deploy and setup a AWS EKS Cluster
- Deploy sample demo app from Github into AWS EKS
Step1: Download same app and deploy into your AWS EKS cluster
#Clone the demo application
git clone
https://github.com/aws/aws-app-mesh-examples.git
#Change Directory to the cloned demo application folder
cd
aws-app-mesh-examples/walkthroughs/eks-getting-started/
#Deploy the application yelb
kubectl apply -f
infrastructure/yelb_initial_deployment.yaml
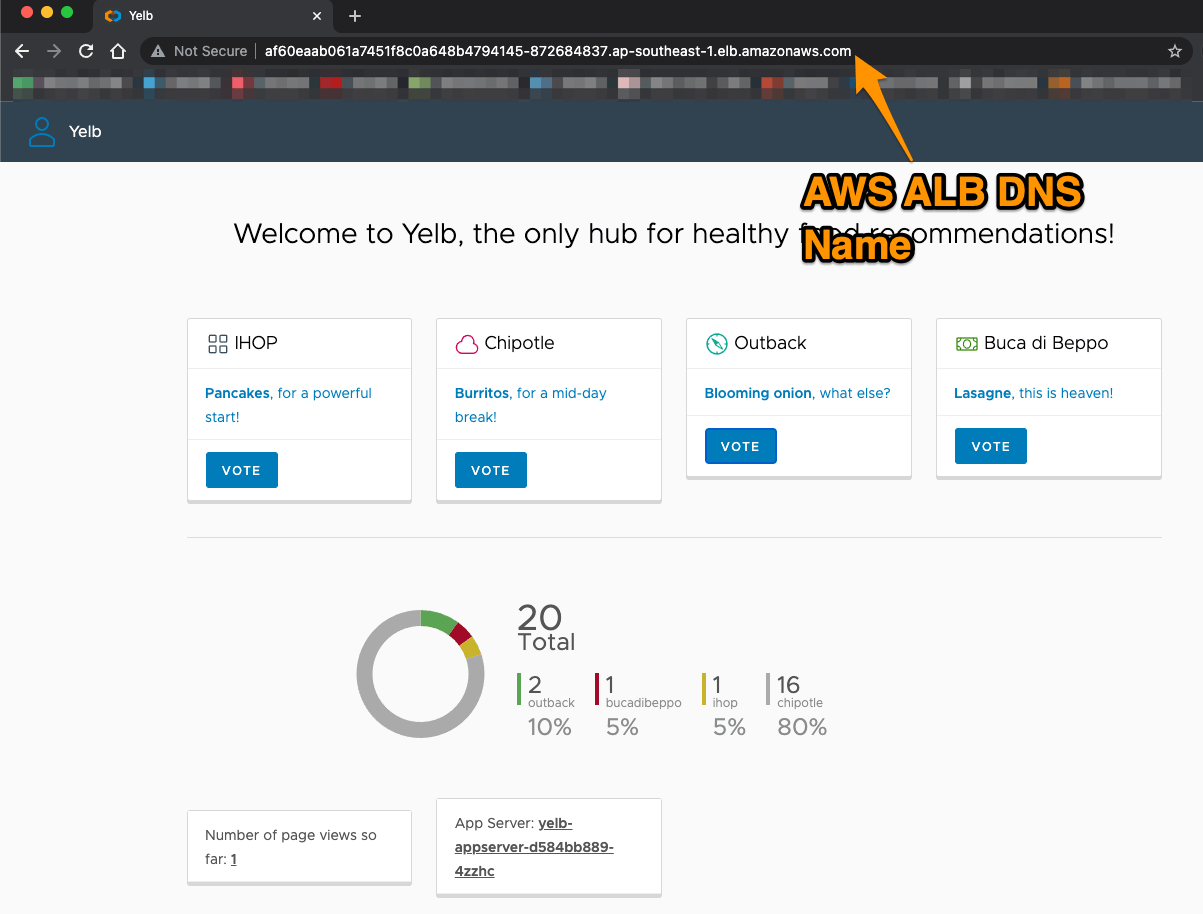
#Get the URL of Ingress load balancer
kubectl get service
yelb-ui -n yelb

Alternatively, proceed to AWS Console > EC2 > Load Balancers > click on the Load Balancer , copy the DNS name and paste in your browser:
Step2: Meshify Your Demo App

- Install the integration components based on this user guide:
https://docs.aws.amazon.com/app-mesh/latest/userguide/getting-started-kubernetes.html
- Deploy the App Mesh controller . For a list of all configuration options, see Configuration on GitHub.
helm upgrade -i appmesh-controller eks/appmesh-controller \
    --namespace appmesh-system \
    --set region=
$AWS_REGION
 \
    --set serviceAccount.create=false \
    --set serviceAccount.name=appmesh-controller
- Confirm that the controller version is v1.0.0 or later. You can review the change log on GitHub.
kubectl get deployment
appmesh-controller
 \
    -n appmesh-system \
    -o json  | jq -r ".spec.template.spec.containers[].image" | cut -f2 -d ':'
- Deploy the Yelb application in the yelb namespace and use the same name for the mesh . You need to add two labels to the yelb namespace: mesh and appmesh.k8s.aws/sidecarInjectorWebhook . The labels instruct the controller to inject and configure the Envoy proxies in the pods:
kubectl label namespace
yelb mesh
=
yelb

kubectl label namespace
yelb

appmesh.k8s.aws/sidecarInjectorWebhook
=
enabled
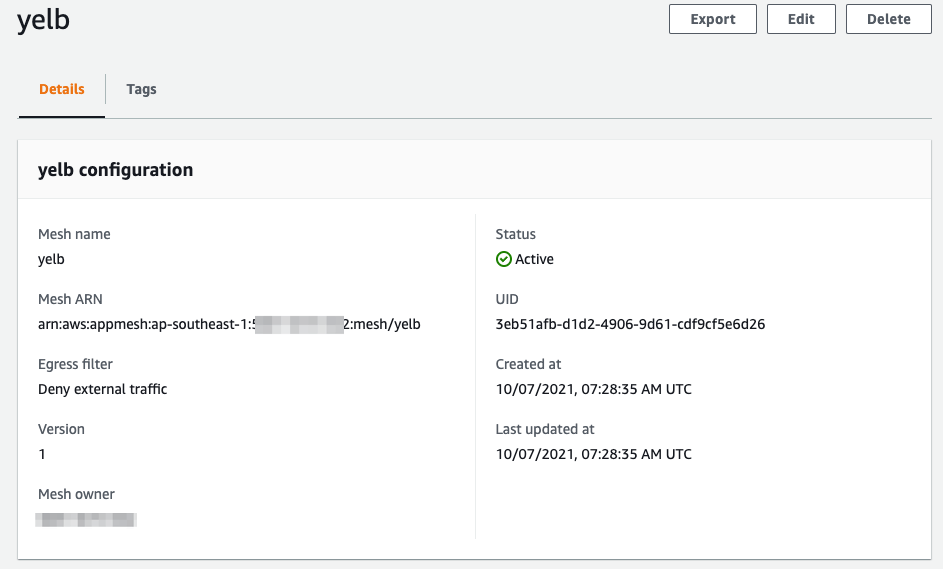
- Now we can create the AWS App Mesh resource. create a yelb-mesh.yml file and provision the configuration by ‘ kubectl apply’ :
apiVersion: appmesh.k8s.aws/v1beta2
kind: Mesh
metadata:
  name:
yelb

spec:
  namespaceSelector:
    matchLabels:
      mesh:
yelb
- From now you can check on AWS Console to see that App Mesh was created properly:

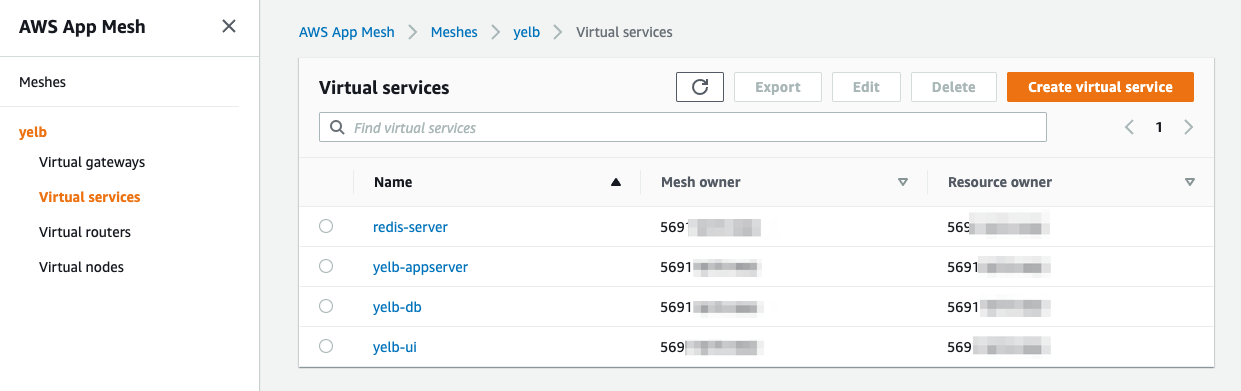
- After creating the Service Mesh , you have to create all the App Mesh components for every Yelb component.
- Use the YAML files (downloaded previously from github) in the infrastructure/appmesh_template directory to create the Virtual Nodes , Virtual Routers , Routes , and Virtual Services .
- Apply the configurations using the following command:
kubectl apply -f
infrastructure/appmesh_templates/appmesh-yelb-redis.yaml

kubectl apply -f
infrastructure/appmesh_templates/appmesh-yelb-db.yaml

kubectl apply -f
infrastructure/appmesh_templates/appmesh-yelb-appserver.yaml

kubectl apply -f
 infrastructure/appmesh_templates/appmesh-yelb-ui.yaml
- The App Mesh controller is configured to inject Envoy sidecar containers, but it hasn’t done so yet. This is because sidecars are only injected when a Pod is created . Hence we will need to delete the existing pods with the following command :
kubectl -n yelb delete pods --all
- The deletion of yeld pods will make trigger the creation of new pods with the Envoy sidecars . To validate that the controller, check the number of containers running in each pod:
#Get all pods in the yelb namespace

kubectl -n
yelb
 get pods

#Describe pods to see there is an additional envoy sidecar container in each pod

kubectl -n
yelb
 describe pod
redis-server-74556bbcb7-kmhgj

Step3: Traffic Shaping With New App Version

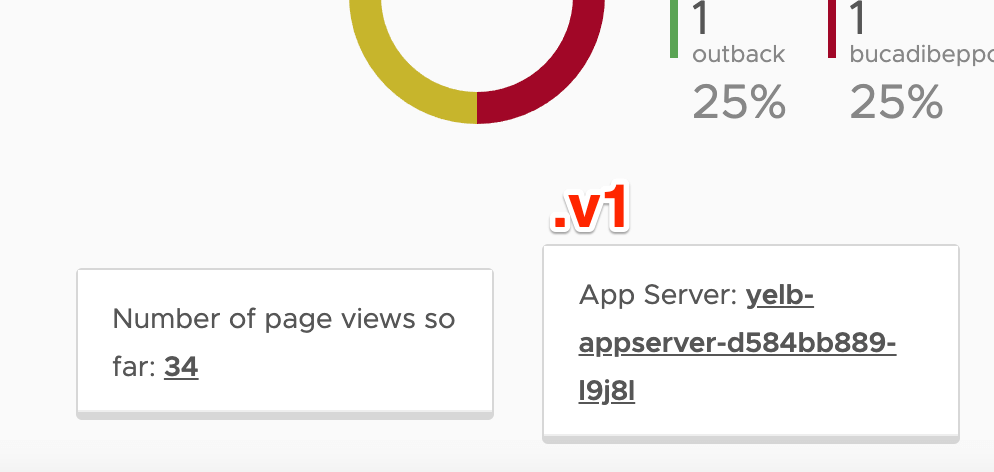
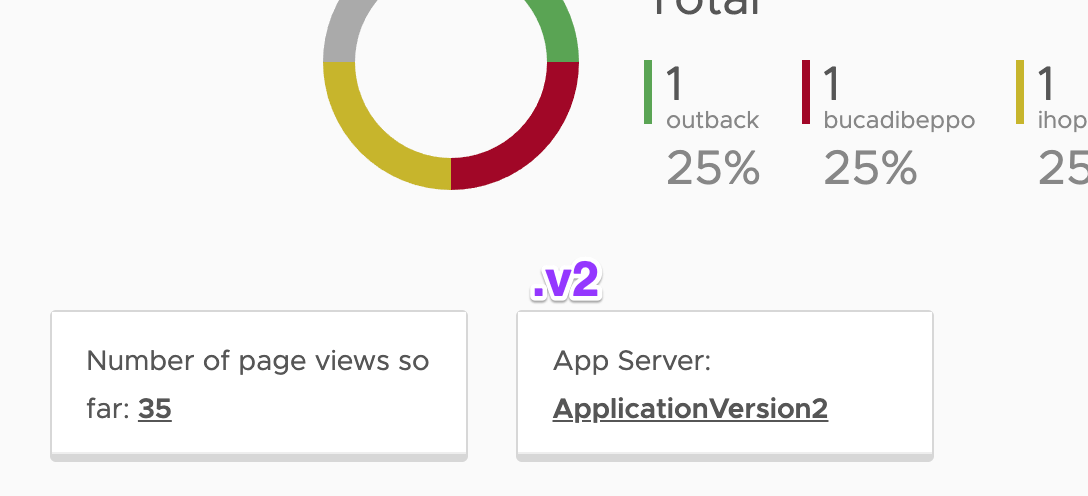
- Now we can create a new version of the yelb-appserver and use AWS App Mesh to send the traffic to the new app version ( v2 ).
- To do so, create a new container image with the updated code and push it to an AWS ECR repository with following command:
./build-appserver-v2.sh
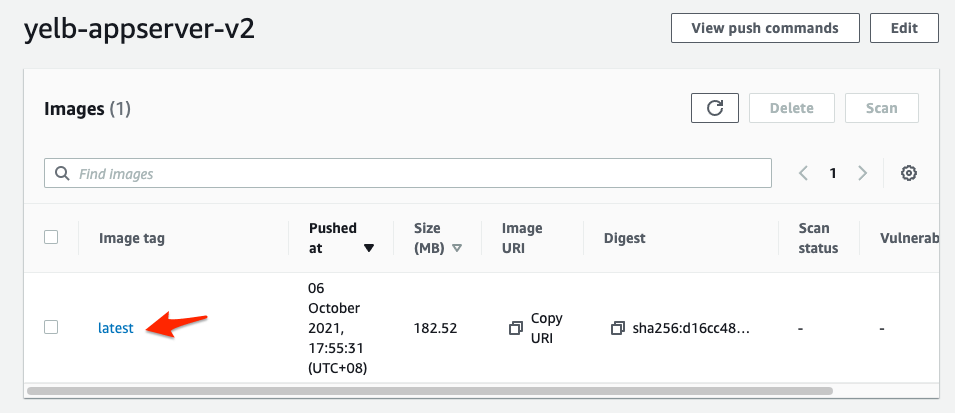
- After executing the code, you can proceed to AWS ECR under the repo name ‘ yelb-appserver-v2 ’ to check if the newly created image container existed in AWS ECR .
- To deploy the newly created app ( v2 ) using AWS ECR container image , edit <APPSERVER_V2_IMAGE_URI> to the URI of new AWS ECR container image.
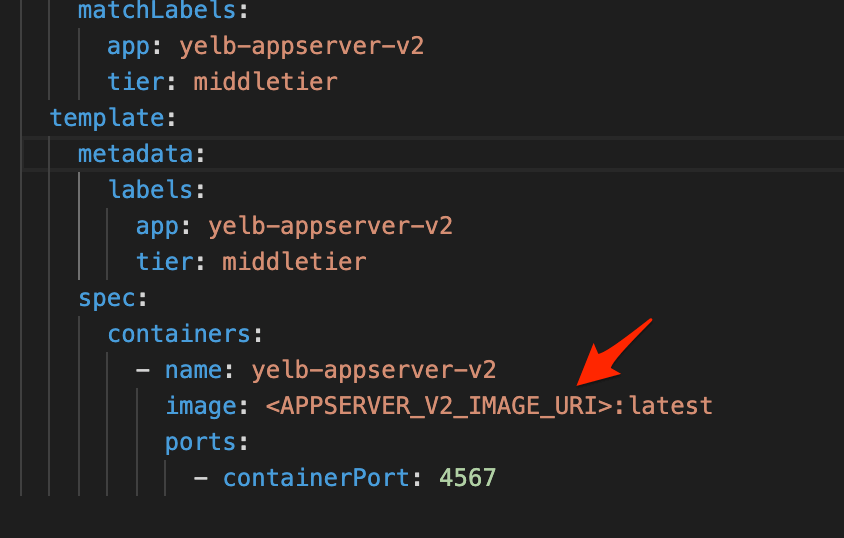
- Then deploy the yaml file “yelb_appserver_v2_deployment.yaml”
kubectl apply -f
yelb_appserver_v2_deployment.yaml
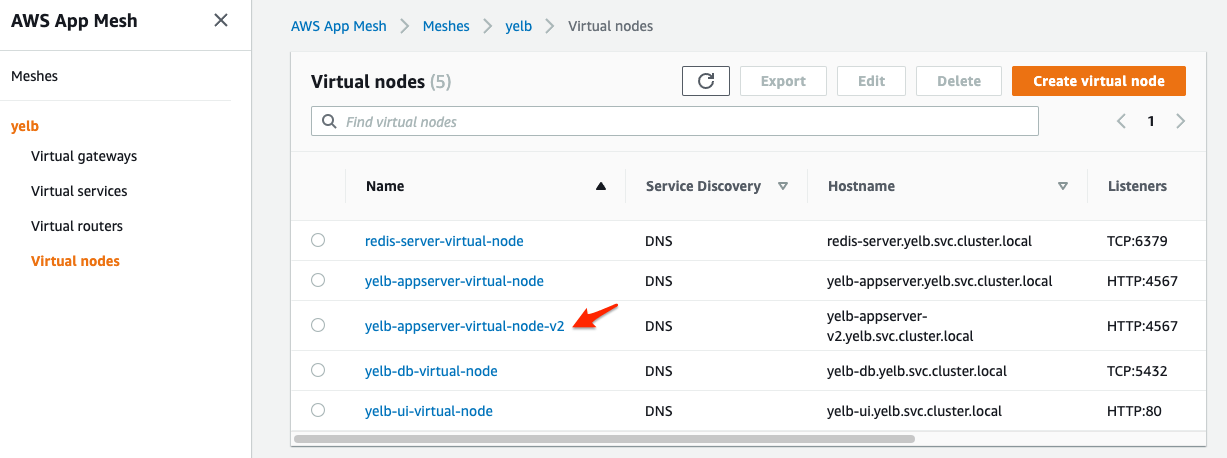
- Next, create a new Virtual Node that will represent this new app v2 version:
kubectl apply -f
infrastructure/appmesh_templates/appmesh-yelb-appserver-v2.yaml
- You should be able to see a new version of the yelb-appserver running by listing the pods in the yelb namespace:
kubectl get pods -n
yelb

Step4: Create virtual Route to send 50% of user traffic to version v2
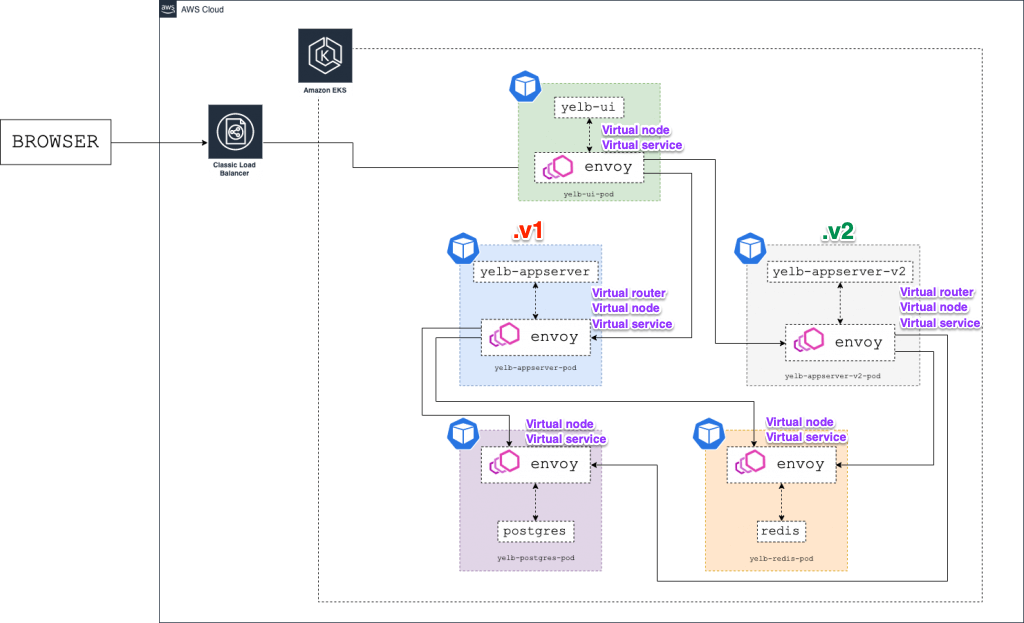
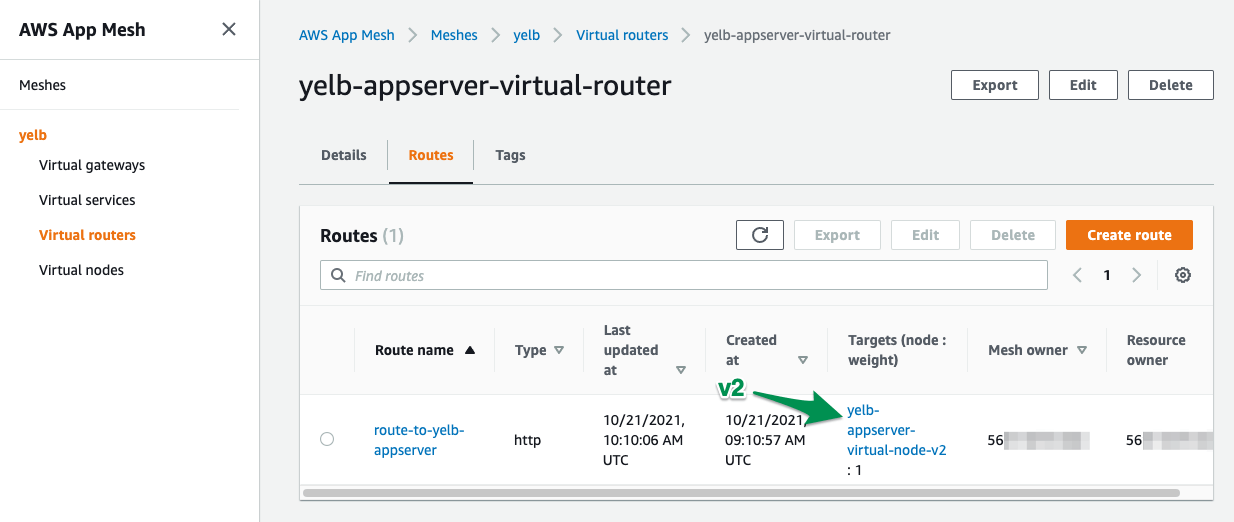
- Now we can configure AWS App Mesh Virtual Route to send 50% of the traffic to version v2 and 50% to the old v1 version.
- The architecture diagram below shows the environment with two versions of the yelb- appserver running at the same time (v1 and v2):
- To modify the Virtual Route to split user traffic of 50% to v1 and 50% to v2 , run the following command:
kubectl apply -f
./infrastructure/appmesh_templates/appmesh-virtual-router-appserver-v1-v2.yaml

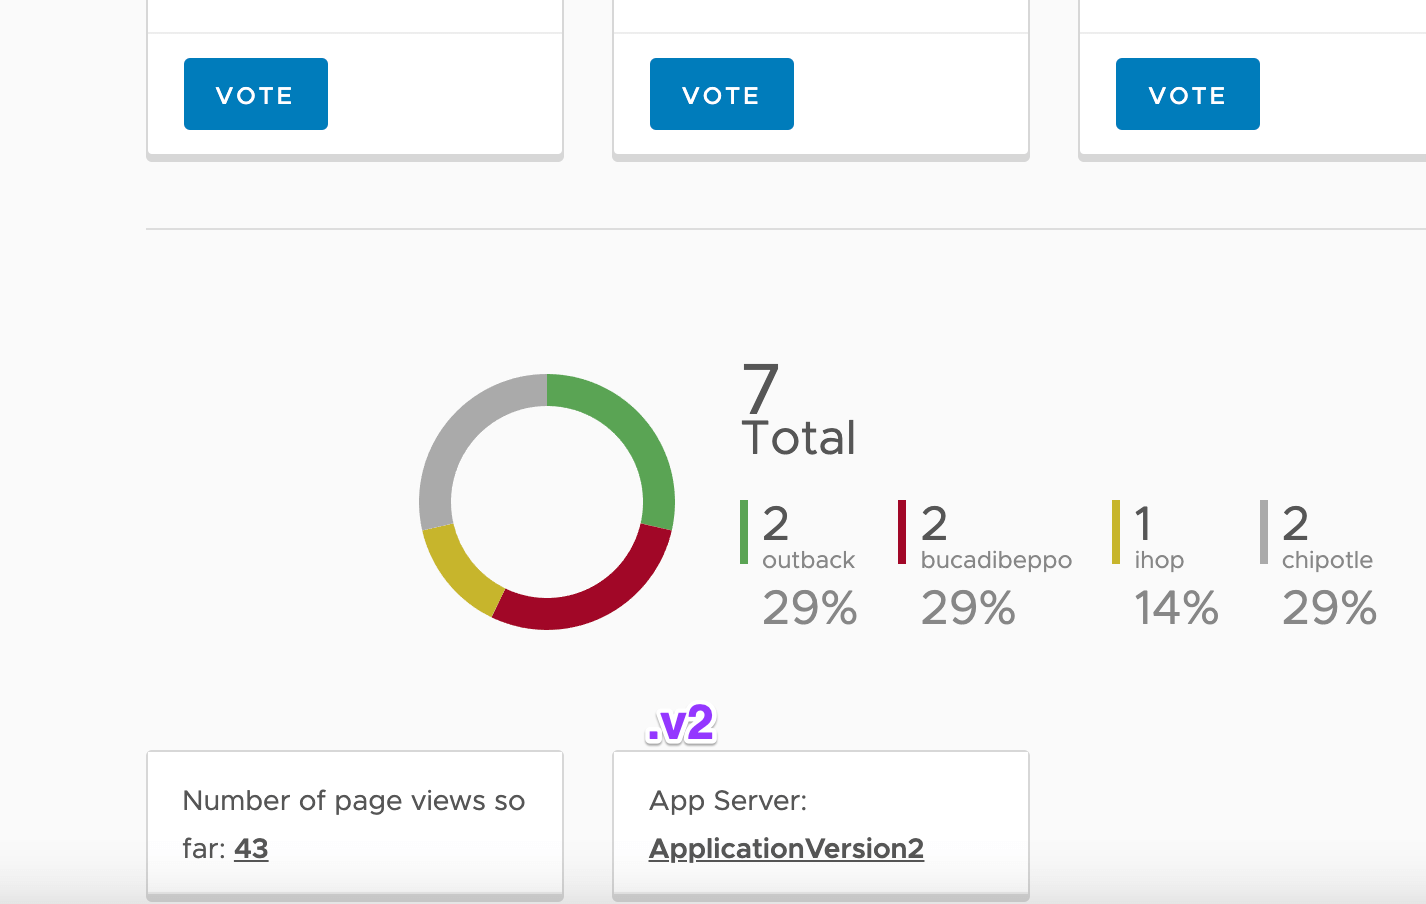
- After modifying the Virtual Route , you can reload the Yelb page a couple of times and see that some of the requests are being served by the old version of the yelb-appserver while some users are re-directed to the newer version ( v2 ) .
- You can find out the version by looking at the App Server field name, where the old version will show hostname of the yelb-appserver container and the new version will show ApplicationVersion2 :
- Lastly, let’s change the Virtual Route to route all (100%) traffic to the newest version ( v2 ) of yelb-appserver :
kubectl apply -f
infrastructure/appmesh_templates/appmesh-virtual-router-appserver-v2.yaml
- Now you can keep refreshing your browser and the new version yelb-appserver-v2 deployment serves all the requests !
Step5: Clean up all the Sidecar Envoy and Container deployments
- Packing and clear up all the resources! To cleanup all the resources created during the execution of the AWS blog tutorial, run the cleanup with the following bash shell script file command:
./infrastructure/cleanup.sh
!! Do remember to tear down your AWS EKS cluster and you are done!

Additional Setup:
- Setup monitoring of Envoy (AWS App Mesh) containers with Amazon Managed Service for Prometheus (AMP) + AWS Managed Grafana (AMG)
Credits & References:
Tan Kai Jian
Schnauzer Lover | Amazon Web Services | Microsoft Azure | An individual passionate in commercial cloud - design, operations & ever changing automation on infrastructure. Evergreen learning is what i believe , it is a journey not a destination
Note
Disclaimer: The views expressed and the content shared in all published articles on this website are solely those of the respective authors, and they do not necessarily reflect the views of the author’s employer or the platform. We strive to ensure the accuracy and validity of the content published on our website. However, we cannot guarantee the absolute correctness or completeness of the information provided. It is the responsibility of the readers and users of this website to verify the accuracy and appropriateness of any information or opinions expressed within the articles. If you come across any content that you believe to be incorrect or invalid, please contact us immediately so that we can address the issue promptly.

